Call us at 1-888-GTCOMM1
Linux Native Firewall : Introduction to IPtables
Iptables is an interface which controls linux kernel-embedded packet filter. In other words, what it does is that it controls the way your server handles the traffic that it receives. Most of the time it’s used as a firewall, but it may be used for a variety of purposes, from NATing to routing. I am going to cover several of these functionalities by giving an overview of how the iptables components work. Then, I will cover the different commands you can use to manage these tables.
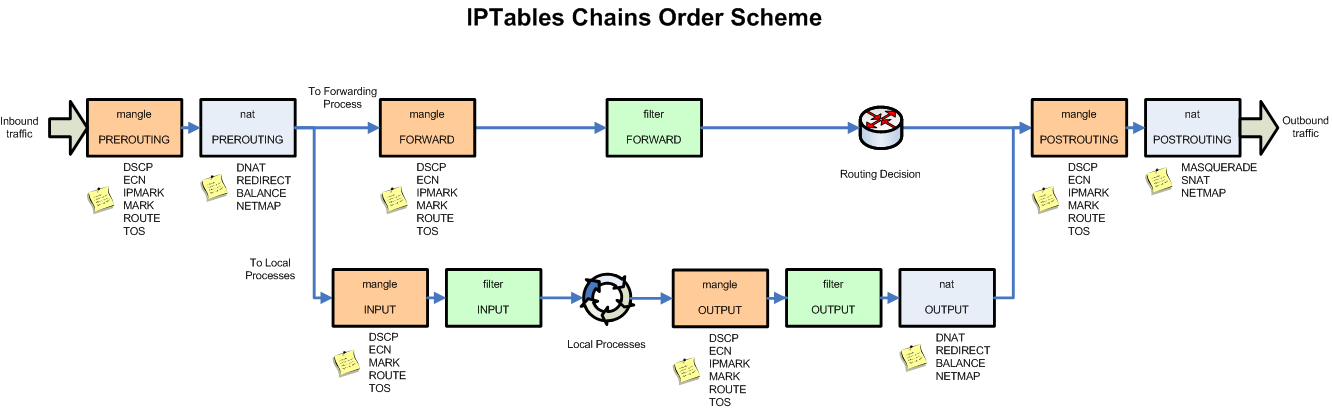
Iptables is made up of 5 tables, each associated to specific functionalities of the net filter and each split into several “chains”, specifying the functionalities of each table further. The first table we are going to cover is the filter table. This is the “firewall” table, the one which tells the packet filter which packet comes in, which packet doesn’t. It is split into 3 chains, “INPUT”, “OUTPUT” and “FORWARD”. The input chain affects traffic coming to the server, the output chain affects traffic generated from the server and the forward chain affects traffic transiting through the server and heading elsewhere.
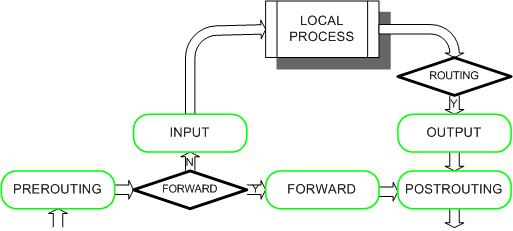
Of course, the forward chain only becomes relevant if the server is acting as an intermediary node in a network. This would mean that it has at least 2 network interfaces and that it is controlling traffic headed from one interface to the other, with the traffic source and endpoint set in the network beyond the server. Most users will never use this chain, but it is useful to know that it exists.
The input and output chains are the most used chains in the filter table. The input chain will generally be used to block traffic from the internet to the server. To use it, you need to specify several characteristics of the traffic you want to alter and then specify if you want to allow it or deny it. For example, if want to deny server access to someone with IP 192.168.0.1, then you will use this chain to block all traffic which shows its source as 192.168.0.1.
The same can be done with the output chain, but this time for traffic leaving the server. So, if ever you wanted to block ping requests to a specific IP range, you could use the output chain to prevent the ping request from leaving the server. To do that, you can tell the filter to block all traffic with the advertised destination being the network you don’t want to be able to ping and the advertised protocol being ICMP. As you can see, the output chain is more often used to prevent communication with the outside network than to block outside communication attempts.
The second table we are going to cover is the NAT table. NAT here stands for Network Address Translation. Again, just like the “forward” chain of the filter table, the NAT table is mostly useful when you have a server with at least two network interfaces. In this case though, it is mostly useful when these two interfaces are connected on two different network and the server needs to act as a link in between these interfaces. The NAT table is generally used to ensure that traffic is routed properly between two networks when these two networks should normally not be able to communicate with each other. This is a routing functionality which maybe be used to hide servers of a private network from a public network, for example.
This table has 3 chains, “Prerouting”, “Output” and “Postrouting”. The “Prerouting” and “Postrouting” chains are necessary to establish a NAT for oncoming and outgoing connection. The “Postrouting” chain lets you change the source of the traffic as it goes out, so that the destination sees the NAT IP. “Prerouting” modifies the destination of the traffic, so that the traffic is routed properly behind the NAT. “Output” modifies the traffic as it leaves the firewall server, depending on its destination.
The 3 other tables are mangle, raw and security. These are tables with fairly advanced functionalities, so I will not cover them in detail. The mangle tables is used to modify traffic as it originates or go through the server. These modifications only cover specific traffic components though, like packet time to live, for example. Then you have the raw table, which lets you specify if specific traffic should be tracked by the conntrack table or not. Finally, you have the security table which has several security functions usable with SElinux. This should be used mostly to modify traffic on your local network or in between your own servers if you use SElinux to secure them.
In overall, here’s the complete IPtables schema (you can click on the picture to enlarge)
As for the IPtables syntax and usage, most tables work in a similar way. Each chain works with a top to bottom rules priority; this means that the rules at the top will be taken into account in the filter before those at the bottom. Because of that, iptables rule order becomes very important. For example, on the filter table, if you had a deny all rule at the top, all rules underneath would become useless and all traffic would be blocked.
Two commands are available to control where in the chain a rule is inserted. Iptables –A will add the rule at the end. Iptables –I will add the rule at the top by default. You can also specify a number after –I and the rule will be inserted at that exact spot in the chain. Iptables –D will delete a rule. You need to either specify a rule number or specify the whole rule you want to remove for this option to work.
Next, you’ll want to specify the traffic’s characteristics for which this rule needs to apply. There are several flags you can use for this. For example, there is the –p flag for protocol, which lets you specify the protocol of the affected traffic. There are also the source and destination flags (-s and –d) which specify the traffic source and destination. I won’t list them all, but here’s a short list of the most important ones, taken from the iptables manual at http://ipset.netfilter.org/iptables.man.html .
[!] -p, –protocol protocol
The protocol of the rule or of the packet to check. The specified protocol can be one of tcp, udp, udplite, icmp, esp, ah, sctp or the special keyword “all”, or it can be a numeric value, representing one of these protocols or a different one. A protocol name from /etc/protocols is also allowed. A “!” argument before the protocol inverts the test. The number zero is equivalent to all. “all” will match with all protocols and is taken as default when this option is omitted.
[!] -s, –source address[/mask][,…]
Source specification. Address can be either a network name, a hostname, a network IP address (with /mask), or a plain IP address. Hostnames will be resolved once only, before the rule is submitted to the kernel. Please note that specifying any name to be resolved with a remote query such as DNS is a really bad idea. The mask can be either a network mask or a plain number, specifying the number of 1’s at the left side of the network mask. Thus, a mask of 24 is equivalent to 255.255.255.0. A “!” argument before the address specification inverts the sense of the address. The flag –src is an alias for this option. Multiple addresses can be specified, but this will expand to multiple rules (when adding with -A), or will cause multiple rules to be deleted (with -D).
[!] -d, –destination address[/mask][,…]
Destination specification. See the description of the -s (source) flag for a detailed description of the syntax. The flag –dst is an alias for this option.
[!] -i, –in-interface name
Name of an interface via which a packet was received (only for packets entering the INPUT, FORWARD and PREROUTING chains). When the “!” argument is used before the interface name, the sense is inverted. If the interface name ends in a “+”, then any interface which begins with this name will match. If this option is omitted, any interface name will match.
[!] -o, –out-interface name
Name of an interface via which a packet is going to be sent (for packets entering the FORWARD, OUTPUT and POSTROUTING chains). When the “!” argument is used before the interface name, the sense is inverted. If the interface name ends in a “+”, then any interface which begins with this name will match. If this option is omitted, any interface name will match.
-j, –jump target
This specifies the target of the rule; i.e., what to do if the packet matches it. The target can be a user-defined chain (other than the one this rule is in), one of the special builtin targets which decide the fate of the packet immediately, or an extension (see EXTENSIONS below). If this option is omitted in a rule (and -g is not used), then matching the rule will have no effect on the packet’s fate, but the counters on the rule will be incremented.
It will gives us commands like these:
iptables -A INPUT -s 192.168.1.10 -j DROP
– This command will append a rule that blocks all traffic coming from 192.168.1.10 . This rule would be added in the input chain of the filter table by default.
iptables -I INPUT -i eth0 -p tcp --dport 22 -j ACCEPT
– This command will append a rule that allows all traffic from the interface eth0 which uses the tcp protocol and which has port 22 as a destination. This rule is only really useful if you have a deny-all further down in your list. Again, this rule is added in the input chain of the filter table.
iptables -t nat -A PREROUTING -p tcp -d 192.168.1.190 --dport 5622 -j DNAT --to 10.10.10.4:22
– This rule is actually a nat table rule, because of the –t nat flag. It appends to the prerouting chain a rule that affects all traffic going on port 5622 of IP address 192.168.1.190 using the tcp protocol. The destination of this traffic will be changed to 10.10.10.4 port 22.
This covers up pretty much all the functionalities of iptables. In my next piece, we shall continue to look at the Cisco ASA hardware firewall solution with some example on how it works and how to setup more advanced functionalities.