 Call us at 1-888-GTCOMM1
-

- Dedicated Hosting
- Cloud hosting
- Services
- Support
- Learning Center
- Referral Program
- Français
-
Why globotech
- Log in
If you are a website administrator and responsible for managing website you will encounter many different types of errors. ERR_TOO_MANY_REDIRECTS is one of them that confuses many administrators and users. Troubleshooting err_too_many_redirects is not always easy. The ERR_TOO_MANY_REDIRECTS means the website keeps redirecting between different addresses like, www to non-www or HTTP to HTTPS.
This type of error usually occurs in WordPress and Magento CMS as they use a base_url or URL type configuration within the site. This error is also known as the 310 error or 404 page not found. In simple terms, the ERR_TOO_MANY_REDIRECTS means the web browser does not know where it is supposed to go or cannot reach your site.
Usually, the reason for ERR_TOO_MANY_REDIRECTS is an incorrectly configured redirects or problems with domain mapping. The most common issues that cause a redirect error are listed below:
In this tutorial, we will explain what causes err_too_many_redirects and how troubleshooting it.
Sometimes, corrupted or outdated cookies can cause the ERR_TOO_MANY_REDIRECTS error. So it is a good idea to clear your website cookies stored on your browser before making any changes to your site.
To troubleshooting err_too_many_redirects error, you can clear all cookies by deleting your browser history by following the below steps:
1. Open the Chrome browser and click on the three small dots on the upper right corner as shown below:
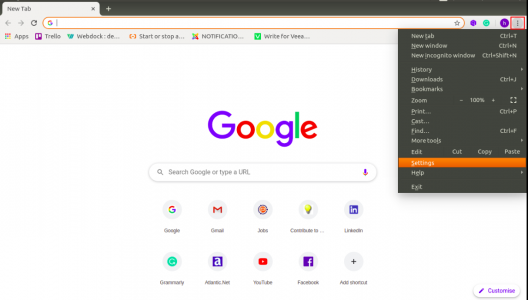
2. Click on the Settings. You should see the following screen:
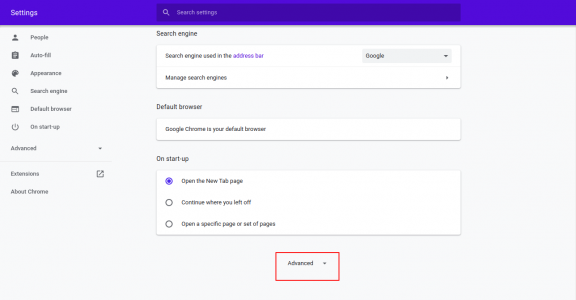
3. Scroll down and click on Advanced. You should see the following screen:
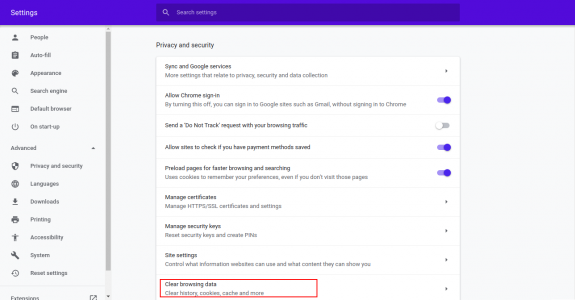
4. Click on the Clear Browsing Data. You should see the following screen:

5. Click on the Clear data to clear your browser history and cache.
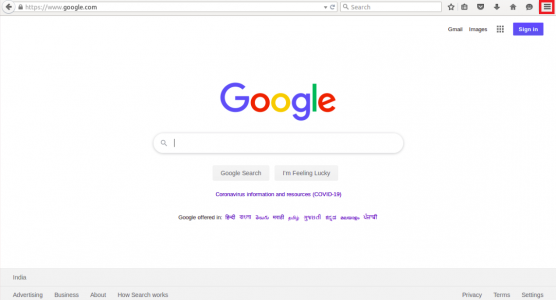
1. Open the Mozilla Firefox browser and click on the upper right menu button as shown below:
2. Click on the preferences. You should see the following screen:
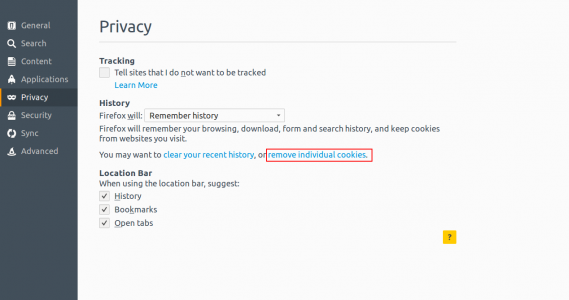
3. Click on the Privacy. You should see the following screen:
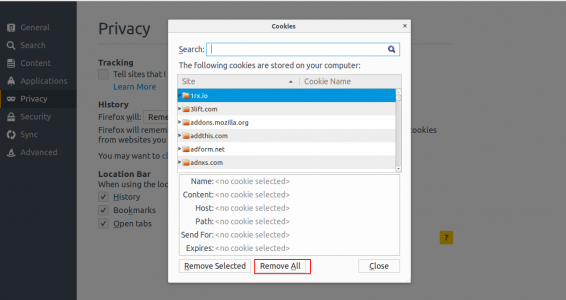
4. Click on the Remove All button to clear your browser cache.
Now, try to access your website and check whether it is functioning properly or not. If your website is still not working, you can proceed to the next step.
The most common reasons for redirect loop error is your WordPress home URL and website URL do not match. So for troubleshooting err_too_many_redirects, it is a good idea to check whether your WordPress URL settings are configured correctly.
To fix this, log in to your WordPress admin dashboard and click on the settings tab. You should see the following screen:
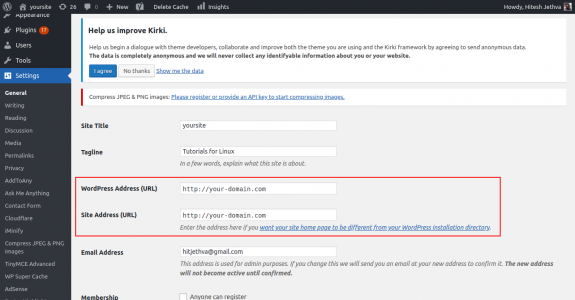
In the General Settings page, check your WordPress Address (URL) and Site Address (URL).
Make sure both URLs are configured properly.
Note : don’t leave a trailing slash at the end of your URL like http://www.your-domain.com/
If you don’t have permission to access the WordPress admin dashboard, you can define this setting by editing wp-config.php file.
Connect your website with an FTP client, open the wp-config.php file and add the following lines:
 define('WP_HOME','http://your-domain.com');
 define('WP_SITEURL','http://your-domain.com');
Save the file and try to access your WordPress site. If you got any error then try to add your domain with the www prefix.
Sometimes, the .htaccess file can also cause your website goes into a loop of redirection.
You can rename the .htaccess file to fix the issue.
Follow the below steps to disable the .htaccess file:
1. Open the File Manager using your control panel.
2. Find your .htaccess file.
3. Right-click on the .htaccess file and rename it to a different name.
Now, try to check your website whether it is working or not. If it works correctly, then you will need to edit the .htaccess file and add the default configuration as shown below:
 <IfModule mod_rewrite.c>
 RewriteEngine On
 RewriteBase /
 RewriteRule ^index.php$ – [L]
 RewriteCond %{REQUEST_FILENAME} !-f
 RewriteCond %{REQUEST_FILENAME} !-d
 RewriteRule . /index.php [L]
 </IfModule>
Save and close the file when you are finished. This method will help you to fix the problem immediately.
Sometimes, corrupted or outdated plugins can also cause err_too_many_redirects error. You can try to disable them to fix the issue.
1. Open the File Manager using your control panel.
2. Locate the Plugins directory and rename it as shown below.
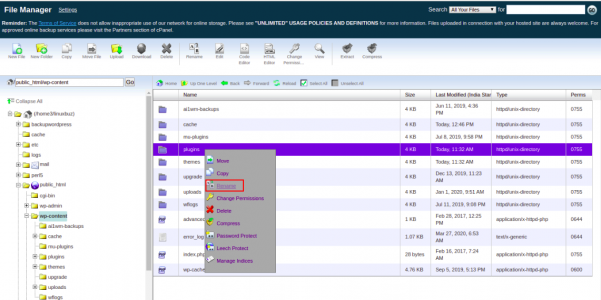
3. Now, try to check your website. If it is working properly that means one or more plugins on your website were outdated.
In this case, find the plugin that causes the error by renaming them one-by-one. Once you are finished, remove the outdated plugins and remove the folder back to Plugins.
In some cases, the WordPress cache also causes the err_too_many_redirects error. You can resolve this by deleting the WordPress cache.
You can delete the WordPress cache by following the below steps:
1. Login to your WordPress admin dashboard and click on the Plugins >> Add New. You should see the following screen:
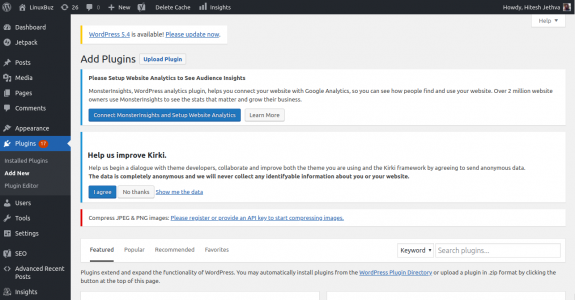
2. Search for Super Cache and click on Install Now >> Activate button to setup the plugin.
3. Click on the Super Cache option under Settings as shown below:
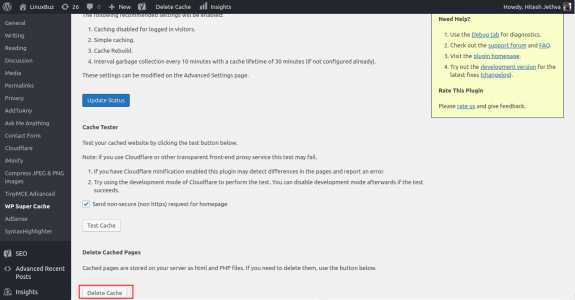
4. Click on the Delete Cache button to delete the WordPress cache.
Now, try to check your website whether it is working or not.
If you are using reverse proxy services like Cloudflare CDN then you will need to clear the Cloudflare cache to resolve this error.
You can follow the below steps to clear the Cloudflare cache:
1. Login to your Cloudflare dashboard. You should see the following screen:
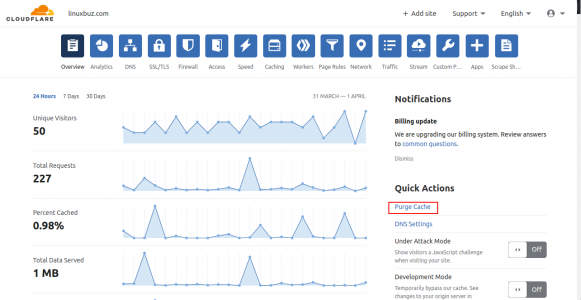
2. Click on the Purge Cache. You should see the following screen:

Click on the Purge Everything button to clear the Cloudflare cache.
Next, try to check your website whether it is loading properly.
In this guide, you learned several methods to fix the err_too_many_redirects error. I hope this will helps you to resolve your error. It is recommended to take a backup of your website before following any of the above steps.
In this tutorial, we will explain how hosts file works on your local computer, for users running Linux, Windows or MacOS and how to modify it.
The way how hosts file works is a very simple. The hosts file is simple and small, but very useful file located in your local computer that can be used to map hostnames to IP addresses. The information entered into the hosts file will by-pass the public DNS server response. It is very useful for developers to test their application, when the application can not resolve an IP via DNS or must resolve to a different IP than the public DNS IP. They don’t need to buy separate Domain to test the application. They just need to add a static entry in hosts file to allow the application to access with the hostname. Host file allows you to manually point a website address to a specific IP address. Using host file you can override DNS servers and control access to websites and network traffic.
You can modify the hosts file in Linux-based operating system with the following steps :
1. Open a new terminal window.
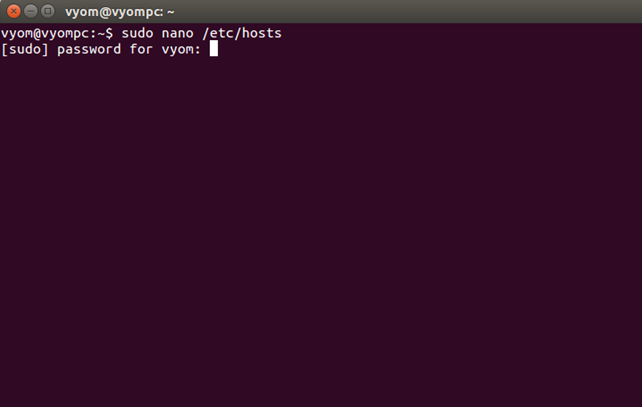
2. Use your favorite text editor to open the hosts file, located into /etc/hosts.
sudo nano /etc/hosts
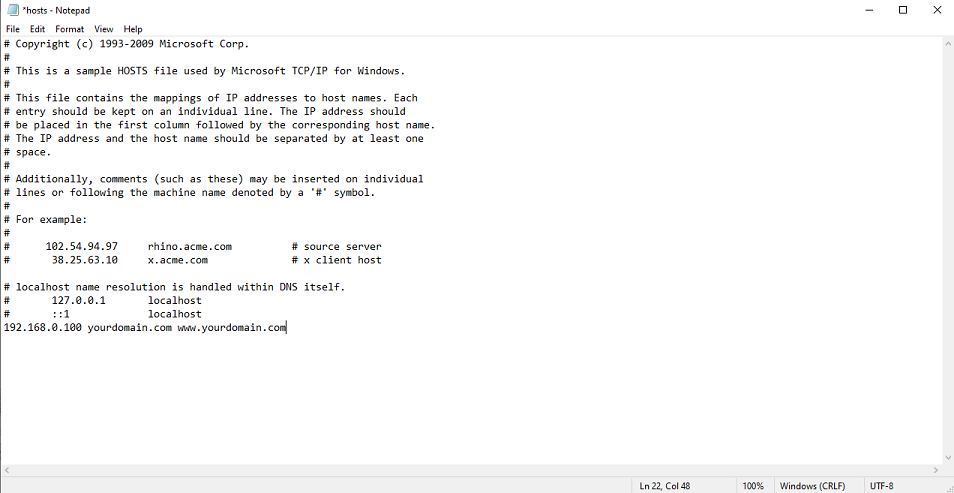
3. Add your DNS entry into at the end of the hosts file. The syntaxe must be as following: IP address host1 host2.
192.168.0.100 yourdomain.com www.yourdomain.com
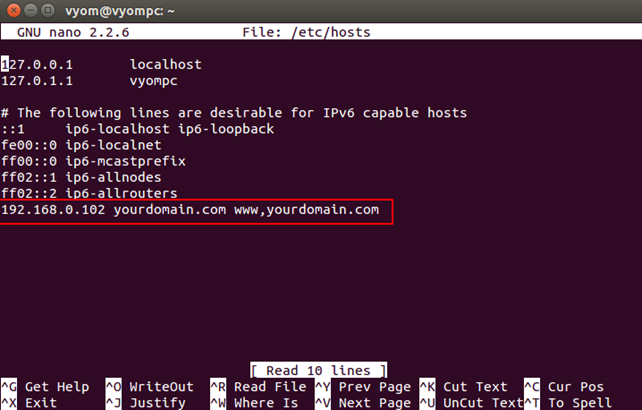
4. Save and close the file, when you are finished.
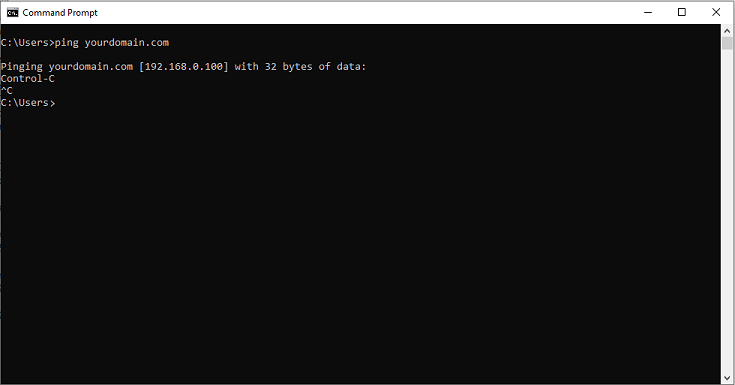
You can now test the name resolution with the following command:
ping yourdomain.com
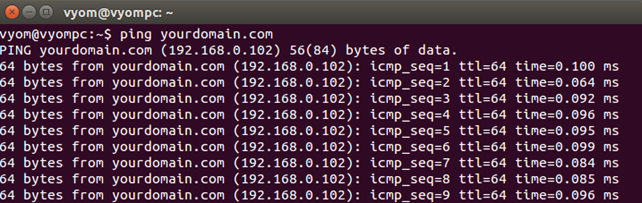
You can also test the name resolution with the web browser. Open your web browser and type the URL http://yourdomain.com. You will be redirected to the website hosted on the server with IP 192.168.0.100.
You can modify the hosts file in Windows 10 operating system with the following steps:
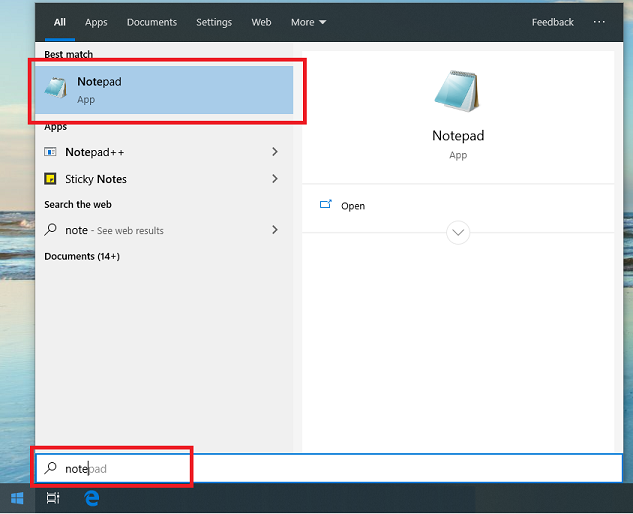
1. Press the windows key or click the “Start” button and then type “notepad” in the search bar.
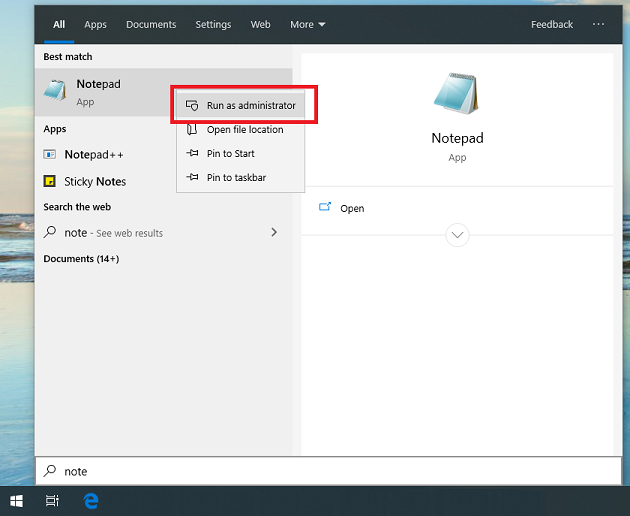
3. Right click on Notepad and select Run as administrator. This will open Notepad application with administrator rights.
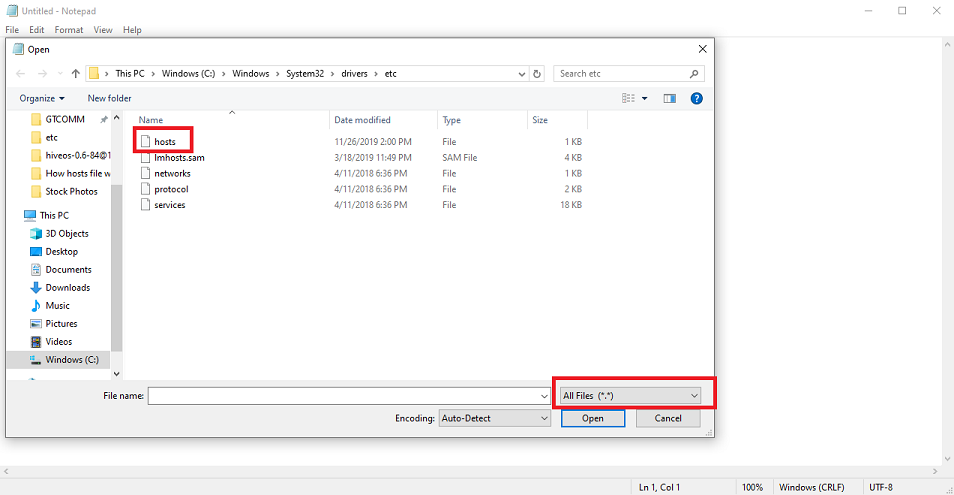
4. From Notepad, click on the File menu and then click Open. Browse into X:\Windows\System32\Drivers\etc\hosts, and then selection “All files (*.*). Then click on file named “hosts” and click Open.
5. Add your DNS entry into at the end of the hosts file. The syntaxe must be as following: IP address host1 host2
192.168.0.100 yourdomain.com www.yourdomain.com
6. Save and close the file.
7. Open yourdomain.com through the web browser. The host should now resolve the IP that been entered into the hosts file.
Into MacOS, you can create the hosts file using the following steps:
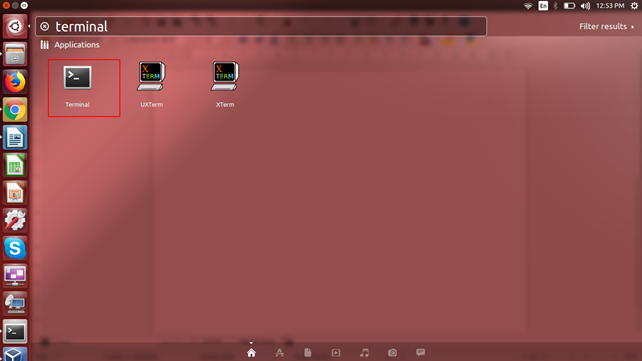
1. Open your terminal from Applications -> Utilities -> Terminal
2. Use your favorite text editor to open the hosts file, located into /private/etc/hosts:
sudo nano /private/etc/hosts
3. You will need to provide your user’s password. Then, add the following line at the end of the file:
192.168.0.100 yourdomain.com www.yourdomain.com
4. Save and close the file, when you are finished.
Open yourdomain.com through the web browser. The host should now resolve the IP that been entered into the hosts file.
I hope you have now enough knowledge to setup hosts file for name resolution. You can now test your website without purchasing domain name using the hosts file.
WordPress is the most widely used and the leading Content Management System (CMS) that powers more than 30% of the website around the world. How to “decrease page load time” and “speed up the WordPress site” are one of the hot topic these days. The owner of every website will want their websites and blogs to be the fastest. As per Google algorithm, a slow loading site can damage your SEO rankings. So optimizing the WordPress site for better performance is very challenging part of any webmaster.
In this tutorial, we will explain some tips and tricks on how to optimize your WordPress site for better performance.
It is very important for any webmasters to update the WordPress and its plugins and themes to the latest version. This will increase your site performance and decrease the vulnerabilities.
To do so, log in to your WordPress admin, go to the Dashboard > Updates. You should see the following page:
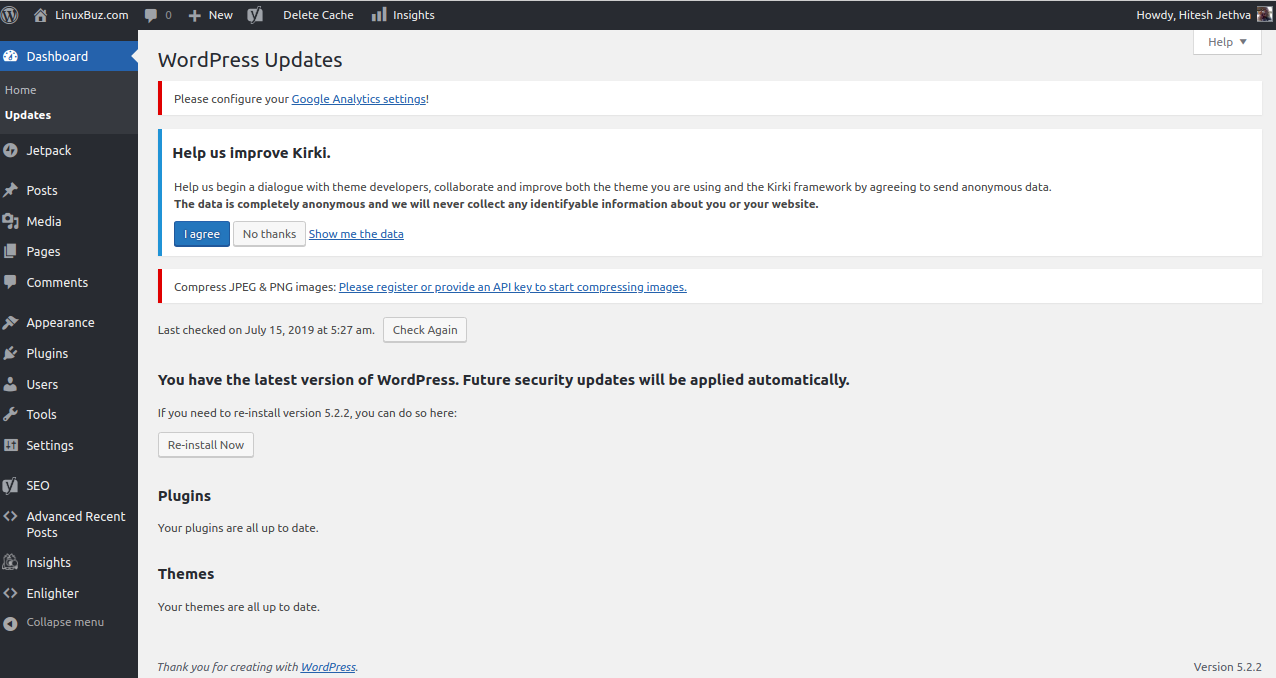
In the above page, you should see that WordPress and all your plugins and themes are up-to-date. If any updates are available, you should see the message “An updated version of WordPress is available” in the above page.
WordPress database accumulates a lot of extra data including, trashed comments, spam comments, unused plugins data and many unnecessary data. It is recommended to clean up your WordPress database regularly to remove all unnecessary data to improve your website performance. Regular clean-ups reduce your database size and speed up your backup process. It is a good way to optimize your WordPress site.
To clean up your database, you will need to install and activate WP-Sweep plugin. After installing WP-Sweep plugin, go to the Tool > Sweep. You should see the following page:
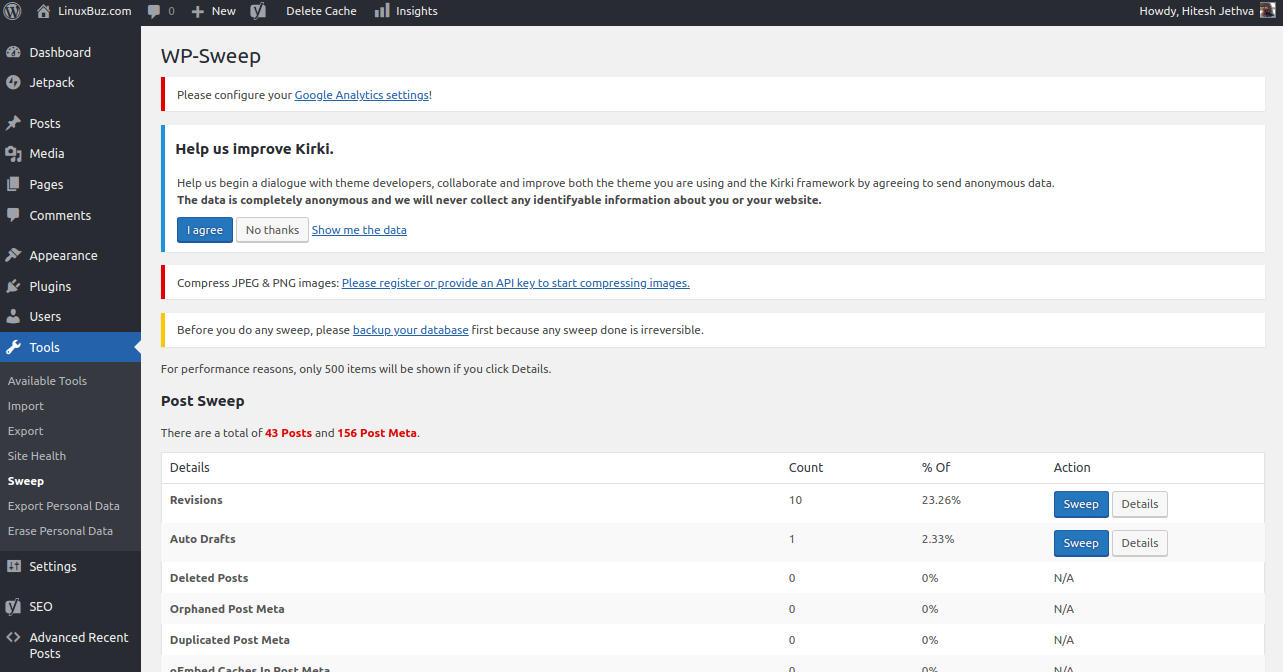
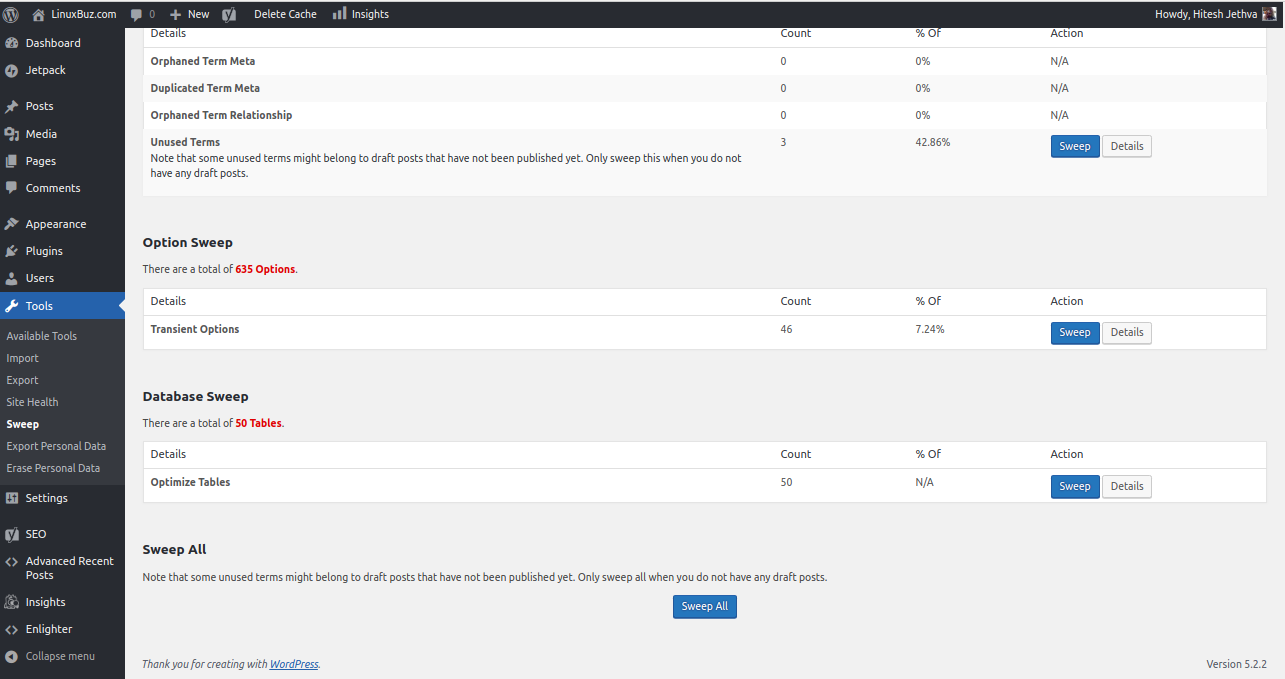
You can clean up your data one by one or click on the sweep all button on the bottom of the page to clean up all the data in your WordPress database.
Enabling Gzip compression in WordPress will reduce server response time and volume of data sent by the server to a web browser. GZIP is a file format and application that can be used for file compression and decompression. GZIP compression allows you to reduce the size of your HTML, stylesheets, and JavaScript files. This will significantly reduce the amount of time to download the resource, reduce data usage and improve the page load time.
You can enable Gzip compression by editing .htaccess file from your WordPress root directory. Enabling Gzip compression in WordPress using .htaccess file will reduce server response time and volume of data sent by the server to a web browser.
Go to the WordPress root directory and Open your .htaccess file with the following command:
nano .htaccess
Add the following lines for WordPress running with Apache web server:
<IfModule mod_gzip.c>
mod_gzip_on Yes
mod_gzip_dechunk Yes
mod_gzip_item_include file \.(html?|txt|css|js|php|pl)$
mod_gzip_item_include handler ^cgi-script$
mod_gzip_item_include mime ^text/.*
mod_gzip_item_include mime ^application/x-javascript.*
mod_gzip_item_exclude mime ^image/.*
mod_gzip_item_exclude rspheader ^Content-Encoding:.*gzip.*
</IfModule>
Or, add the following lines for WordPress running with Nginx web server:
gzip on;
gzip_comp_level 2;
gzip_http_version 1.0;
gzip_proxied any;
gzip_min_length 1100;
gzip_buffers 16 8k;
gzip_types text/plain text/html text/css application/x-javascript text/xml application/xml application/xml+rss text/javascript;
gzip_disable "MSIE [1-6].(?!.*SV1)";
gzip_vary on;
Save and close the file, when you are finished.
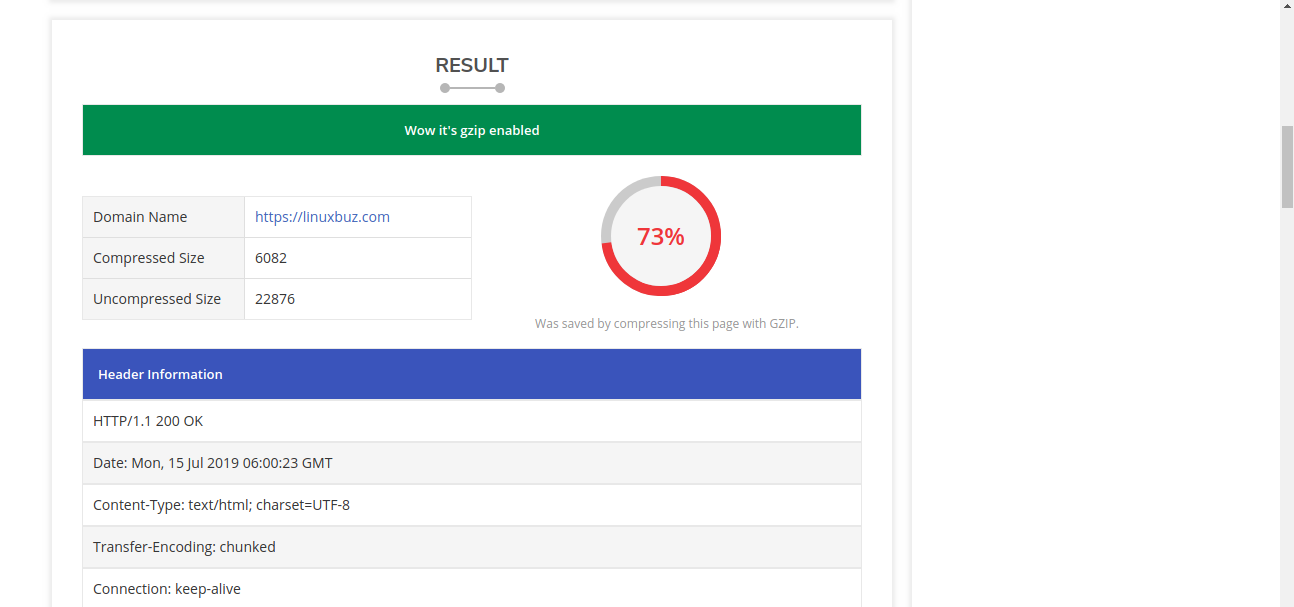
After enabling Gzip Compression, you can check whether the compression is enabled or not by visiting the website https://smallseotools.com/check-gzip-compression/
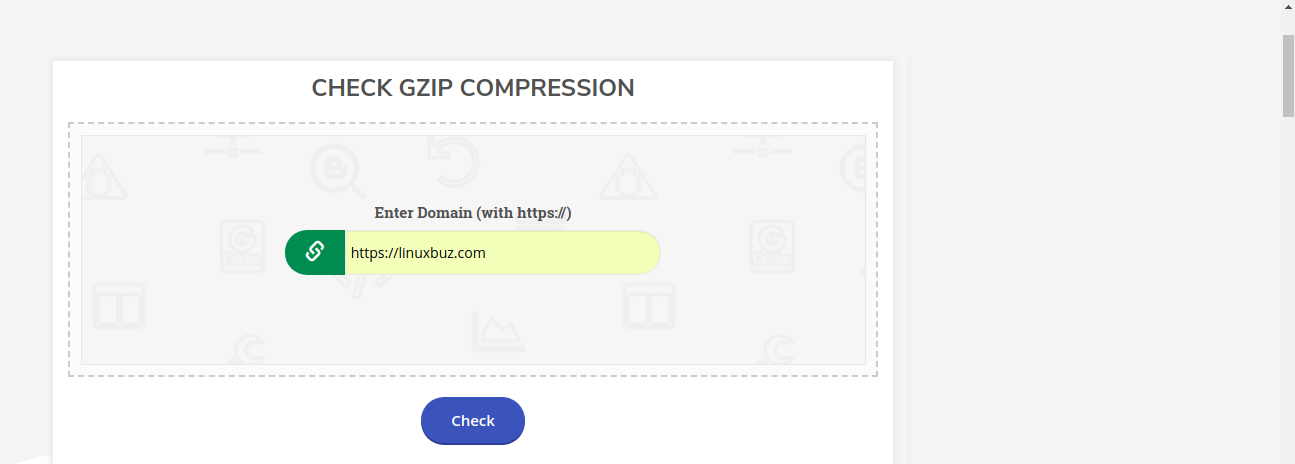
Provide your website URL and click on the Check button. You should see the following page:
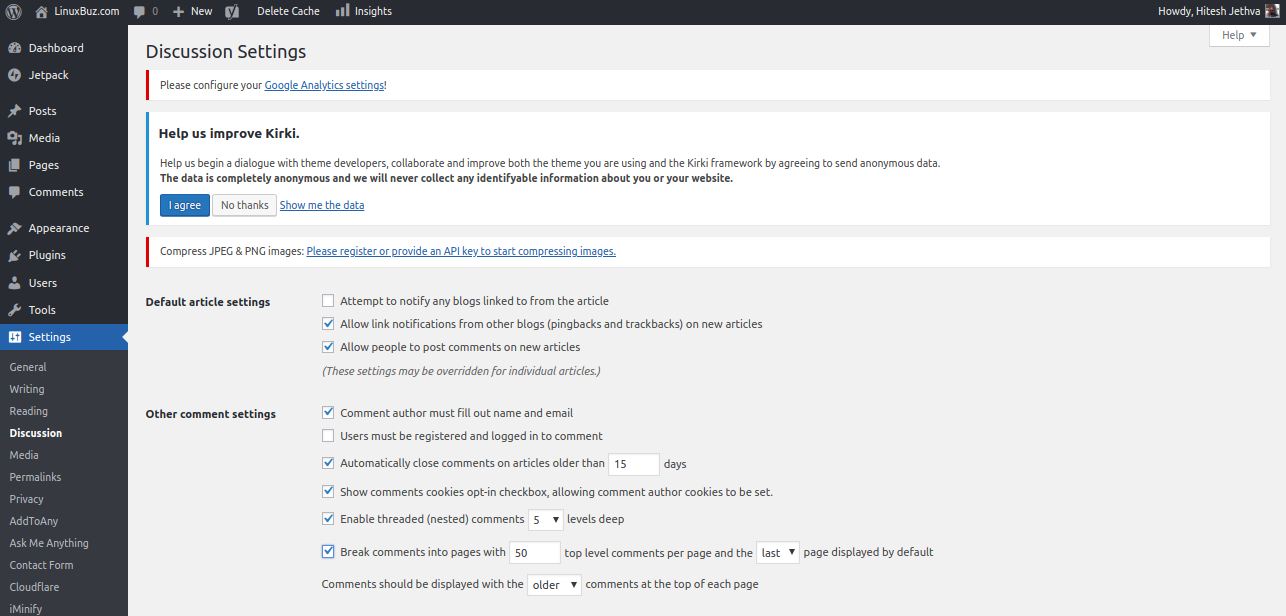
If your blog is getting a lot of comments, this can be causing page leg. The blog posts with a lot of comments load slower than other posts. Many comments increase your server load time and also decrease your SEO rankings. So it is recommended to break the comment section into pages to save off the time it takes for them to load.
To split the comments, go to Settings > Discussions. Then, choose the number of comments you want per page.
A content delivery network (CDN) is a geographically distributed servers and data centers. CDN provides high availability and high performance by delivering pages and other web content to a user based on the user’s geographic locations. The users visit your site from the different locations around the world. The website loading speed will differ if the users are located far away from where your site is hosted. Content Delivery Networks (CDN) keeps a copy of your website in different data centers located in different locations and serve the web page to a user from the nearest location.
So it is recommended to add your website to CDN like, Cloudflare, MaxCDN, Rackspace and Cachefly.
In the above tutorial, we have learned some tips and tricks to optimize your WordPress site. I hope you have now enough knowledge to boost your WordPress performance. This will also increase your rankings in the SERPs and improve the experience of your visitors. Feel free to ask me if you have any questions.
Owning a WordPress will for sure require some updates from time to time. Since the uptime of a website is important, it is recommended to update your staging environment before changing your website into a production website. This will help to avoid having to fix issues on your production website, and to have it down for an extended time. This article explains how to turn your staging website into a production website.
To achieve this, you will need:
– Access to cPanel account
– Shell access
– MySQL or MariaDB database
– A backup of your site and database in case of manipulation error
This article is for users who do not have WHM access. By having access to WHM, it would be easier to create a new cPanel user for the staging environment, than having it created into a sub-domain.
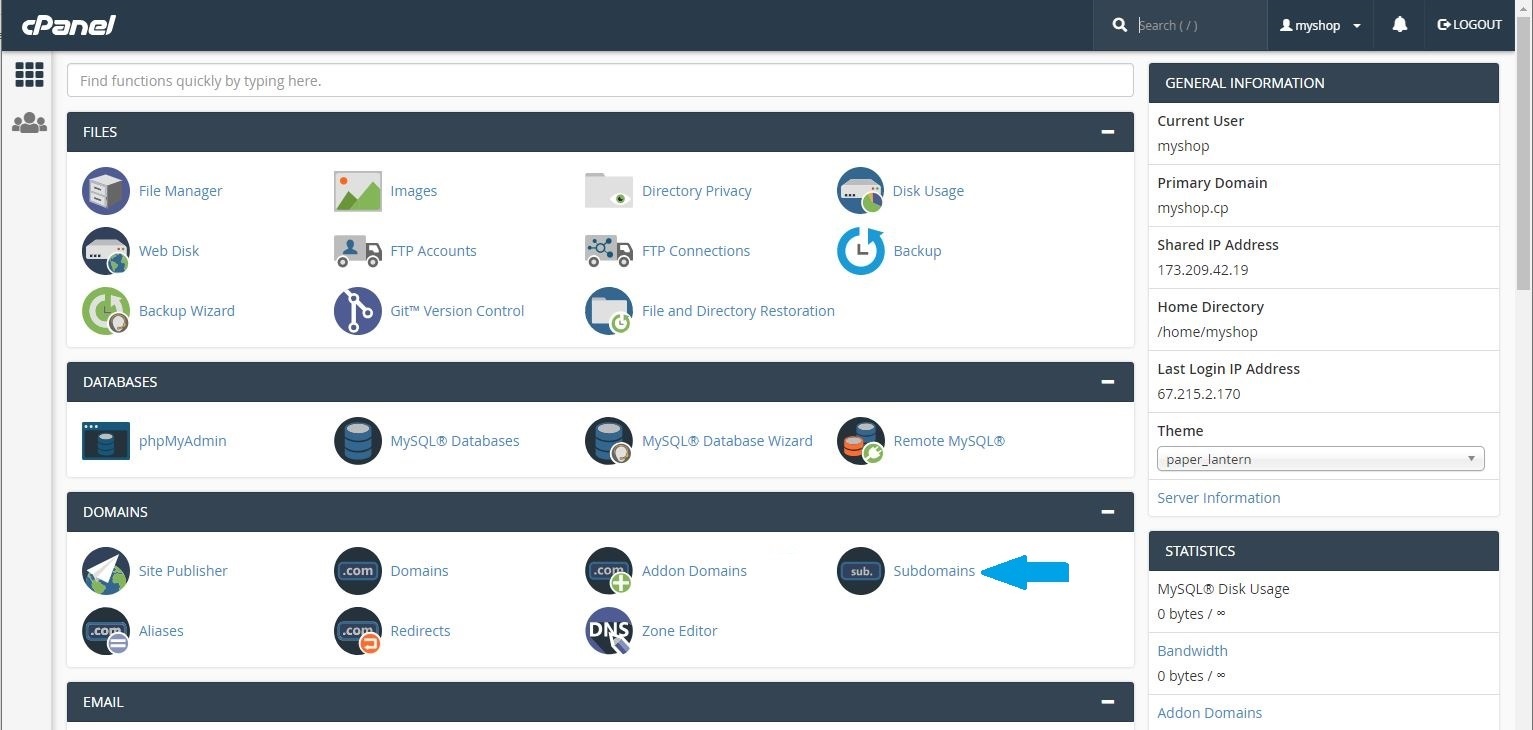
1. Create a sub-domain into your cPanel account. To do this, log into your cPanel account, and click on “Subdomain“, which is found in the “DOMAINS” menu.
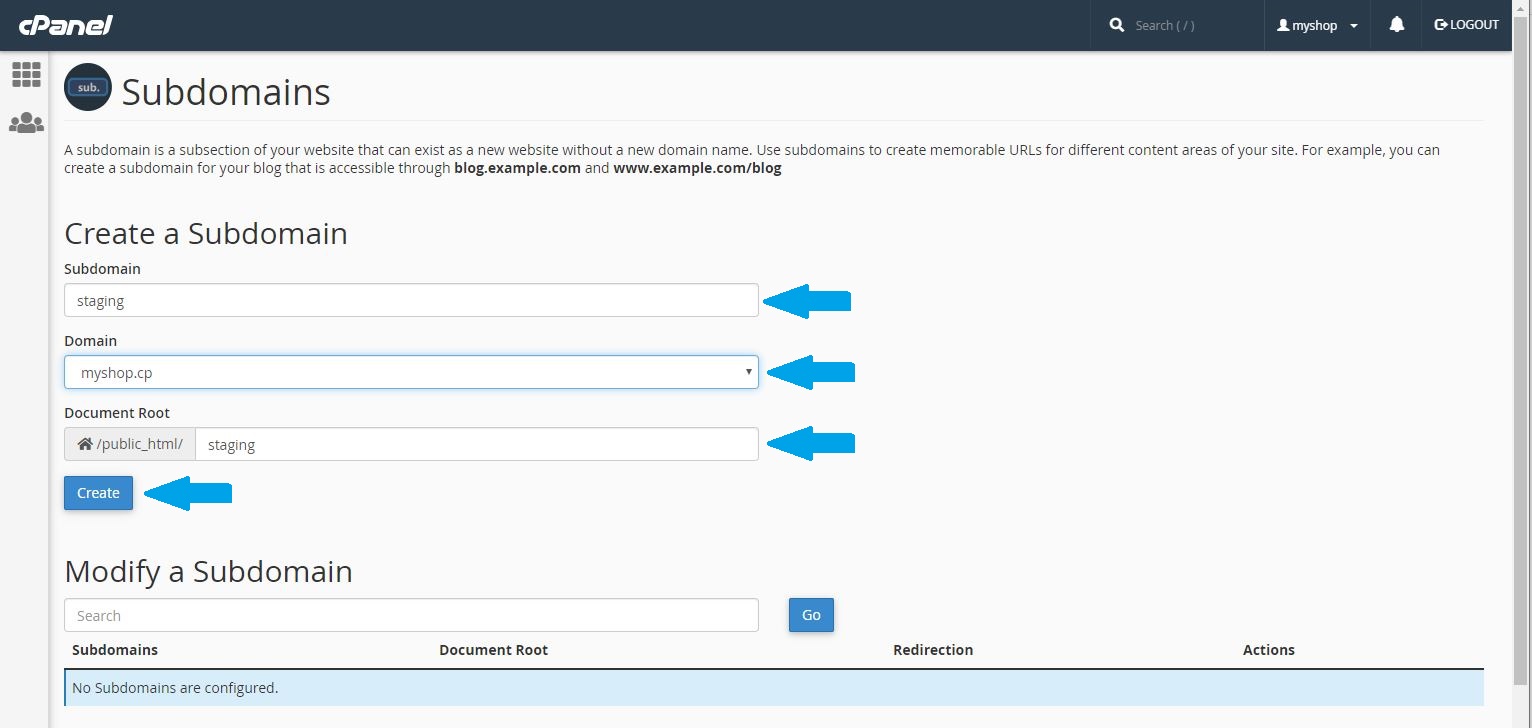
2. Under “Create a Sub-domain”, enter the desired sub-domain name, but do not specify the domain it self; that part will be filled automatically. Once done, click “Create“.
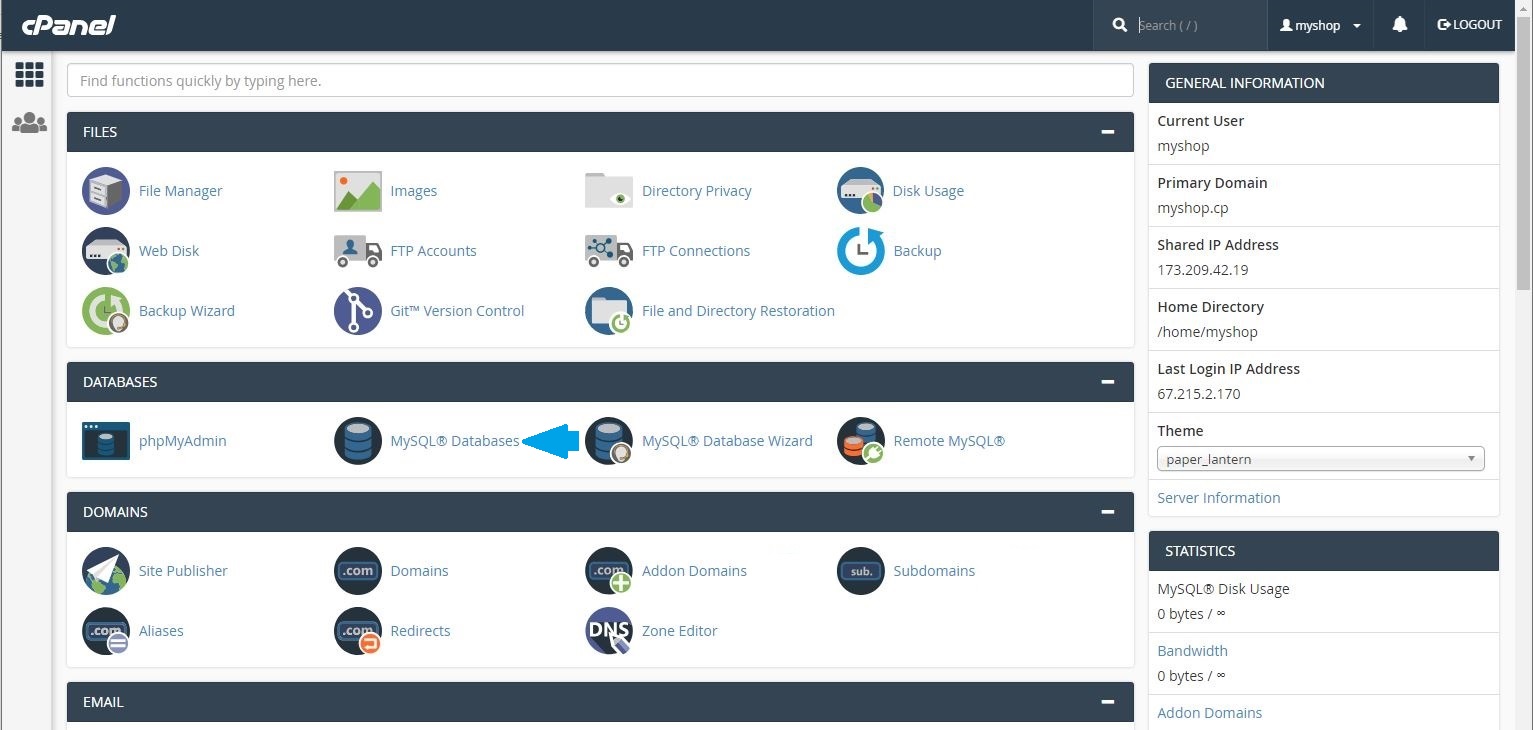
3. Go to MySQL Databases by clicking on cPanel Home > MySQL Databases.
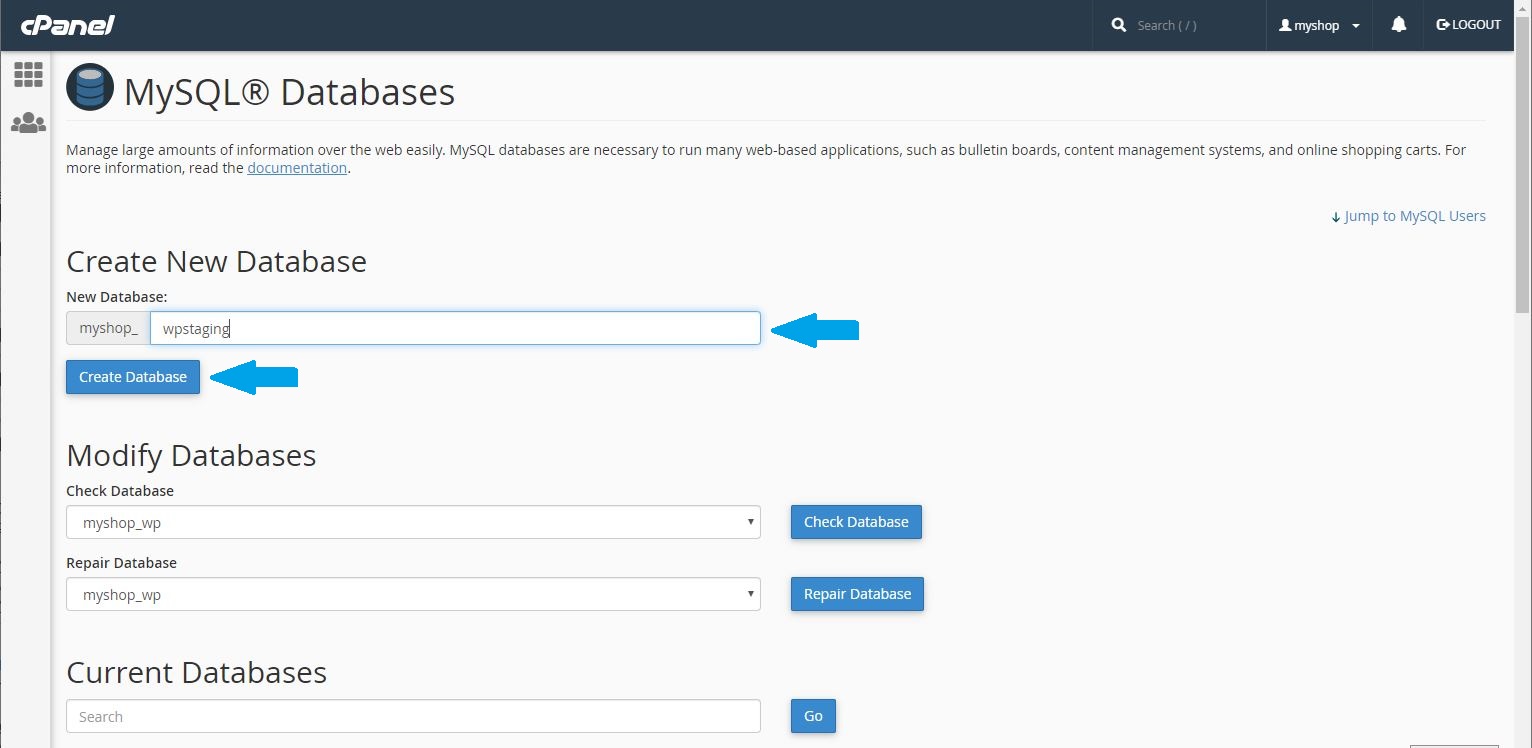
4. Under “Create New Database”, enter the new database name, and click “Create Database” to create the sub-domain database.
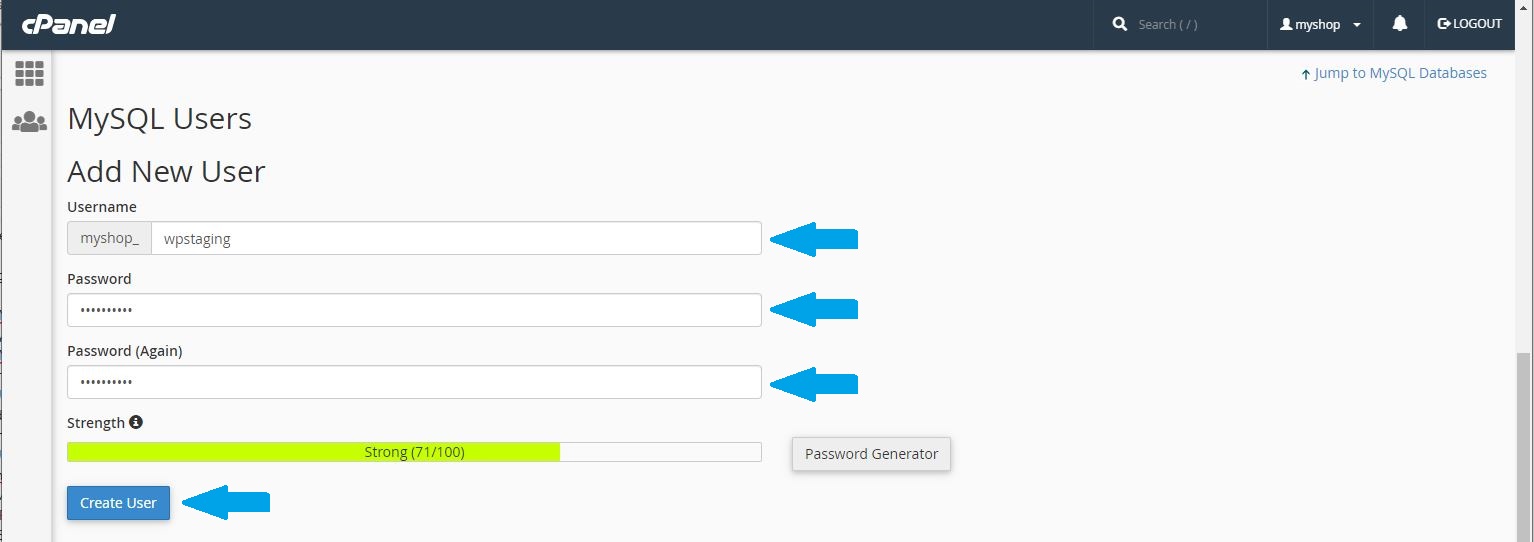
5. Once the new database is created, click on “Go Back” and scroll to MySQL Users. Select “Add New User”, specify the username and password, and then click “Create User“.
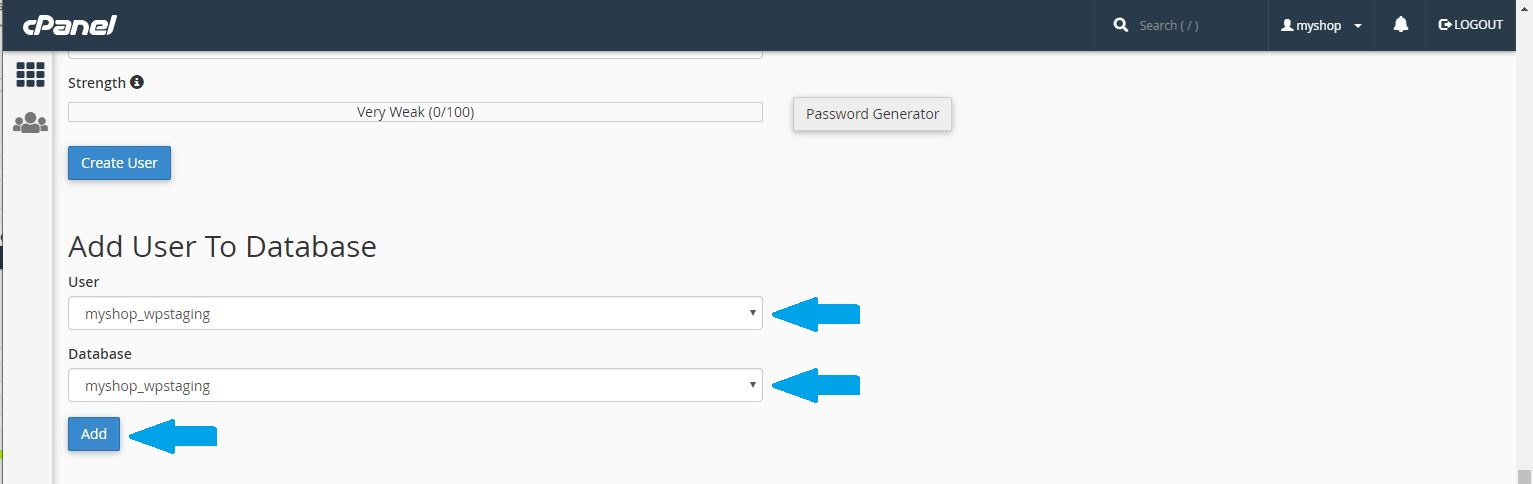
6. Once the new username and password are created, click on “Go Back“, and scroll to “Add User To Database“. Select the corresponding user and database, and click “Add“
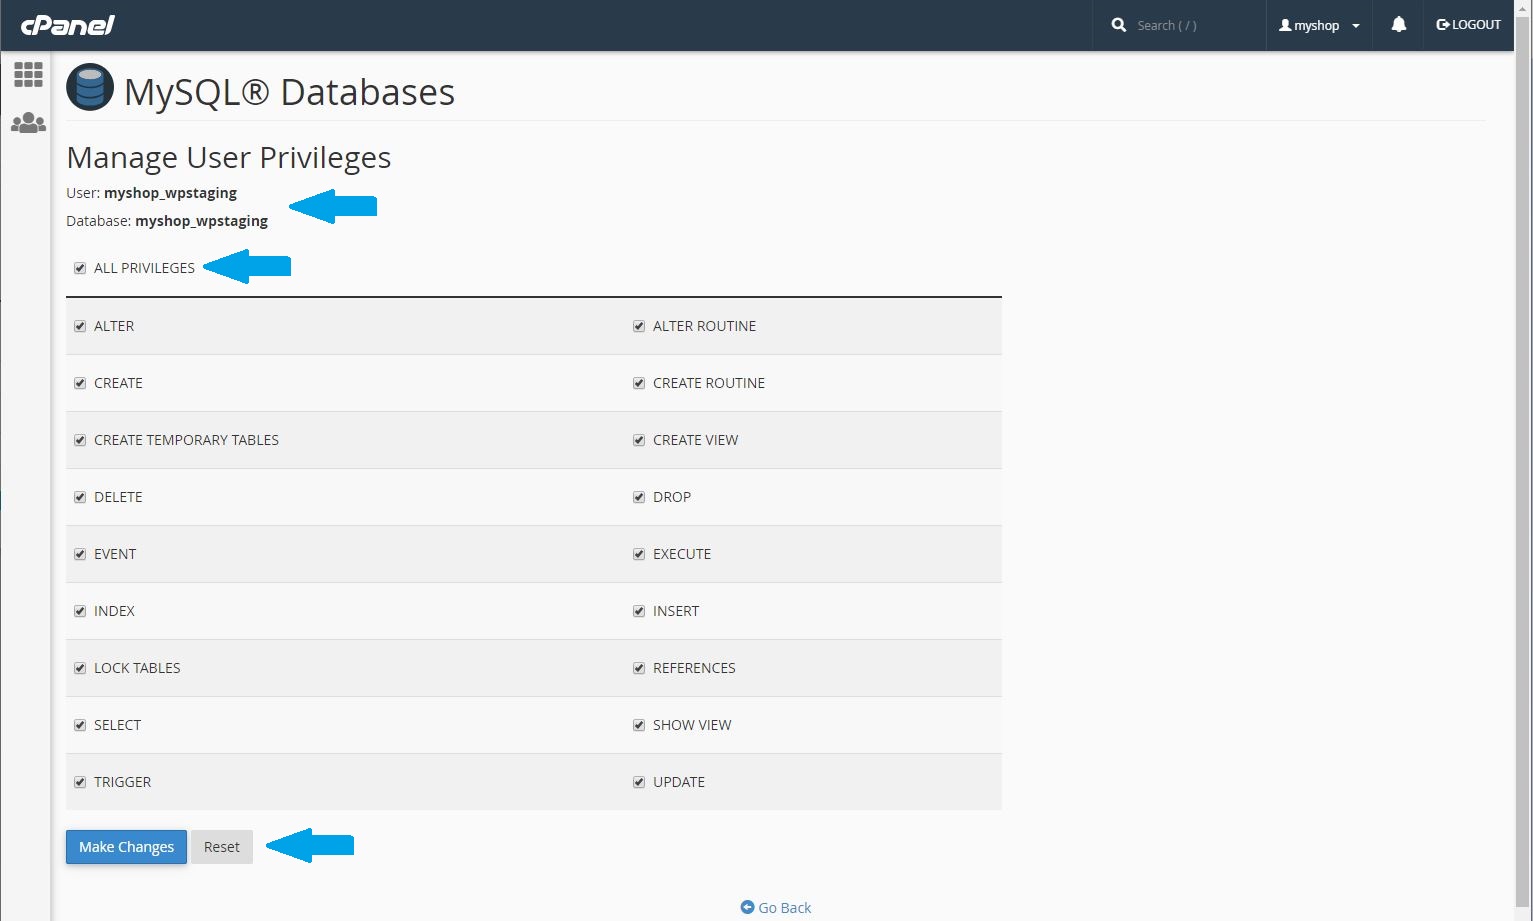
7. Give the “Full Access” privileges to the new database using the new user, go to “Manage User Privileges” review the user and database, check “ALL PRIVILEGES”, and then click “Make Changes”.
Now that the sub-domain environment has been configured and is ready, it’s now time to do a data migration.
1. Log into the shell access using SSH and do a copy of the current website you’re using. The copy will be done out of the public_html folder, and in this case, you will do the copy using sync. To do so, use the following syntax:
# rsync -a /home/CPANEL_USER/public_html/ /home/CPANEL_USER/SUBDOMAIN_PREFIX/
2. Move the website copy into the right directory of the new sub-domain.
# rsync -a /home/CPANEL_USER/SUBDOMAIN_PREFIX/ /home/CPANEL_USER/public_html/SUBDOMAIN_PREFIX/
3. Do a dump of your current site database. To find the databasename, database user, and password, check in the wp-config.php file.
# mysqldump -u DB_USER -p DATABASE_NAME > DUMP_FILE_NAME.sql
4. Restore the dump of the database onto the new sub-domain WP database.
# mysql -u NEW_DB_USER -p NEW_DATABASE_NAME < DUMP_FILE_NAME.sql
5. Update the file wp-config.php located in the sub-domain folder, to match the new database name, database user, and password. Look for the following lines :
define( 'DB_NAME', 'NEW_DB_NAME_HERE' );
define( 'DB_USER', 'NEW_DB_USER_HERE' );
define( 'DB_PASSWORD', 'NEW_DB_PASSWORD_HERE' );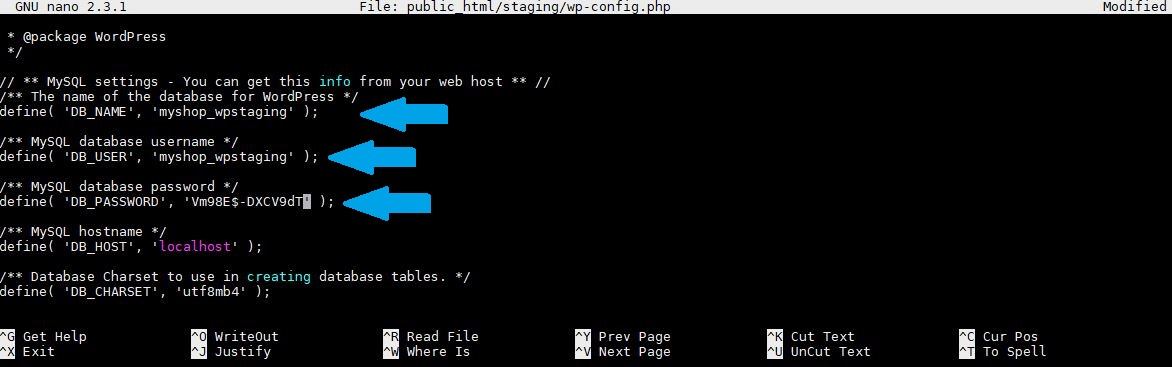
6. At this point, the database in the newly installed sub-domain WordPress still has the original site URL hard-coded into it. This has to be updated with the sub-domain URL. The fastest way to do it would be to change it into the database directly. You will need to first determine your WordPress database prefix, which can be found into the wp-config.php file.
$table_prefix = 'wp_';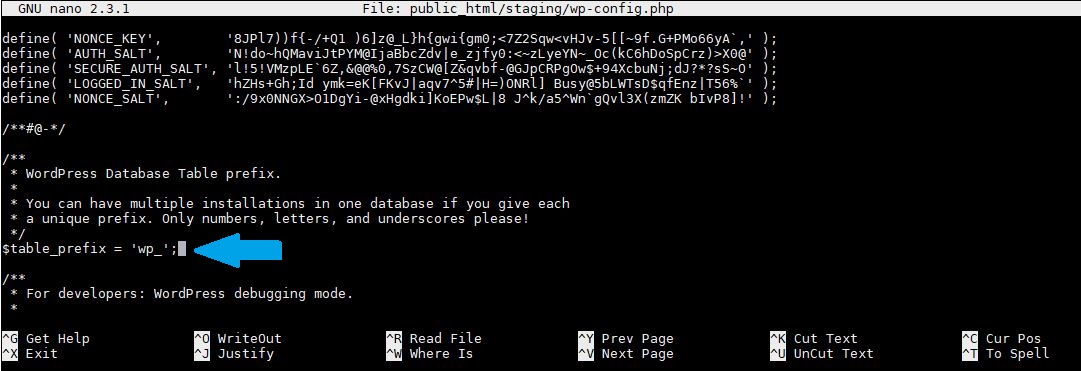
7. Update the site URL into the sub-domain WordPress database.
# mysql -u NEW_DB_USER -p NEW_DATABASE_NAME
* Enter the database password

# mysql> UPDATE wp_options SET option_value = replace(option_value, 'ORIGNAL.DOMAIN', 'SUBDOMAIN-PREFIX.ORIGNAL.DOMAIN') WHERE option_name = 'home' OR option_name = 'siteurl';
Query OK, 0 rows affected (0.00 sec)
Rows matched: 2 Changed: 0 Warnings: 0

# mysql> UPDATE wp_posts SET guid = replace(guid, 'ORIGNAL.DOMAIN', 'SUBDOMAIN-PREFIX.ORIGNAL.DOMAIN');
Query OK, 0 rows affected (0.02 sec)
Rows matched: 964 Changed: 0 Warnings: 0

# mysql> UPDATE wp_posts SET post_content = replace(post_content, 'ORIGNAL.DOMAIN', 'SUBDOMAIN-PREFIX.ORIGNAL.DOMAIN');
Query OK, 0 rows affected (0.05 sec)
Rows matched: 964 Changed: 0 Warnings: 0

# mysql> UPDATE wp_postmeta SET meta_value = replace(meta_value, 'ORIGNAL.DOMAIN', 'SUBDOMAIN-PREFIX.ORIGNAL.DOMAIN');
Query OK, 0 rows affected (0.01 sec)
Rows matched: 686 Changed: 0 Warnings: 0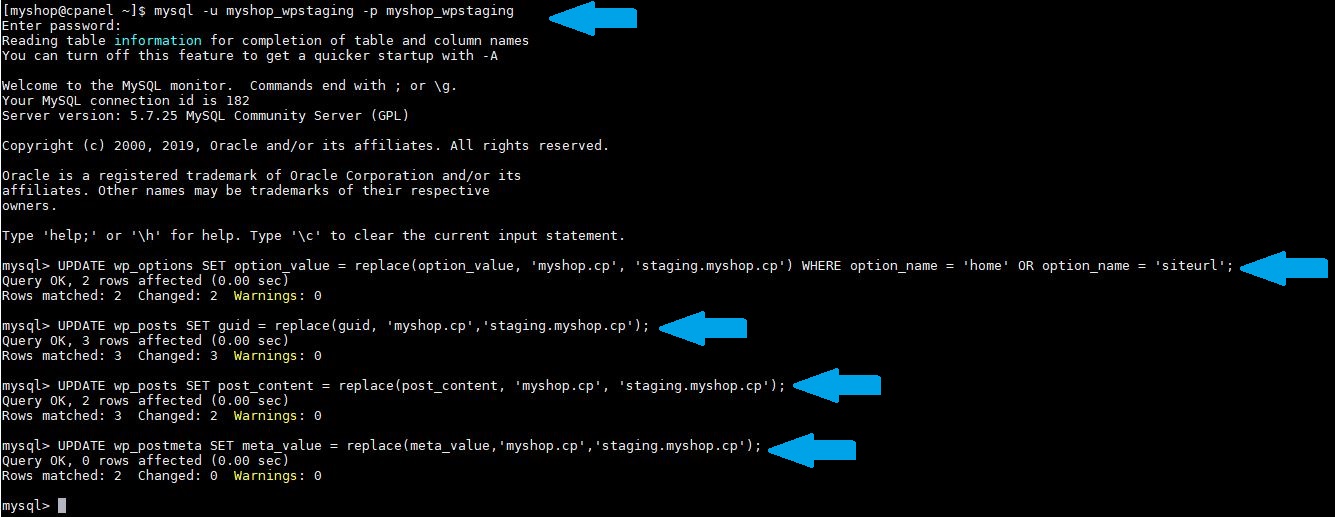
Having migrated the data, it’s now time to test your site for any errors. Take a look at php.ini, .user.ini, or any other files of that kind, which may have a hard-coded path. At this point, the WordPress site under the sub-domain may be working already. If it is not working, then any of the following two major things may be the cause:
1. Some URL are hard coded into the files into directory /home/CPANEL_USER/SUBDOMAIN_PREFIX/. This can be fixed by doing a replace into all files that are into that specific directory. The following command syntax may be used to do so:
# find /home/CPANEL_USER/SUBDOMAIN_PREFIX/ -type f -exec sed -i 's#ORIGNAL.DOMAIN#SUBDOMAIN-PREFIX.ORIGNAL.DOMAIN#g' {} +
2. Some PATH are hard coded into the files into directory /home/CPANEL_USER/SUBDOMAIN_PREFIX/. This can be fixed by doing a replace into all files that are into that specific directory. The following command syntax may be used to do so:
# find /home/CPANEL_USER/SUBDOMAIN_PREFIX/ -type f -exec sed -i 's#/home/CPANEL_USER/public_html#/home/CPANEL_USER/public_html/SUBDOMAIN_PREFIX#g' {} +
Hopefully, after all this hard work, the WordPress that has been copied into the sub-domain should be working correctly, just as the original site. If you’re still experiencing issues, check the error_log file in the sub-domain directory; it may give more details about any errors.
Need help with the above kind of operation? Being a customer of Globo.Tech, you can contact our support department for just that. Our highly technical staff would be glad to assist you.

One of the most important thing for day to day business is surely Email. And for that, cPanel have something special for you! Email Deliverability is one of the newest feature of cPanel, available from version 78. It’s designed to help users keep their legitimate emails out of Spam folders.
If you’re running server sending out Emails, then it is vital to have proper configuration to have successful mail delivery. This means that it’s far more likely your emails can be successfully delivered for your daily customer. No one want a unhappy customer.
The new email deliverability feature, in cPanel, will help you to ensure that you have the technical elements in place. Which allow other email servers to recognise your domain as trustworthy.
Simply by opening the cPanel’s email deliverability function, it will automatically flags issues that could harm Emails deliverability. All that, by checking proper RDNS, DKIM and SPF configurations.
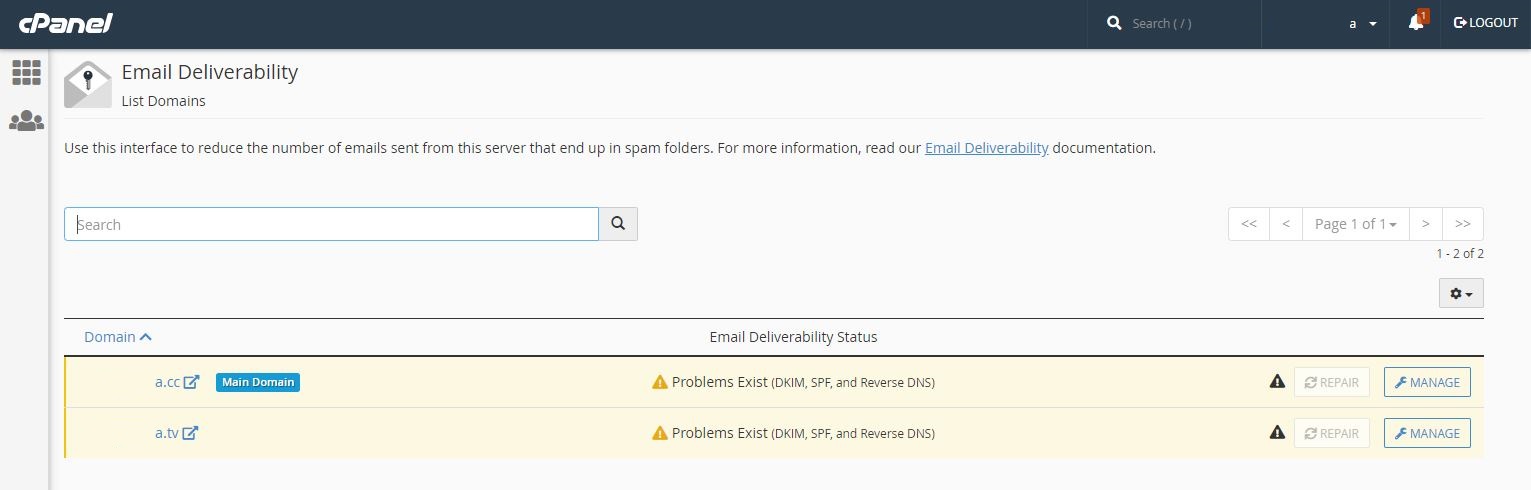
The first section looks at your email related DNS records (RDNS). Naturally, cPanel can only analyse these if the system controls your mail related DNS records. If cPanel detects a problem with these records, then it will flag it up in this section. Under certain circumstances, you can choose to have cPanel repair the errors automatically, by prompting the modification needed. This allowing you to review and customise the changes that it is going to make before they are carried out.
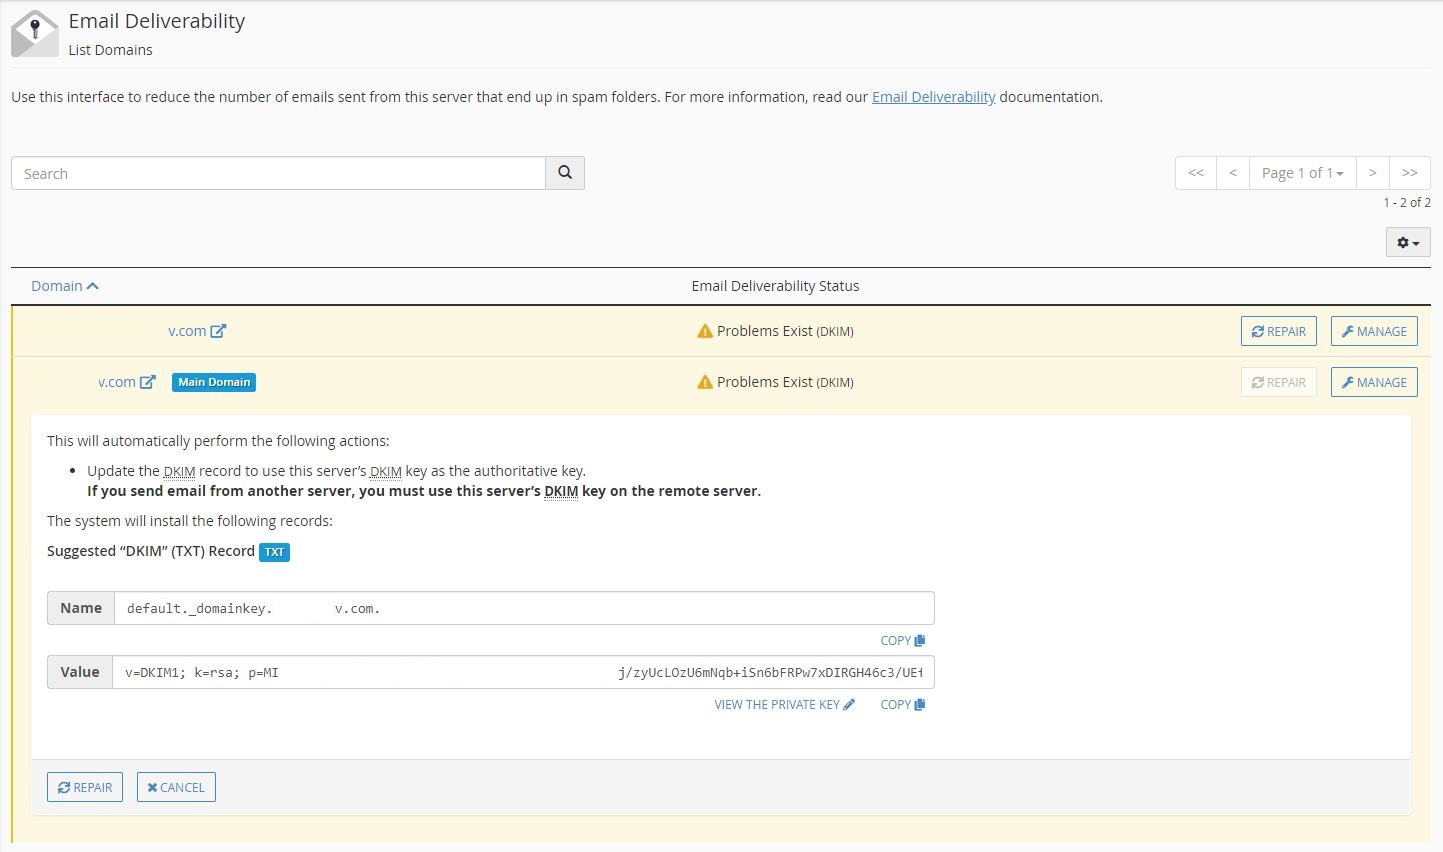
Depending on your server, the repair process can take up to five minutes. You can only update one domain record in the same zone at a time. However, if two domains have records in different zones, these can be updated simultaneously.
The same setup is in place when it comes to managing your Domain Keys Identified Mail records (DKIM). Used by mail server, these records are used to identify trusted servers. Reducing the risk of Emails being caught in spam filters.
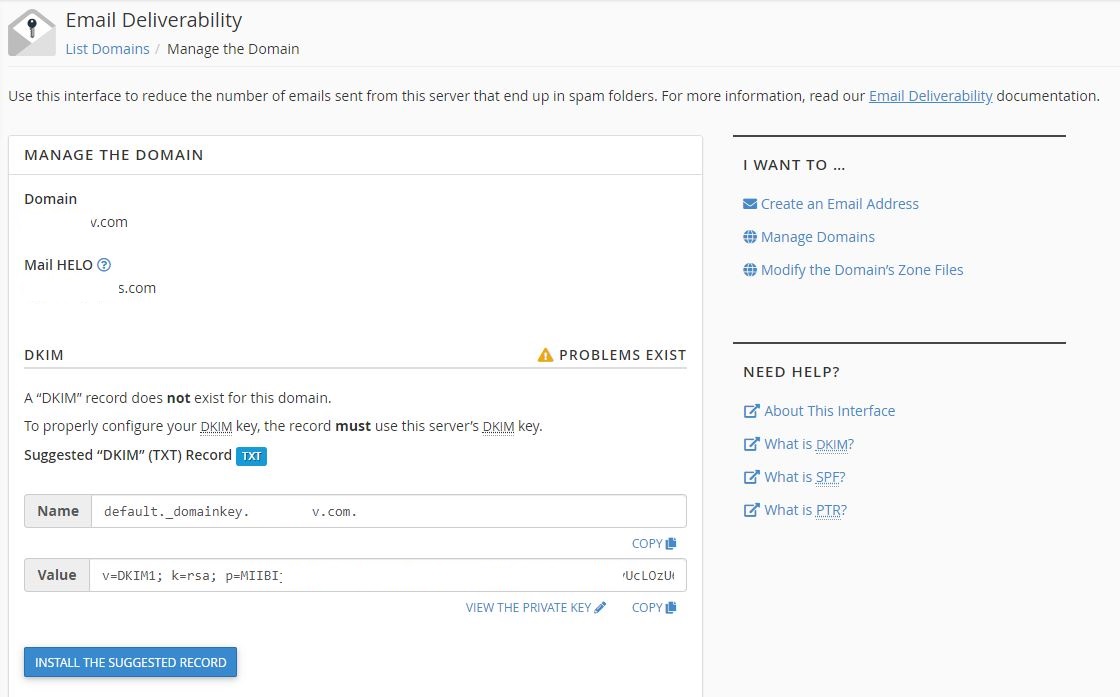
If you don’t have a DKIM record, the new cPanel interface can generate one for you. Treat this DKIM key with care though. Exposing it to others could allow them to send email in your name, harming your reputation as a safe and trustworthy sender.
Similar useful settings also exist to allow you to manage your server’s Sender Policy Framework (SPF).
In some case, the DNS may be managed from a remote server. Which means that cPanel won’t be able to handle the DNS changes for you, by using the repair function. In such scenario, the required configuration for DKIM and SPF will be prompted by cPanel. They will need to be manually updated into the proper DNS zone.
Overall, this new cPanel feature is undoubtedly a great way to handle the deliverability of your email at a glance. It allow to quickly identify, and resolve, any issues which may be impacting the success of your email delivery.
LAMP is a software bundle that is an acronym of the primary or original open source products, which include a Linux operating system, an Apache server, a MySQL database, and utilizes the PHP programming language; the acronym originated from Linux, Apache, MySQL, and PHP. However, the stack has interchangeable options, such as another web server, scripting, or database options. Using open source software allows the stack to be customized in ways that benefit the user without fear of being locked into a specific vendor or software producer.
A commonly used iteration of Linux is Ubuntu, a user-friendly Linux-based operating system that new and experienced users often utilize. For this guide, Ubuntu 18.04 is being used, which is the current stable release.
To get started installing the stack, you will need a freshly installed virtual machine (VM) with root access; root access is used to engage in administrator level actions on the operating system.
Make sure that your version of Ubuntu is the current stable release, 18.04, before proceeding with your stack installation. You can start by verifying that your system is up to date:
apt update && apt upgrade -y
Once complete, you will need to install tasksel:
apt install tasksel
After completing the tasksel installation, it’s time to install the lamp server package, which will include Apache 2.4, PHP 7.2, and MySQL 5.7:
tasksel install lamp-server
When finished, you will need to secure your MySQL installation, since there’s a blank password by default:
mysql_secure_installation
It’s important to secure your MySQL server deployment, especially since it’s installed with a blank password by default. Once completed, you can connect to MySQL with a blank password and use the VALIDATE PASSWORD PLUGIN function to test passwords and help improve security.
The plugin helps you create passwords that are considered secure enough for the installation. You will be prompted to setup the VALIDATE PASSWORD PLUGIN, pressing “y” for ‘yes’ or any other key for ‘no’.
Once you select ‘yes,’ you will be prompted to set the root password, entering it twice for confirmation.
On the default setup, MySQL has an anonymous user account, which allows any user to log on without having a user account created. The anonymous user accounts allow for easier testing environments and easier installations, but they should be removed before placing your VM into production.
To remove anonymous users, there will be a prompt asking you to select “y” for ‘yes’ or any other key for ‘no.’ Make your selection of “y” and complete the removal when ready.
When setting up a stack installation with root access, it’s important to set up your root connection to connect from ‘localhost.’ Setting up the connection in this fashion keeps users from attempting to guess the password and connecting from unauthorized locations.
During setup, you will be prompted to “disallow root login remotely,” pressing “y” for ‘yes’ and any other key for ‘no.’ Select “y” to disallow remote root logins.
There is another default database, named ‘test,’ that can be accessed by anyone and should be removed before placing your database in production.
Similar to the other steps, you will be prompted to select “y” for ‘yes’ or any other key for ‘no.’ Select “y” and remove the test database.
Once the test database has been dropped and privileges are removed, you will be prompted to reload privilege tables to ensure that changes take effect immediately. You will be prompted to select “y” for ‘yes’ or any other key for ‘no.’ Select “y” and complete the table reload, making your changes take effect.
You’ve successfully completed installing your LAMP stack on a virtual machine running Ubuntu 18.04; you’re ready to move your installation into production. If you found this process guide helpful, please share it with other users engaging in a similar setup, and review our other guides for additional help and support.
Vesta control panel (often abbreviated as VestaCP) is an open source hosting control panel, allowing the user to manage websites, create email accounts, manage email accounts, manage FTP accounts, and more. During this guide, we will install VestaCP on Debian 9, which is a freely provided operating system designed to be similar to Unix systems and is a popular system used with cloud and dedicated server instances.
To get started installing VestaCP on Debian 9, you will need a node running Debian 9; you can choose to use a cloud server or dedicated server to host your node. Your node should be running the most up-to-date version of Debian 9.
Now that you’ve selected your cloud or dedicated server, you’ve verified your node is running Debian 9, and you’ve confirmed Debian 9 is running the current software version, you’re ready to begin.
The first step is getting a Debian 9 minimal install on a virtual private server (VPS) or dedicated server.
Then it’s time to run the update for Debian 9 and reboot your node:
apt update && apt upgrade -y && reboot
Once the update is complete, you can download the VestaCP installation script:
curl -O http://vestacp.com/pub/vst-install.sh
After downloading the installation script, you can run it on your node:
bash vst-install.sh
If you need to customize your VestaCP installation, you can do so at https://vestacp.com/install/.
While running the installation script, you will be prompted to fill in the following questions with the appropriate answer:
Would you like to continue [y/n]: y
Please enter admin email address: your_email@email.com
Please enter FQDN hostname [vestacp]: server.example.com
The installation of VestaCP may take up to 15 minutes to complete.
Once the installation script completes, you may receive the following notification:
root is not in the sudoers file. This incident will be reported.

=======================================================

_| _| _|_|_|_| _|_|_| _|_|_|_|_| _|_|

_| _| _| _| _| _| _|

_| _| _|_|_| _|_| _| _|_|_|_|

_| _| _| _| _| _| _|

_| _|_|_|_| _|_|_| _| _| _|
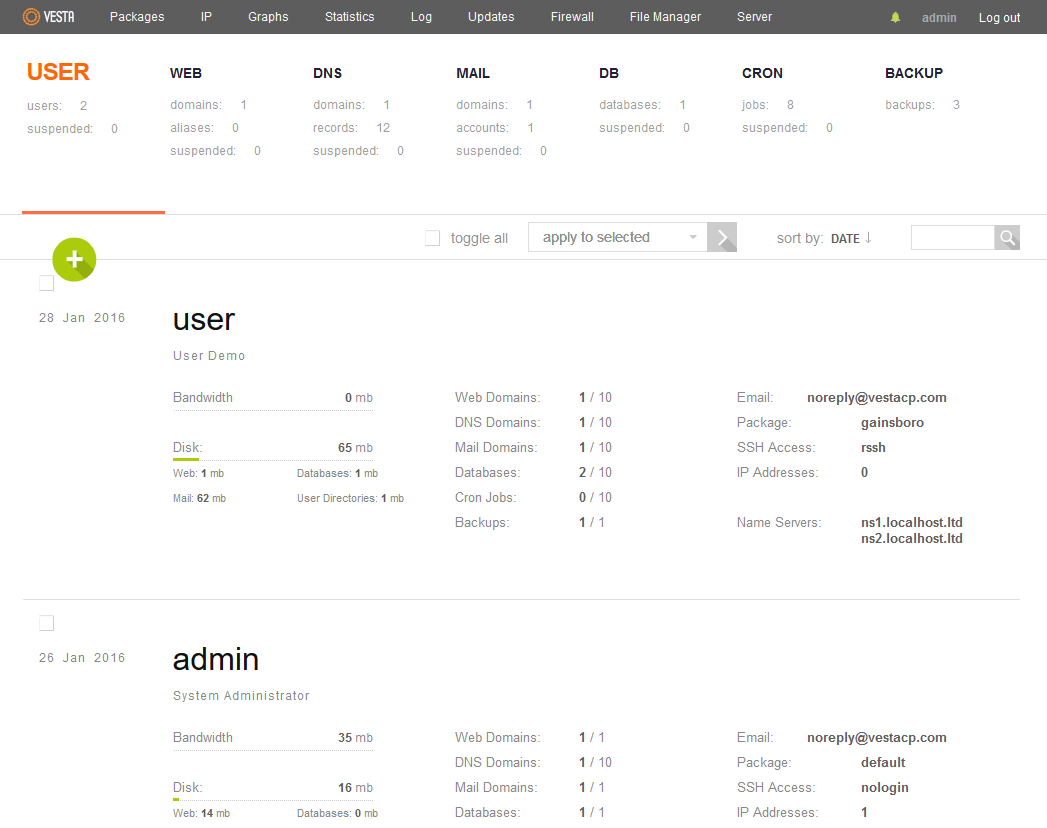
You’ve completed the installation of VestaCP. You will receive a prompt with the username, password, and host once complete.
https://********:8083

username: admin

password: *******
You can now sign into your control panel and begin utilizing your VestaCP installation.
Congratulations on completing your install of Vesta CP on Debian 9, you’re now ready to begin managing websites, email accounts, FTP accounts and more. If you found the use of this guide helpful in setting up your new control panel, please share it with other users engaging in the same setup process.
Virtual hosting is the technique of hosting multiple websites on one server. Virtual hosting enables efficient utilization of computing resources because the multiple websites share the computing resources of the host server. Apache is one of the most web servers in the world, and it provides a mechanism for enabling virtual hosting on a web server. Virtual hosting works by creating a directory for each domain/website and then redirecting visitors of a domain to that site’s specific directory. The whole process is handled transparently by Apache, and the user is not aware that the server is hosting other websites. Apache virtual hosting is very scalable and can be expanded to handle a large number of sites.

Getting started
To complete this walkthrough successfully the following are required:
• A node (Dedicated or Cloud Server) running Ubuntu 16
• All commands must be entered as root
• Apache web server installed
Tutorial
This guide demonstrates how to implement virtual hosting for two domains, www.globo.tech and support.globo.tech, on a single server. The two domains can be substituted for any domain that you may use.
First, create the directories for each website in the /var/www directory using the following commands:
sudo mkdir -p /var/www/www.globo.tech

sudo mkdir -p /var/www/support.globo.tech

Next change the ownership of the directories so that the regular user can modify them:

sudo chown -R $USER:$USER /var/www/www.globo.tech

sudo chown -R $USER:$USER /var/www/support.globo.tech
Next change the permissions for the directories so that visitors to the site can have read access to the web pages:
sudo chmod -R 777 /var/www/www.globo.tech

sudo chmod -R 777 /var/www/support.globo.tech
The next step is creating a virtual host file for each website; this is accomplished by copying the default virtual host file and then editing it appropriately. Use the following commands to copy the default host file:
sudo cp /etc/apache2/sites-available/000-default.conf /etc/apache2/sites-available/www.globo.tech.conf

sudo cp /etc/apache2/sites-available/000-default.conf /etc/apache2/sites-available/support.globo.tech.conf
The virtual host files have to be modified so that they can direct requests appropriately. Open the virtual host file for the www.globo.tech site using an editor of your choice. In this example nano has been used:
sudo nano /etc/apache2/sites-available/www.globo.tech.conf
Subsequently, add a directive for the ServerName, this is the domain for the website:
ServerName www.globo.tech
Next, modify the DocumentRoot directive so that it matches the directory that you have created for the website
DocumentRoot /var/www/www.global.tech
If the changes have been implemented correctly the virtual host file will look this:
<Virtualhost>

ServerAdmin webmaster@localhost

ServerName www.global.tech

DocumentRoot /var/www/www.global.tech

ErrorLog ${APACHE_LOG_DIR}/error.log

CustomLog ${APACHE_LOG_DIR}/access.log combined

</Virtualhost>
The same changes should be made for the support.global.tech website. Open the virtual host file using the following command:
sudo nano /etc/apache2/sites-available/support.globo.tech.conf
Alter the file so that it matches the following:
<Virtualhost>

ServerAdmin webmaster@localhost

ServerName support.global.tech

DocumentRoot /var/www/support.global.tech

ErrorLog ${APACHE_LOG_DIR}/error.log

CustomLog ${APACHE_LOG_DIR}/access.log combined

</Virtualhost>
The final step is for enabling the new virtual hosts and reloading the web server. Apache provides the a2ensite tool for enabling sites. Use the following commands to enable the two sites:
sudo a2ensite www.global.tech.conf

sudo a2ensite support.global.tech.conf
Finally, reload apache using the following command:
sudo systemctl restart apache2
Conclusion
You have now setup virtual hosting, and you can use your single server to serve two websites. You can experiment further by adding more sites to your server. If this walkthrough has assisted you, do not hesitate to share with other people.
WHM stands for Web Host Manager, which is a program designed for administrative access and management of the back end of an interface solution called cPanel. WHM provides the administrator with more control, more flexibility, and the ability to create or manage different cPanel instances. WHM provides users with a variety of tools that make administration more comfortable, which includes building or deleting cPanel accounts, managing sites, monitoring sites, configuring support requests, customization of the control panel and hosting solutions, and much more. Users should explore this solution when they need flexibility, more creative management solutions, and when they’re managing multiple sites.
To get started creating a package, you will need to have cPanel already setup. The goal of cPanel packages is to create an account with pre-selected settings and resources, which helps to speed up account creation without having to change settings each time a new account is created. Additionally, you will need to have a Linux-based hosting solution employed, since cPanel and the accompanying solutions are not designed for use on Windows instances.
If you’re unfamiliar with cPanel, it is an online web hosting control panel that is Linux-based, allowing the user to have a graphical interface, automation tools, and simplified management for web hosting options. The graphic user interface, often abbreviated GUI, provides a graphic and straightforward management console, similar to the point and click style of Windows systems. However, an interface like cPanel only works for Linux-based hosting solutions.
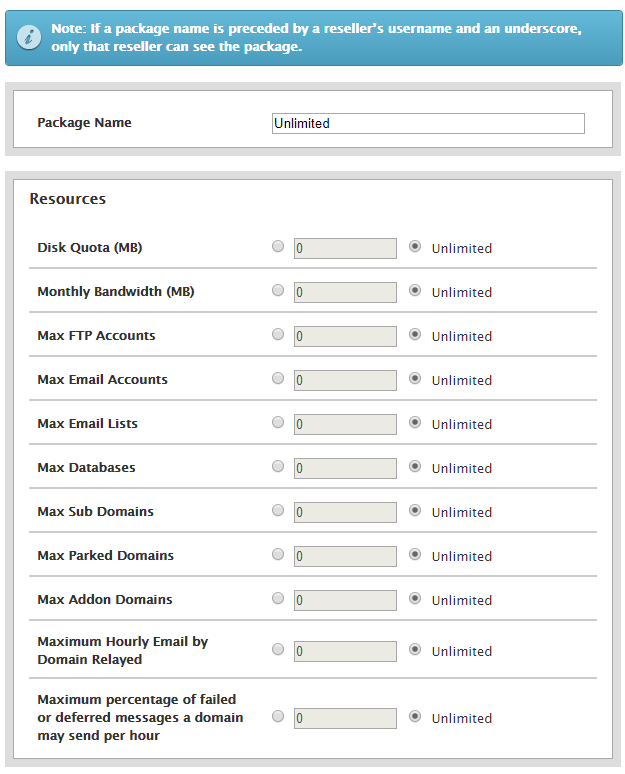
During this tutorial, a package named “unlimited” with the default resources was created, with a change to the Max Parked Domains and the Max Addon Domains; each of these options has been changed to unlimited.
Remember that many of the functions that exist in cPanel or the web hosting manager can require a more advanced understanding of the solution, and this means that the solution should be used on fresh installations that do not have a large amount of pre-existing configuration. Make sure to examine the needs of your server hosting solution before making your choice.
Creating packages in Web Hosting Manager
The first step in creating a package is logging into your WHM instance at the following address:

Once you’ve logged in, you can search at the top left search box for “package,” clicking on the option to “add a package” when you locate it:
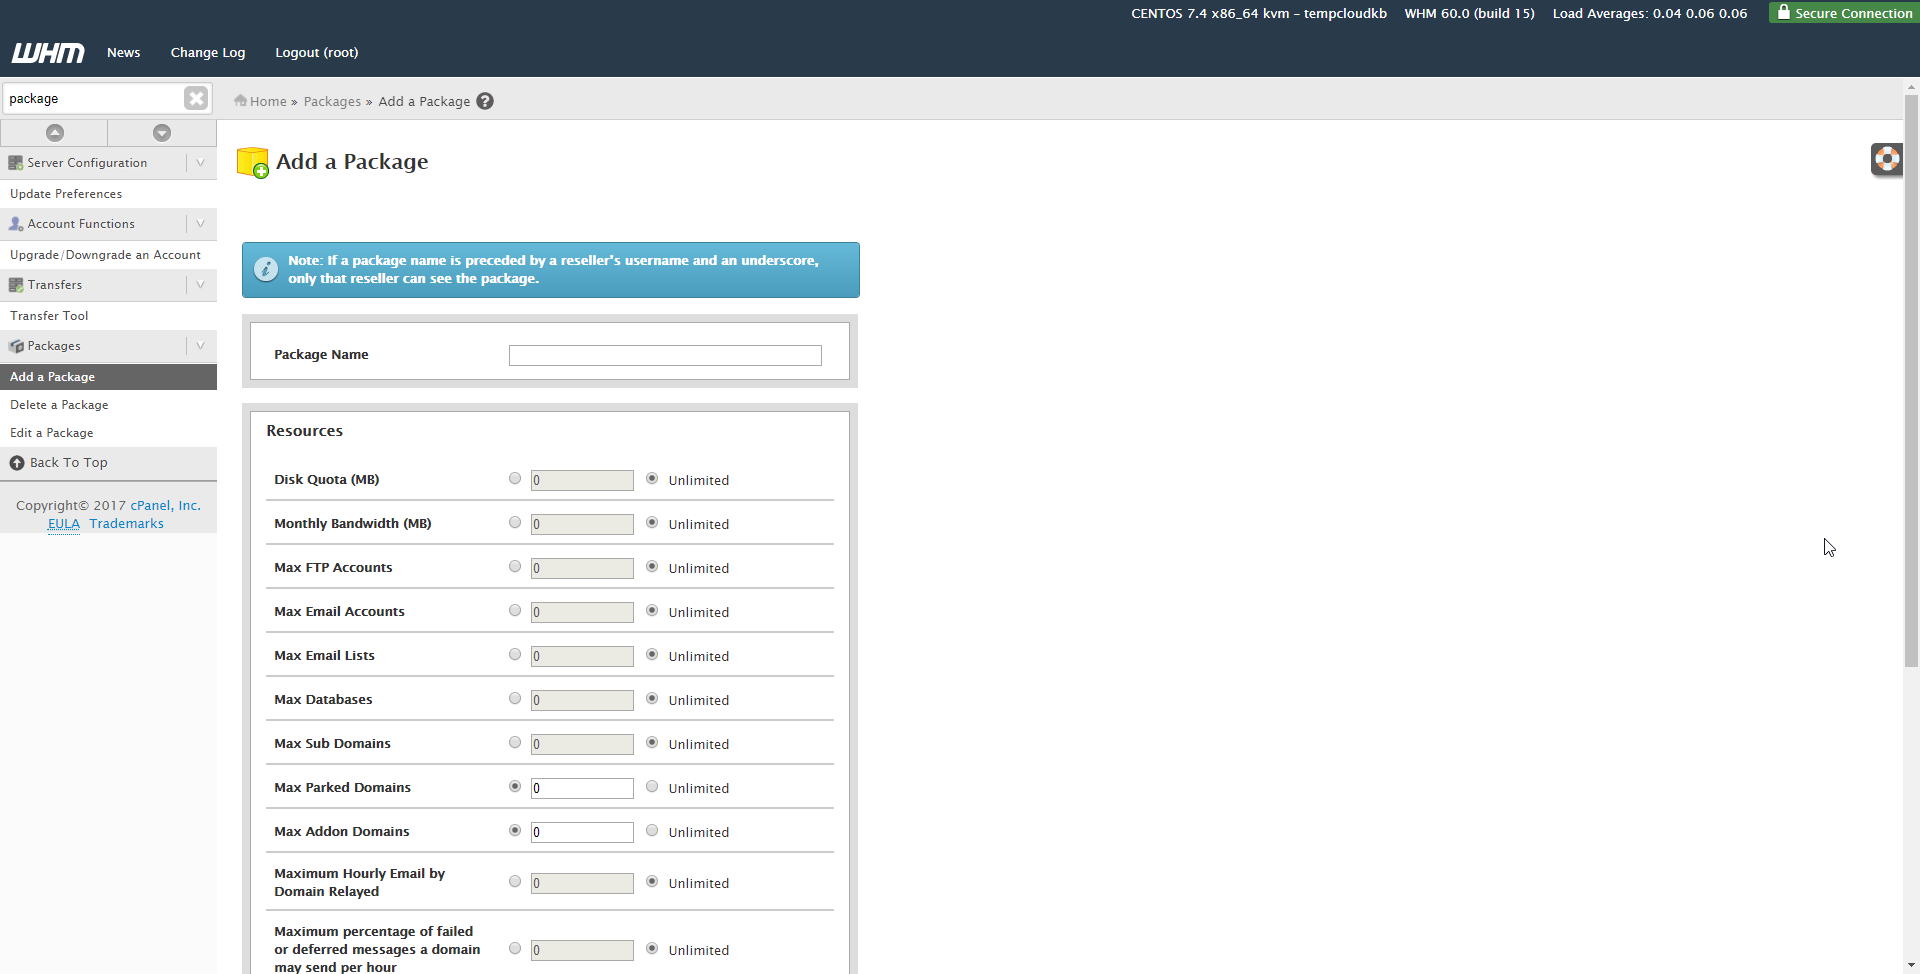
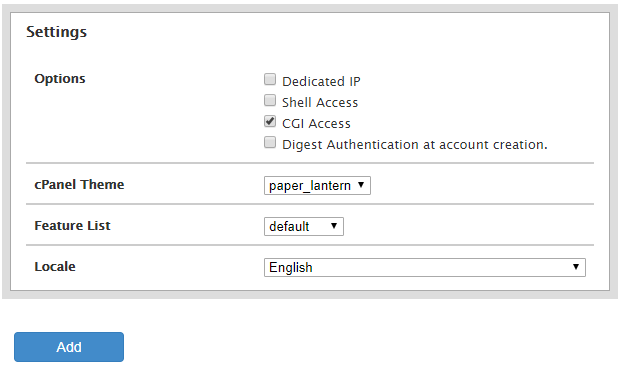
When selected, you can change the package’s name and the preferred resources and options for this creation, clicking “add” when complete:
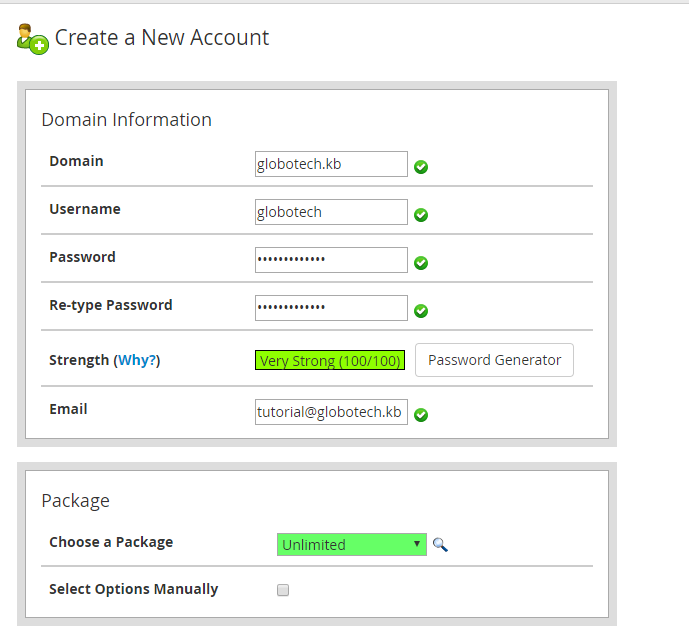
After your new package’s options have been selected and added, you can create new accounts using them:
Congratulations, you’ve successfully created a new package in WHM, giving you the ability to create new accounts with selected resources and options quickly. Make sure to remember the name you’ve assigned and you can always log back in and make changes to the preferred resources and options you selected. If you found this tutorial helpful, please share it with other users that are setting up packages in Web Hosting Manager.
cPanel is a popular web hosting control panel, based on Linux, that gives users a graphic interface and automation tools; the use of cPanel helps simplify the web-hosting process that may be more time consuming or difficult without these tools. cPanel has been in existence for over 20 years and has become a popular option for administrators, end-users, and even resellers; cPanel can be useful for any of these user groups when it comes to managing the various aspects that come with website hosting and server administration.
cPanel also features command line tools and API-based tools that can be used to automate some standard processes for administrators.
To get started changing your cPanel user password, you will need to have cPanel already installed as a dedicated server or cloud server; it’s important to install cPanel on a fresh installation of an operating system with a minor amount of previous configurations.
To change your cPanel user password, there are two different methods that can be explored. You may use the WHM (root) on port 2087 or the cPanel on port 2083 with the user.
Before choosing method one or method two, make sure to choose a strong password, featuring upper- and lower-case letters, numbers, and special characters; a strong password helps prevent malicious individuals from brute forcing your cPanel server.
Method 1
This method requires the use of WHM on port 2087.
Your first step in this method is logging in to the WHM using your root user credentials at https://x.x.x.x:2087.

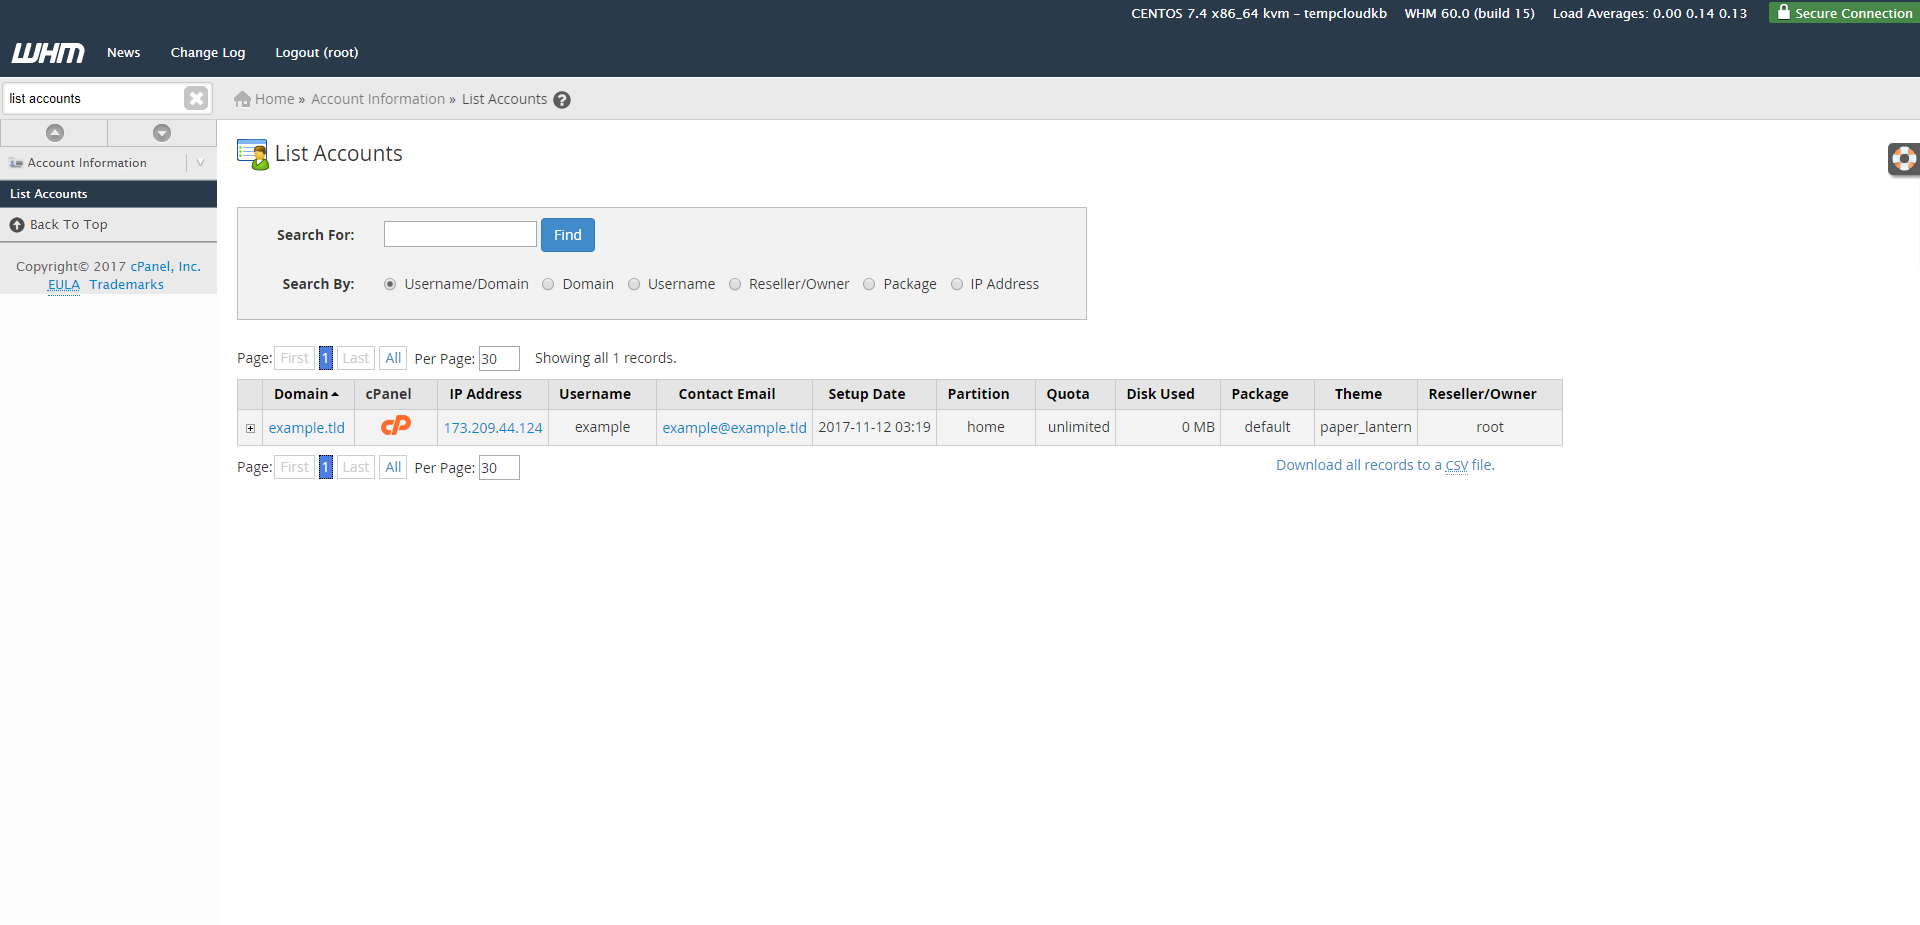
Once logged in, search for “list accounts” on the top left search box, then click on “list accounts.”
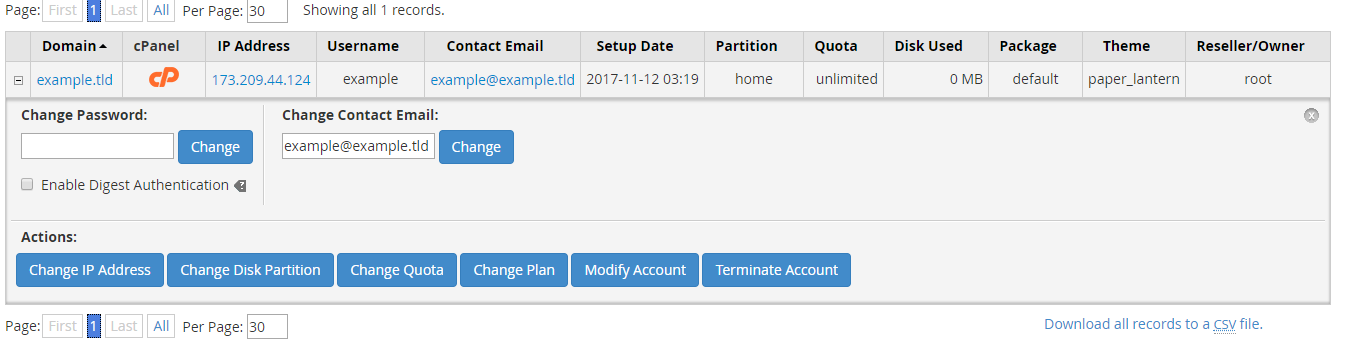
Click on the + (plus) sign on the left of the account you’re changing the password for, then type the new password in the “change password” box.

Click on the “change” prompt to complete your cPanel user password change.
Method 2
This method requires changing the password through cPanel on port 2083.
First off, log in to your cPanel account at the following at https://x.x.x.x:2083.

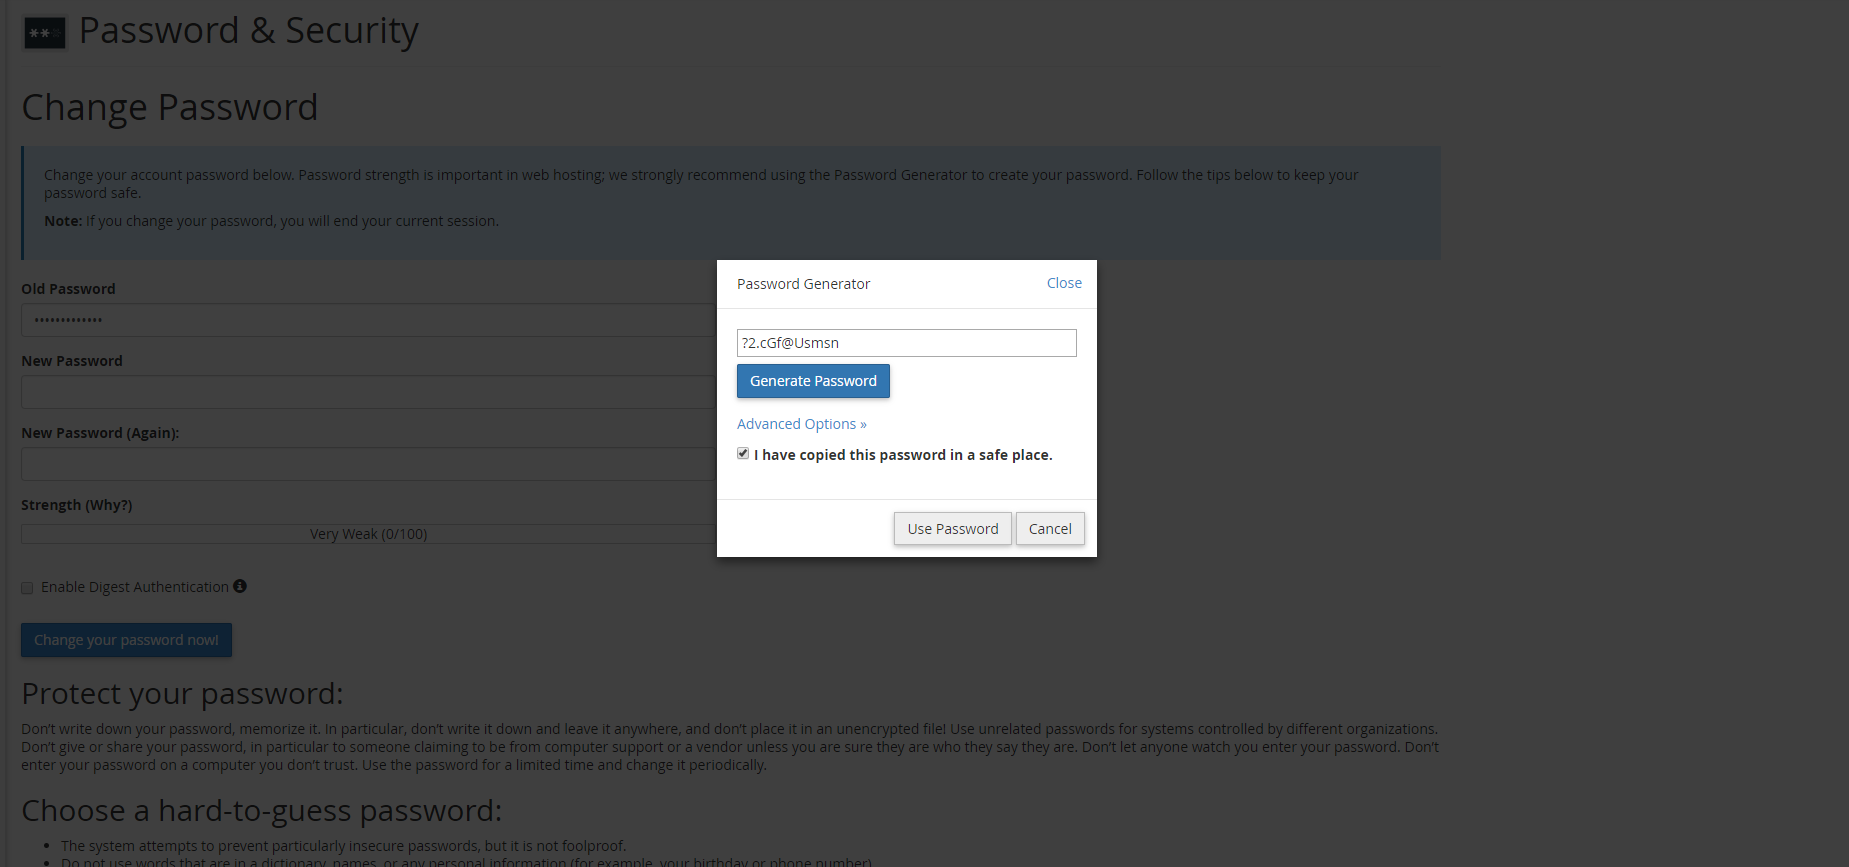
Once logged in, go to the bottom of the page, to the section titled “preferences,” then click on “password & security.”

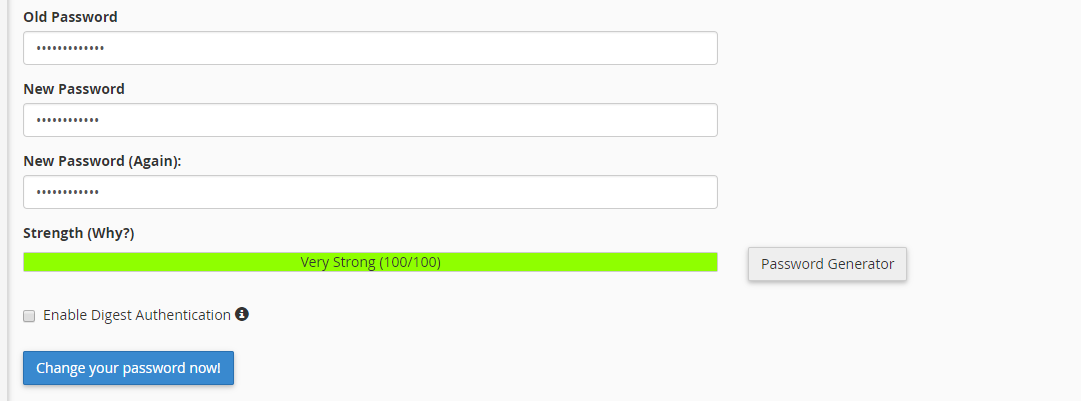
On the password & security page, you will need to enter your current password and the new password. If you choose, you can have the password generator choose the password for you.
After entering your current (old) password and the new password, you can click the “change your password now” option to complete the change.
Please note: once completing the password change using cPanel on port 2083, you will be signed out and will need to log in with the new password to access cPanel again. Make sure you have taken note of your password before completing the change.
Congratulations, you’ve successfully seen two different methods to change your cPanel user password; one method uses root access through WHM and the other uses the cPanel account. Now you’re ready to log in with your new password, using cPanel as before but with a new, more secure password. If you found this guide helpful, please share it with other users pursuing the same process.