 Call us at 1-888-GTCOMM1
-

- Dedicated Hosting
- Cloud hosting
- Services
- Support
- Learning Center
- Referral Program
- Français
-
Why globotech
- Log in

In some cases, you will need to find out how to check Apache version that is running on your Web server, so that you can debug or troubleshoot any issue. It also helps you to find new features and take advantage that is not available in the older version. There are several ways to find the version of your Apache Web server.
In this tutorial, we will show you how to find the version of your Apache Web server.
In Debian/Ubuntu operating system, you can check the version of Apache using apachectl command:
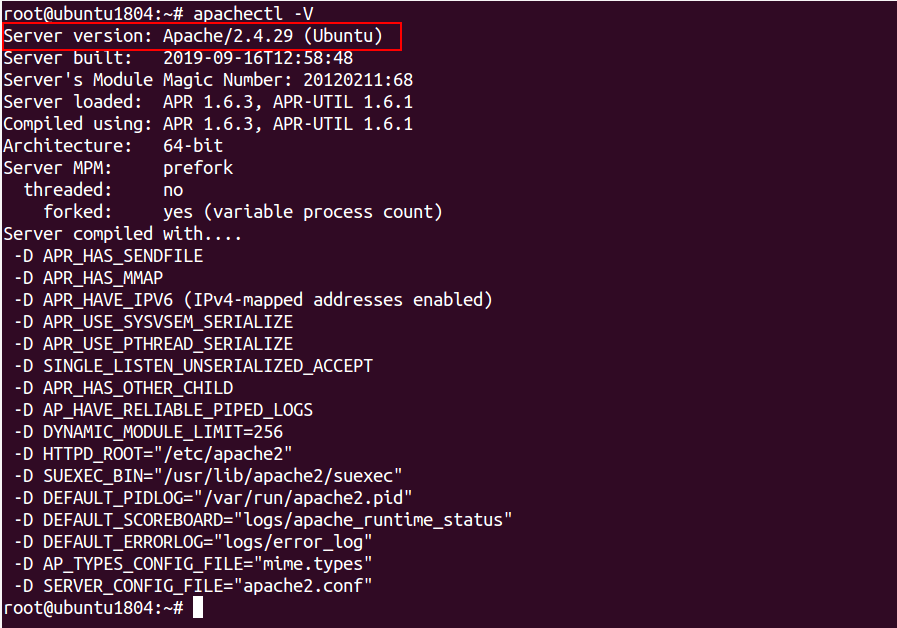
Method 1: You can use -v option with apachectl to display the version of Apache as shown below:
apachectl -v
You should get the following output:
 Server version: Apache/2.4.29 (Ubuntu)
 Server built:   2019-09-16T12:58:48

Method 2: If you want to show the other details along with Apache version, use -V option apachectl as shown below:
apachectl -V
You should get the following output:
 Server version: Apache/2.4.29 (Ubuntu)
 Server built:   2019-09-16T12:58:48
 Server's Module Magic Number: 20120211:68
 Server loaded:  APR 1.6.3, APR-UTIL 1.6.1
 Compiled using: APR 1.6.3, APR-UTIL 1.6.1
 Architecture:   64-bit
 Server MPM:     prefork
  threaded:     no
    forked:     yes (variable process count)
 Server compiled with....
 -D APR_HAS_SENDFILE
 -D APR_HAS_MMAP
 -D APR_HAVE_IPV6 (IPv4-mapped addresses enabled)
 -D APR_USE_SYSVSEM_SERIALIZE
 -D APR_USE_PTHREAD_SERIALIZE
 -D SINGLE_LISTEN_UNSERIALIZED_ACCEPT
 -D APR_HAS_OTHER_CHILD
 -D AP_HAVE_RELIABLE_PIPED_LOGS
 -D DYNAMIC_MODULE_LIMIT=256
 -D HTTPD_ROOT="/etc/apache2"
 -D SUEXEC_BIN="/usr/lib/apache2/suexec"
 -D DEFAULT_PIDLOG="/var/run/apache2.pid"
 -D DEFAULT_SCOREBOARD="logs/apache_runtime_status"
 -D DEFAULT_ERRORLOG="logs/error_log"
 -D AP_TYPES_CONFIG_FILE="mime.types"
 -D SERVER_CONFIG_FILE="apache2.conf"
Method 3: You can also find the version of Apache using the dpkg command as shown below:
dpkg -l | grep -i apache2
You should see the following output:
 ii  apache2                         2.4.29-1ubuntu4.11                         amd64        Apache HTTP Server
 ii  apache2-bin                     2.4.29-1ubuntu4.11                         amd64        Apache HTTP Server (modules and other binary files)
 ii  apache2-data                    2.4.29-1ubuntu4.11                         all          Apache HTTP Server (common files)
 ii  apache2-utils                   2.4.29-1ubuntu4.11                         amd64        Apache HTTP Server (utility programs for web servers)
 ii  libapache2-mod-php7.2           7.2.24-0ubuntu0.18.04.3                    amd64        server-side, HTML-embedded scripting

Method 4: You can also find the version of Apache with dpkg-query command as shown below:
dpkg-query --show apache2
You should see the following output:
apache2 2.4.29-1ubuntu4.11

In CentOS/RHEL/Fedora operating system, you can check the version of Apache using httpd command.
Method 1: You can use -v option with httpd to display the version of Apache as shown below:
httpd -v
You should get the following output:
 Server version: Apache/2.4.37 (centos)
 Server built:   Dec 23 2019 20:45:34

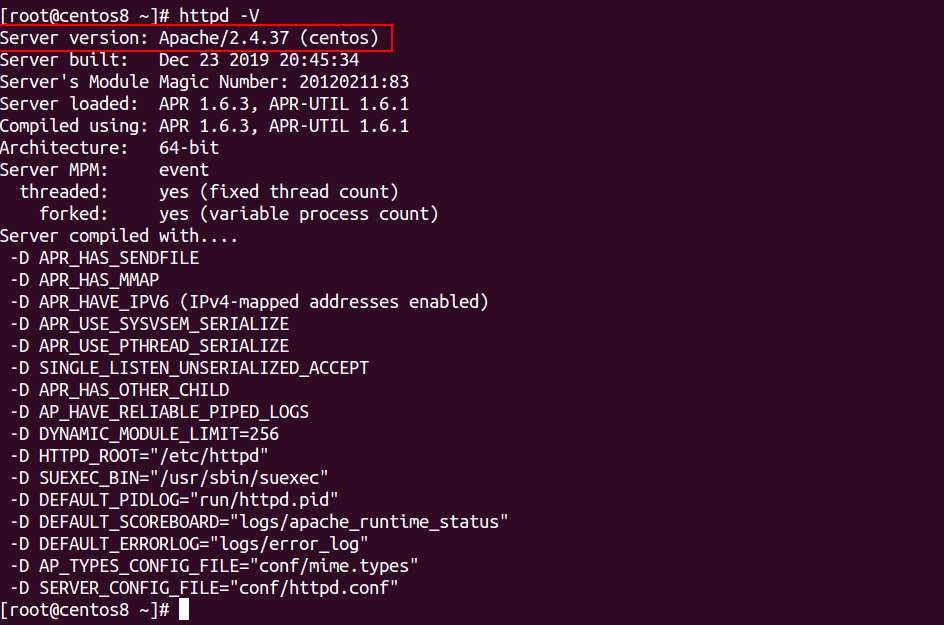
Method 2: If you want to show the other details along with Apache version, use -V option httpd as shown below:
httpd -V
You should get the following output:
 Server version: Apache/2.4.37 (centos)
 Server built:   Dec 23 2019 20:45:34
 Server's Module Magic Number: 20120211:83
 Server loaded:  APR 1.6.3, APR-UTIL 1.6.1
 Compiled using: APR 1.6.3, APR-UTIL 1.6.1
 Architecture:   64-bit
 Server MPM:     event
  threaded:     yes (fixed thread count)
    forked:     yes (variable process count)
 Server compiled with....
 -D APR_HAS_SENDFILE
 -D APR_HAS_MMAP
 -D APR_HAVE_IPV6 (IPv4-mapped addresses enabled)
 -D APR_USE_SYSVSEM_SERIALIZE
 -D APR_USE_PTHREAD_SERIALIZE
 -D SINGLE_LISTEN_UNSERIALIZED_ACCEPT
 -D APR_HAS_OTHER_CHILD
 -D AP_HAVE_RELIABLE_PIPED_LOGS
 -D DYNAMIC_MODULE_LIMIT=256
 -D HTTPD_ROOT="/etc/httpd"
 -D SUEXEC_BIN="/usr/sbin/suexec"
 -D DEFAULT_PIDLOG="run/httpd.pid"
 -D DEFAULT_SCOREBOARD="logs/apache_runtime_status"
 -D DEFAULT_ERRORLOG="logs/error_log"
 -D AP_TYPES_CONFIG_FILE="conf/mime.types"
 -D SERVER_CONFIG_FILE="conf/httpd.conf"
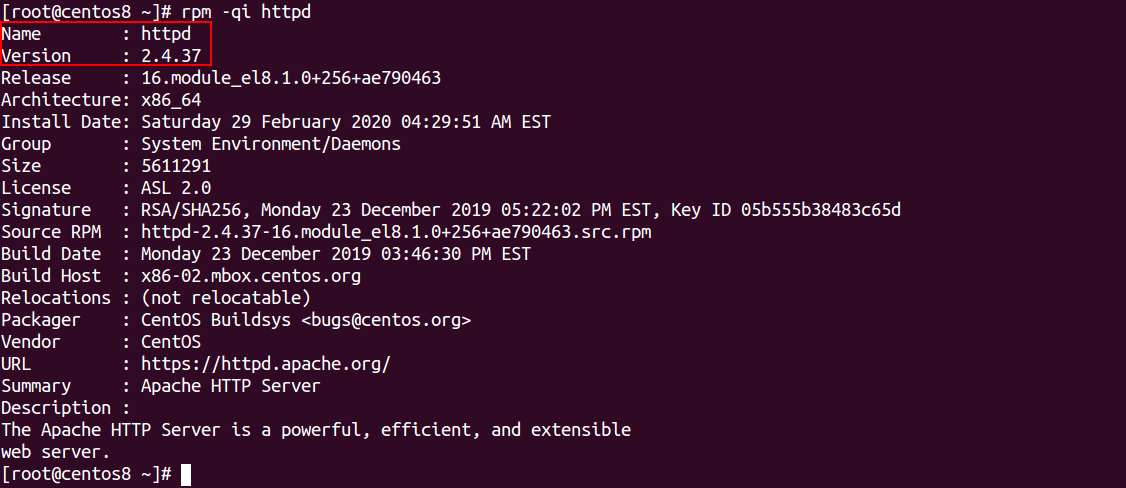
Method 1: You can also use rpm command with the option -qi to find the version of Apache as shown below:
rpm -qi httpd
You should get the following output, if Apache was installed using an RPM package:
 Name        : httpd
 Version     : 2.4.37
 Release     : 16.module_el8.1.0+256+ae790463
 Architecture: x86_64
 Install Date: Saturday 29 February 2020 04:29:51 AM EST
 Group       : System Environment/Daemons
 Size        : 5611291
 License     : ASL 2.0
 Signature   : RSA/SHA256, Monday 23 December 2019 05:22:02 PM EST, Key ID 05b555b38483c65d
 Source RPM  : httpd-2.4.37-16.module_el8.1.0+256+ae790463.src.rpm
 Build Date  : Monday 23 December 2019 03:46:30 PM EST
 Build Host  : x86-02.mbox.centos.org
 Relocations : (not relocatable)
 Packager    : CentOS Buildsys <bugs@centos.org>
 Vendor      : CentOS
 URL         : https://httpd.apache.org/
 Summary     : Apache HTTP Server
 Description :
 The Apache HTTP Server is a powerful, efficient, and extensible
 web server.
In the above tutorial, we learned how to check the version Apache on Debian, Ubuntu, CentOS, RHEL and Fedora operating systems. I hope this will helps you to find out the version of your Apache Web server.
Let’s Encrypt is a free Certificate Authority that provides a free SSL certificates for your domain. Let’s Encrypt provides a Certbot tool to obtain and install TLS/SSL certificates automatically on both Apache and Nginx web server. The certificate is valid for 90 days. So you will need to renew it before it expired. Let’s Encrypt is a nonprofit certificate authority managed by the Internet Security Research Group. Its main aims is to create a more secure and privacy-respecting Web by adopting HTTPS.
In this tutorial, we will learn how to install and secure a LAMP server with a free Let’s Encrypt SSL on Debian 10.
Let’s start with installing LAMP server on your server:
apt-get install Apache2 mariadb-server php php-cli php-common libapache2-mod-php wget -y
Once all the packages are installed, start Apache and MariaDB service and enable them to start on system reboot with the following command:
systemctl start apache2

systemctl enable apache2

systemctl start mariadb

systemctl enable mariadb
Next, you will need to create a virtual host server block for your domain. You can create it with the following command:
nano /etc/apache2/sites-available/blog.fictivedomain.conf
Add the following lines:
 <VirtualHost *:80>
        ServerName blog.fictivedomain.com
        ServerAdmin admin@fictivedomain.com
        DocumentRoot /var/www/html
        ErrorLog ${APACHE_LOG_DIR}/error.log
        CustomLog ${APACHE_LOG_DIR}/access.log combined
 </VirtualHost>
Save and close the file, when you are finished. Then, enable Apache virtual host with the following command:
a2ensite blog.fictivedomain.com.conf
First, you will need to install Certbot tool to secure your web server with Let’s Encrypt. By default, the latest version of Certbot is not available in the Debian 10 default repository.
You can add the Certbot repository with the following command:
 apt-get install software-properties-common

 add-apt-repository ppa:certbot/certbot
Next, update the repository and install Certbot with the following command:
 apt-get update -y

 apt-get install certbot python-certbot-apache -y
Next, you will need to create a well-known.conf file for Let’s Encrypt to validate your domain.
To do so, first create a .well-known directory and give proper permissions with the following commands:
 mkdir -p /var/lib/letsencrypt/.well-known

 chgrp www-data /var/lib/letsencrypt

 chmod g+s /var/lib/letsencrypt
Next, create a well-known.conf file with the following command:
nano /etc/apache2/conf-available/well-known.conf
Add the following lines:
 <Directory "/var/lib/letsencrypt/">
    AllowOverride None
    Options MultiViews Indexes SymLinksIfOwnerMatch IncludesNoExec
    Require method GET POST OPTIONS
 </Directory>
Save and close the file. Then, enable the required modules with the following command:
 a2enmod ssl

 a2enmod headers

 a2enmod http2

 a2enconf well-known
Finally, restart Apache service to apply all the configuration changes:
systemctl restart apache2
Now, run the following command to install and configure your certificate for domain blog.fictivedomain.com:
certbot --apache -d blog.fictivedomain.com
You will be asked to enter an email address and agree to the terms of service.
 Saving debug log to /var/log/letsencrypt/letsencrypt.log
 Plugins selected: Authenticator apache, Installer apache
 Enter email address (used for urgent renewal and security notices) (Enter 'c' to
 cancel): admin@fictivedomain.com


 - - - - - - - - - - - - - - - - - - - - - - - - - - - - - - - - - - - - - - - -
 Please read the Terms of Service at
 https://letsencrypt.org/documents/LE-SA-v1.2-November-15-2017.pdf. You must
 agree in order to register with the ACME server at
 https://acme-v02.api.letsencrypt.org/directory
 - - - - - - - - - - - - - - - - - - - - - - - - - - - - - - - - - - - - - - - -
 (A)gree/(C)ancel: A


 - - - - - - - - - - - - - - - - - - - - - - - - - - - - - - - - - - - - - - - -
 Would you be willing to share your email address with the Electronic Frontier
 Foundation, a founding partner of the Let's Encrypt project and the non-profit
 organization that develops Certbot? We'd like to send you email about our work
 encrypting the web, EFF news, campaigns, and ways to support digital freedom.
 - - - - - - - - - - - - - - - - - - - - - - - - - - - - - - - - - - - - - - - -
 (Y)es/(N)o: Y
 Obtaining a new certificate
 Performing the following challenges:
 http-01 challenge for blog.fictivedomain.com
 Enabled Apache rewrite module
 Waiting for verification...
 Cleaning up challenges
 Created an SSL vhost at /etc/apache2/sites-available/blog.fictivedomain.com-le-ssl.conf
 Deploying Certificate to VirtualHost /etc/apache2/sites-available/blog.fictivedomain.com-le-ssl.conf
 Enabling available site: /etc/apache2/sites-available/blog.fictivedomain.com-le-ssl.conf
If it’s successful, certbot will ask to choose whether or not to redirect HTTP traffic to HTTPS. Choose appropriate option then hit ENTER. Once the certificates are installed successfully, you should see the following output:
 Please choose whether or not to redirect HTTP traffic to HTTPS, removing HTTP access.
 - - - - - - - - - - - - - - - - - - - - - - - - - - - - - - - - - - - - - - - -
 1: No redirect - Make no further changes to the webserver configuration.
 2: Redirect - Make all requests redirect to secure HTTPS access. Choose this for
 new sites, or if you're confident your site works on HTTPS. You can undo this
 change by editing your web server's configuration.
 - - - - - - - - - - - - - - - - - - - - - - - - - - - - - - - - - - - - - - - -
 Select the appropriate number [1-2] then [enter] (press 'c' to cancel): 2


 Enabled Apache rewrite module
 Redirecting vhost in /etc/apache2/sites-enabled/blog. fictivedomain.com.conf to ssl vhost in /etc/apache2/sites-available/blog. fictivedomain.com-le-ssl.conf


 - - - - - - - - - - - - - - - - - - - - - - - - - - - - - - - - - - - - - - - -
 Congratulations! You have successfully enabled https://blog. fictivedomain.com


 You should test your configuration at:
 https://www.ssllabs.com/ssltest/analyze.html?d=blog. fictivedomain.com
 - - - - - - - - - - - - - - - - - - - - - - - - - - - - - - - - - - - - - - - -


 IMPORTANT NOTES:
 - Congratulations! Your certificate and chain have been saved at:
   /etc/letsencrypt/live/blog.fictivedomain.com/fullchain.pem
   Your key file has been saved at:
   /etc/letsencrypt/live/blog.fictivedomain.com/privkey.pem
   Your cert will expire on 2019-10-22. To obtain a new or tweaked
   version of this certificate in the future, simply run certbot again
   with the "certonly" option. To non-interactively renew *all* of
   your certificates, run "certbot renew"
 - Your account credentials have been saved in your Certbot
   configuration directory at /etc/letsencrypt. You should make a
   secure backup of this folder now. This configuration directory will
   also contain certificates and private keys obtained by Certbot so
   making regular backups of this folder is ideal.
 - If you like Certbot, please consider supporting our work by:


   Donating to ISRG / Let's Encrypt:   https://letsencrypt.org/donate
   Donating to EFF:                    https://eff.org/donate-le
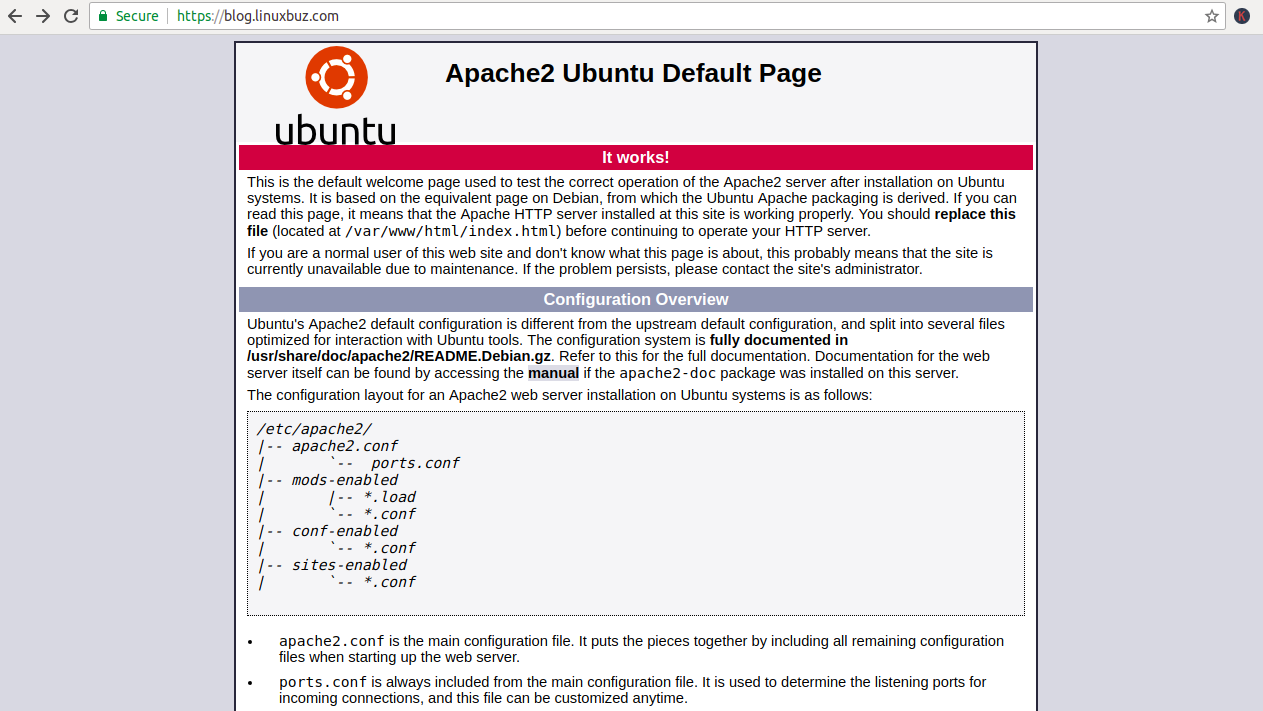
Now, open your web browser and type the URL https://blog.fictivedomain.com. You should that the site is properly secured, usually with a green lock icon, meaning that you successfully installed your free Let’s Encrypt SSL:
Let’s Encrypt free SSL certificates are valid for 90 days. So, you will need to set up a cron job to auto-renew SSL certificate. It is safe to create a cron job that runs every week or even every day.
If you want to renew the SSL certificate manually, run the following command:
certbot renew --dry-run
You can setup cron job to auto-renew SSL certificate by editing following file:
crontab -e
Add the following line:
52 10 * * * root /usr/bin/certbot renew >/dev/null 2>&1
Save and close the file, when you are finished.
In this tutorial, we have learned how to install a free SSL on Apache web server with Let’s Encrypt. I hope you can now easily secure your web server with Let’s Encrypt.

Ansible is an open-source configuration management and software provisioning tool that can be used for controlling multiple remote hosts from the central location and this article will show you how to install Ansible on a Ubuntu 18.04 server.
Ansible can support on all major operating systems like, Linux, Unix, macOS, BSD and Windows. It is very similar to other configuration management systems like, Chef and Puppet. Ansible uses SSH to retrieve information from the remote machines and does not need any client agent on remote servers. You can also create automated tasks using Ansible playbooks to run on your servers.
Before starting, you will need to configure SSH key-based authentication for Ansible hosts on Ansible server. So you will not require a password to manage Ansible hosts.
To do so, log in to Ansible server and generate an ssh key pair with the following command:
ssh-keygen -t rsa
You should see an output looking like this:
 Generating public/private rsa key pair.
 Enter file in which to save the key (/root/.ssh/id_rsa):
 Enter passphrase (empty for no passphrase):
 Enter same passphrase again:
 Your identification has been saved in /root/.ssh/id_rsa.
 Your public key has been saved in /root/.ssh/id_rsa.pub.
 The key fingerprint is:
 SHA256:5JfGu2stiaee+oOud8NDAQVY0YJQ87iwKGud42rl6Oo root@ubuntu1804
 The key's randomart image is:
 +---[RSA 2048]----+
 |  .oo++=.        |
 |    o+o .        |
 |  . . .o.        |
 | . o . o.. .     |
 |o . .   S.=      |
 |.....   .o .     |
 |..++   + ..o     |
 |.o... o B.=..    |
 |*E...+o==Boo     |
 +----[SHA256]-----+
Next, copy the generated public key to your Ansible hosts with the following command:
ssh-copy-id -i ~/.ssh/id_rsa.pub root@192.168.0.3
Once the SSH key is added to the Ansible hosts, you should see the following output:
 /usr/bin/ssh-copy-id: INFO: Source of key(s) to be installed: "/root/.ssh/id_rsa.pub"
 /usr/bin/ssh-copy-id: INFO: attempting to log in with the new key(s), to filter out any that are already installed
 /usr/bin/ssh-copy-id: INFO: 1 key(s) remain to be installed -- if you are prompted now it is to install the new keys
 root@192.168.0.3's password:

 Number of key(s) added: 1
Now try logging into the machine, with:
ssh root@192.168.0.3
If it worked correctly, you can now access Ansible hosts from Ansible server using SSH without a password.
Next, you will need to install Ansible package on the Ubuntu Ansible server. By default, the latest version of Ansible is not available in the Ubuntu 18.04 repository.
First, add the Ansible repository with the following command:
apt-add-repository ppa:ansible/ansible
Then, install Ansible by just running the following command:
apt-get install ansible -y
After installing Ansible, you can check the version of Ansible with the following command:
ansible --version
You should see the following output:
 ansible 2.8.2
 config file = /etc/ansible/ansible.cfg
 configured module search path = [u'/root/.ansible/plugins/modules', u'/usr/share/ansible/plugins/modules']
 ansible python module location = /usr/lib/python2.7/dist-packages/ansible
 executable location = /usr/bin/ansible
 python version = 2.7.15+ (default, Nov 27 2018, 23:36:35) [GCC 7.3.0]
First, you will need to define Ansible hosts in /etc/ansible/hosts to monitor all the hosts.
nano /etc/ansible/hosts
Add the following lines:
 [hosts]
 host1 ansible_host=192.168.0.3
Note: You can add the multiple hosts in the above file to monitor multiple hosts at a time.
Save and close the file.
Next, create a group named group_vars in /etc/ansible directory and create a files for each group you want to configure:
mkdir /etc/ansible/group_vars
nano /etc/ansible/group_vars/hosts
Add the port and user for remote hosts:
 ansible_port: 22
 ansible_user: root
Then, save and close the file, when you are finished.
Next, check all the host’s connectivity with the following command:
ansible -m ping hosts
If everything is fine, you should see the following output:
 host1 | SUCCESS => {
     "ansible_facts": {
         "discovered_interpreter_python": "/usr/bin/python"
     },
     "changed": false,
     "ping": "pong"
 }
Now, you can easily monitor all the hosts defined in the hosts group easily.
To check the disk size of Ansible hosts, run the following command:
ansible -m shell -a 'df -h' hosts
You should see the following output:
 host1 | CHANGED | rc=0 >>
 Filesystem      Size  Used Avail Use% Mounted on
 udev            1.9G  4.0K  1.9G   1% /dev
 tmpfs           384M  1.3M  383M   1% /run
 /dev/sda1        92G  6.1G   81G   7% /
 none            4.0K     0  4.0K   0% /sys/fs/cgroup
 none            5.0M     0  5.0M   0% /run/lock
 none            1.9G   70M  1.9G   4% /run/shm
 none            100M   48K  100M   1% /run/user
 /dev/sda5       184G   67G  108G  39% /home
 /dev/sda6       179G   12G  159G   7% /Data
To check the uptime of Ansible hosts with the following command:
ansible -m shell -a 'uptime' hosts
You should see the following output:
 host1 | CHANGED | rc=0 >>
 11:14:45 up  1:18,  5 users,  load average: 0.89, 1.11, 1.45
Congratulations! you have successfully installed and configured Ansible server and ansible hosts on Ubuntu 18.04 server. You can also configure Ansible to manage and monitor multiple hosts easily.
For more information, refer the Ansible official doc at https://docs.ansible.com/ansible/latest/index.html

Here is how to install LiteSpeed on CentOS 7 with cPanel. LiteSpeed is a proprietary web server software developed by LiteSpeed Technologies. It is a high-performance web server very similar to Apache and fully compatible with existing Apache configuration files. LiteSpeed is compatible with mod_rewrite, .htaccess, mod_security and most used control panel like cPanel, DirectAdmin, etc. It is specially designed high traffic websites.
In this tutorial, we will explain how to install LiteSpeed web server on a cPanel server.
To install LiteSpeed on CentOS 7 with cPanel, first log in to your server via SSH with root privileges and download the LiteSpeed plug-in installation script for cPanel with the following command:
cd /usr/src
wget http://www.litespeedtech.com/packages/cpanel/lsws_whm_plugin_install.sh
Next, run the script with the following command:
sh lsws_whm_plugin_install.sh
Once the installation has been completed, you should see the following output:
Install LiteSpeed Web Server Plugin for WHM
==============================================


mkdir: created directory ‘/usr/local/cpanel/whostmgr/docroot/cgi/lsws’
mkdir: created directory ‘/usr/local/cpanel/whostmgr/docroot/templates/lsws’


... creating directories ...
mkdir: created directory ‘/usr/src/lsws_whm’
  Temp directory created
... downloading latest version of the plugin ...
--2019-07-13 03:52:29--  http://www.litespeedtech.com/packages/cpanel/lsws_whm_plugin.tar.gz
Resolving www.litespeedtech.com (www.litespeedtech.com)... 52.55.120.73
Connecting to www.litespeedtech.com (www.litespeedtech.com)|52.55.120.73|:80... connected.
HTTP request sent, awaiting response... 200 OK
Length: 665512 (650K) [application/gzip]
Saving to: ‘/usr/src/lsws_whm/lsws_whm_plugin.tar.gz’


100%[=====================================================================================================>] 6,65,512     460KB/s   in 1.4s


2019-07-13 03:52:31 (460 KB/s) - ‘/usr/src/lsws_whm/lsws_whm_plugin.tar.gz’ saved [665512/665512]

Done downloading.

... extracting ...

... moving files ...
... setting permission to files ...
   LiteSpeed is not installed, skip hook operation
Register LSWS Plugin ...
mkdir: created directory ‘/var/cpanel/apps’
  apps registration directory created
lsws registered
updated EA3 to EA4 migration scripts under /var/cpanel/ea4_migration_hooks

LiteSpeed WHM Plugin Installed Successfully.
==============================================
Next, remove the installation script with the following command:
rm -f lsws_whm_plugin_install.sh
LiteSpeed plug-in for cPanel is now installed. Next, Log in to WHM Control Panel and navigate to Plugins. You should see the following page:
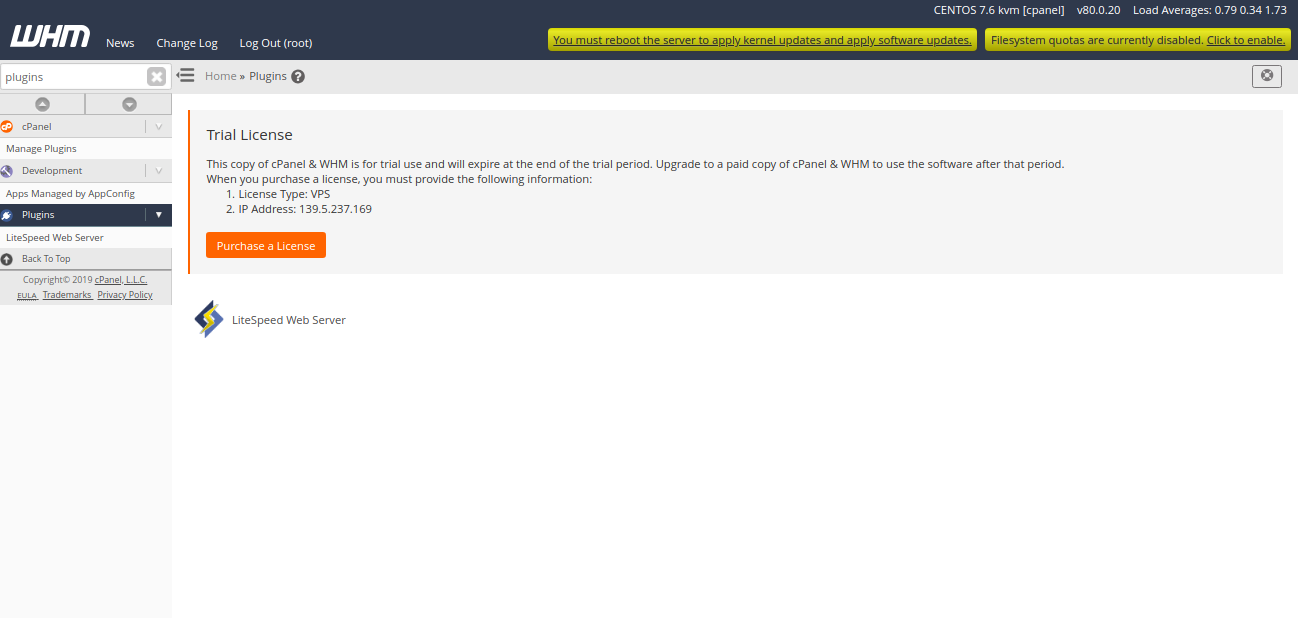
Next, click on the LiteSpeedWebServer, you should see the following page:
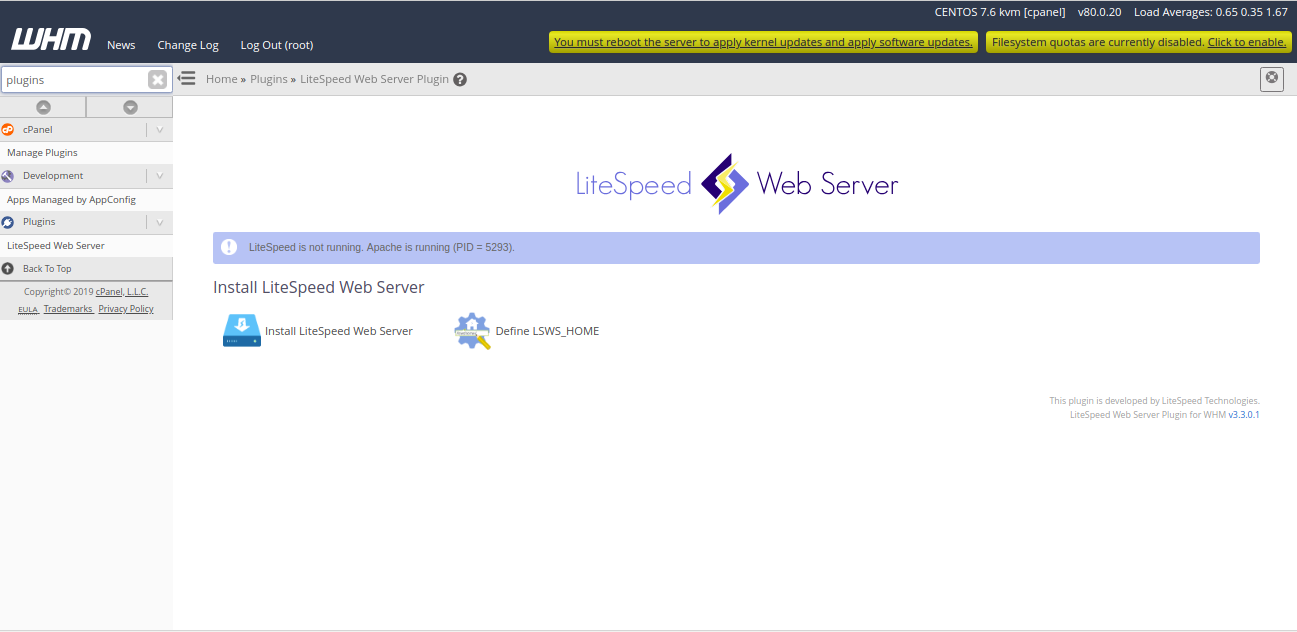
Next, click on “Install LiteSpeed Web Server“. You should see the following page:
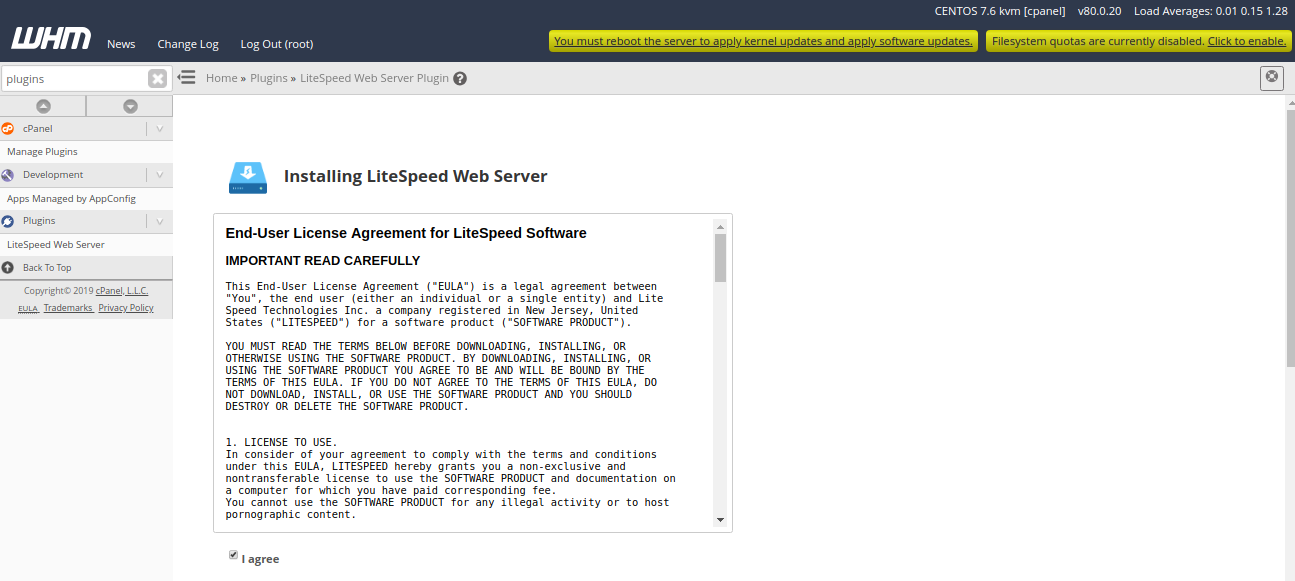
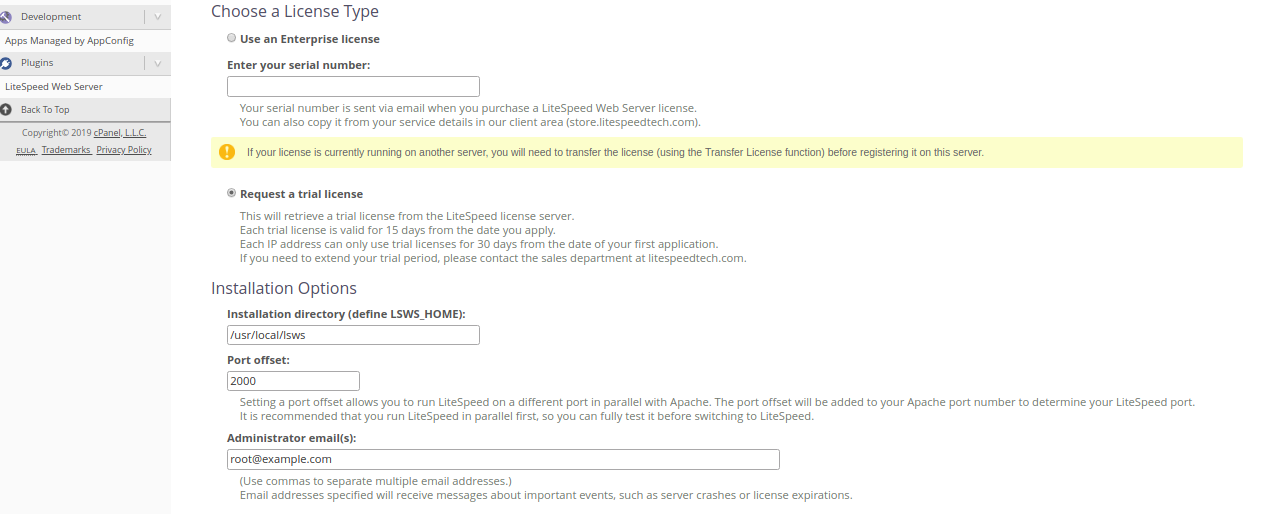
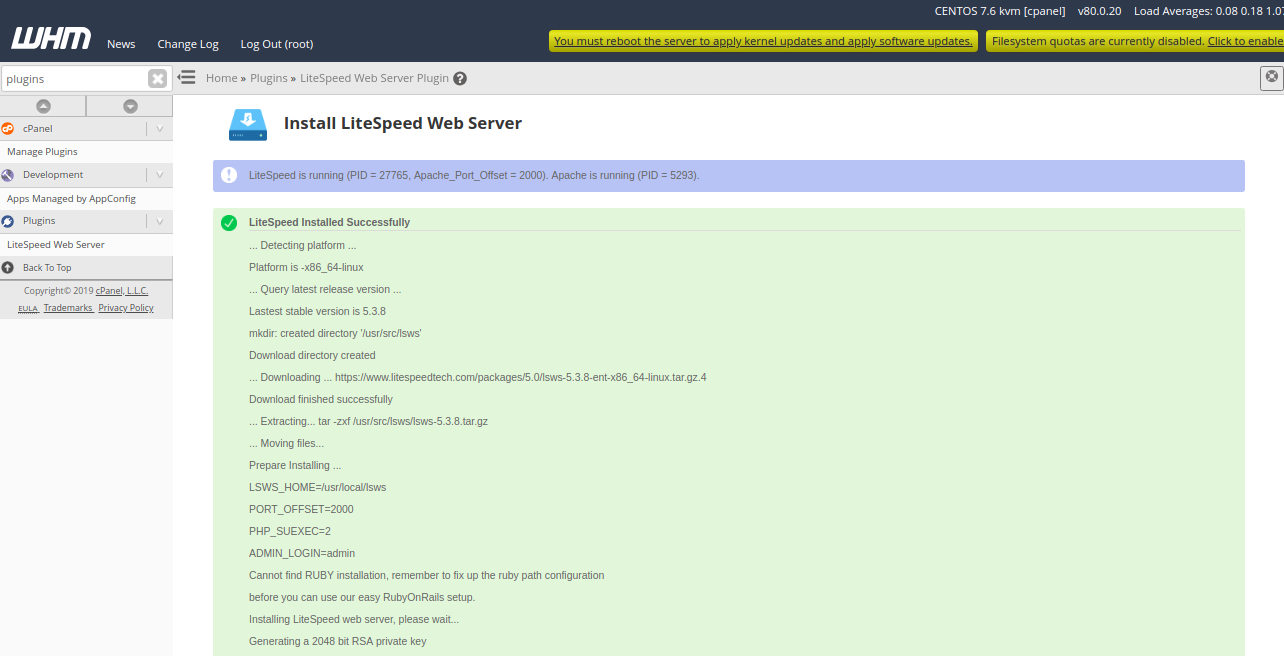
Next, accept the Licence Agreement, Select “Request a trial license”, Provide port offset (Set 0 to replace Apache, set 2000 to set LiteSpeed on port 2080), Provide user name and password for WebAdmin console. Then, click on the Install button. Once the installation has been completed, you should see the following page:
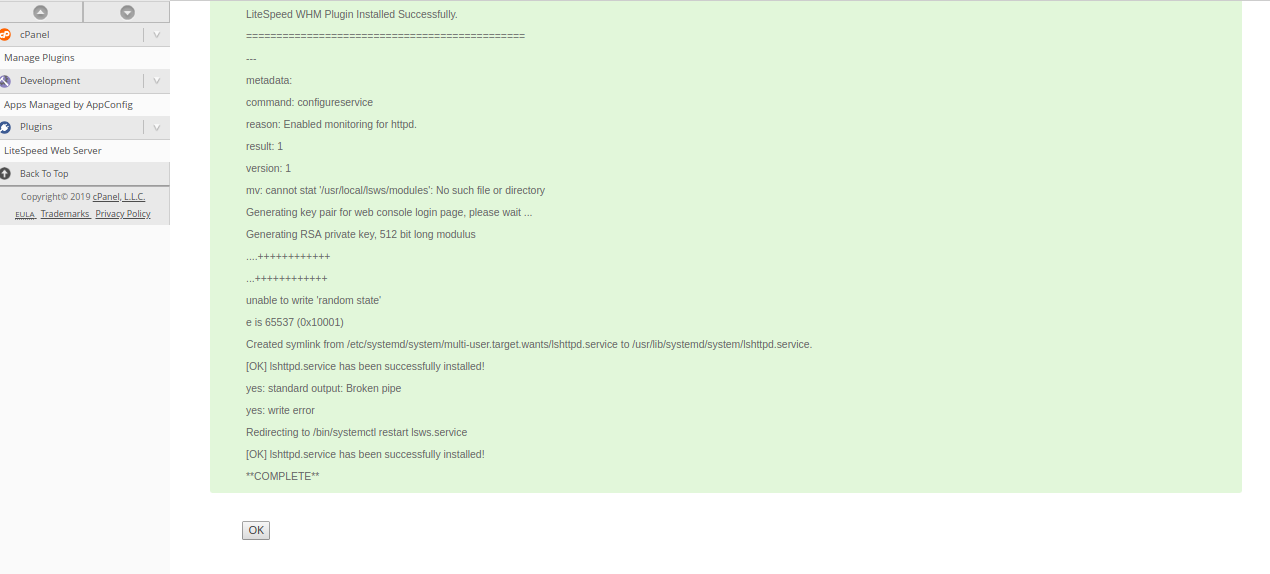
Next, click on the OK button. You should see the following page:
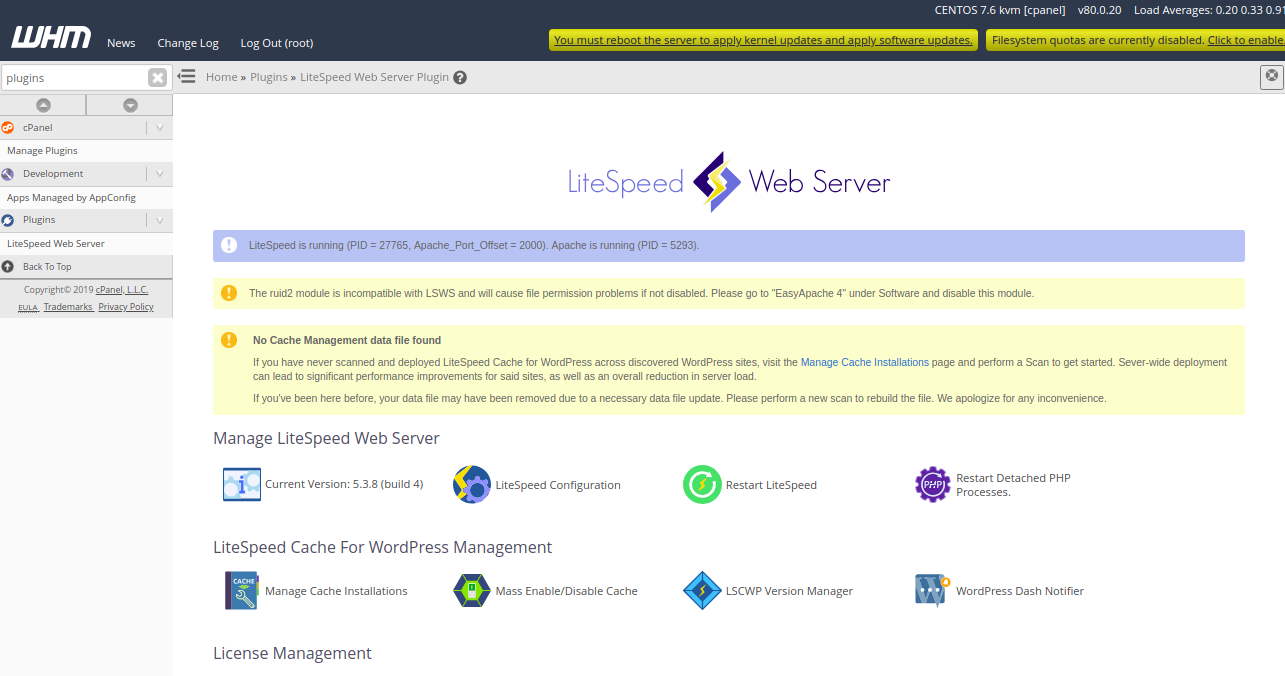
In the above page, you should see some warning. To remove them, first uninstall ruid2 module with the following command on your terminal:
yum remove ea-apache24-mod_ruid2
Next, from the WHM / cPanel dashboard, click on the “Manage Cache Installations” to generate cache management data. You should see the following page:
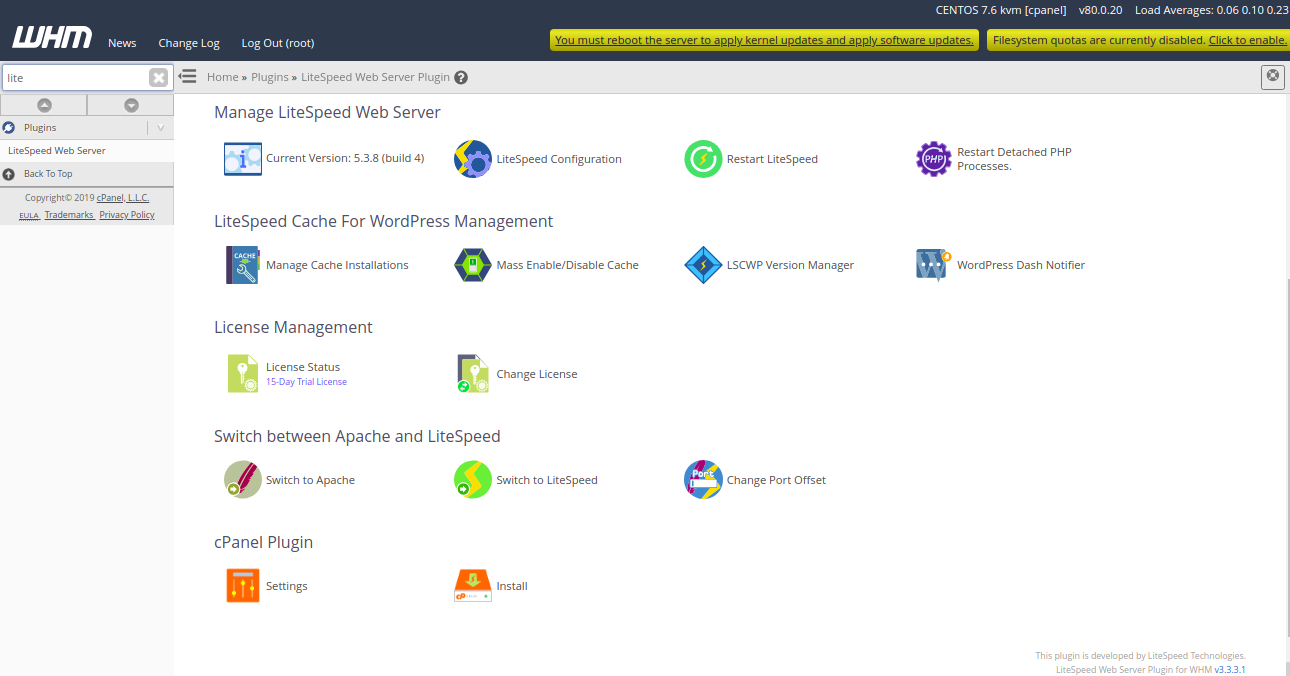
Next, click on the “Switch to LiteSpeed” button to replace Apache with LiteSpeed Web Server. You should see the following page:
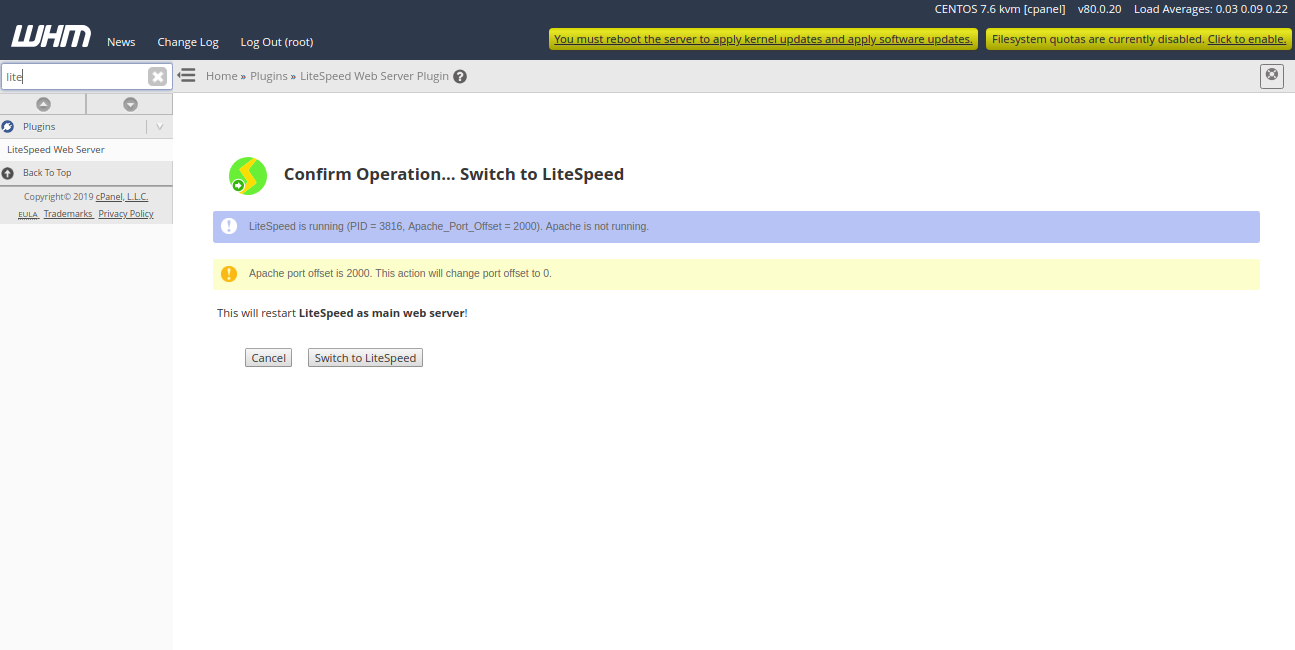
Now, click on the “Switch to LiteSpeed” to restart LiteSpeed as a main web server. You should see the following page:
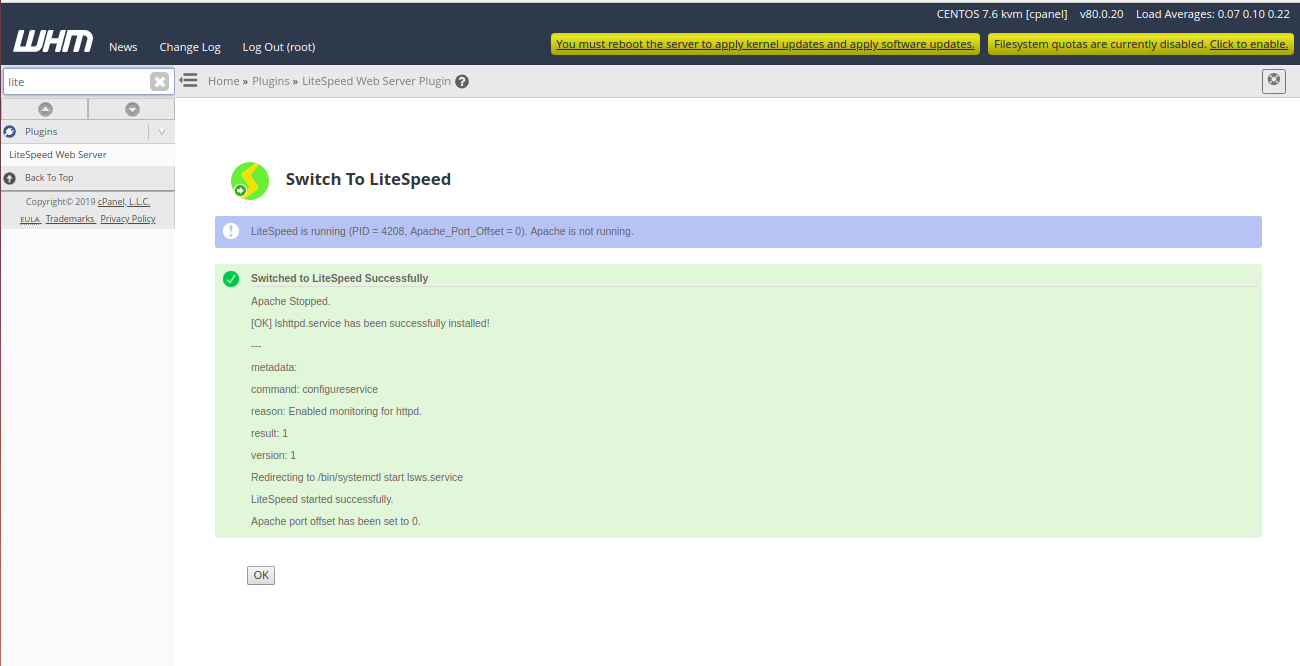
Now, click on the OK button to finish the installation.
Open your terminal and check the status of LiteSpeed service with the following command:
systemctl status lshttpd
If everything is fine, you should see the following output:
 lshttpd.service - LiteSpeed HTTP Server
   Loaded: loaded (/usr/lib/systemd/system/lshttpd.service; enabled; vendor preset: disabled)
   Active: active (running) since Sat 2019-07-13 03:10:00 EDT; 52min ago
 Main PID: 5293 (httpd)
   CGroup: /system.slice/httpd.service
           ├─5293 /usr/sbin/httpd -k start
           ├─5295 /usr/local/cpanel/bin/splitlogs --dir=/etc/apache2/logs/domlogs --main=cpanel.example.com --suffix=-bytes_log
           ├─5296 /usr/local/cpanel/bin/splitlogs --dir=/etc/apache2/logs/domlogs --main=cpanel.example.com --mainout=/etc/apache2/logs/acce...
           ├─5298 /usr/local/cpanel/3rdparty/bin/perl /usr/local/cpanel/bin/leechprotect
           ├─5300 /usr/sbin/httpd -k start
           ├─5301 /usr/sbin/httpd -k start
           ├─5302 /usr/sbin/httpd -k start
           ├─5303 /usr/sbin/httpd -k start
           ├─5304 /usr/sbin/httpd -k start
           └─5449 /usr/sbin/httpd -k start


Jul 13 04:01:07 cpanel.example.com systemd[1]: Starting LiteSpeed HTTP Server...
Jul 13 04:01:08 cpanel.example.com lswsctrl[27749]: 2019-07-13 04:01:08.410168 [NOTICE] Memory size is: 1014968KB.
Jul 13 04:01:09 cpanel.example.com lswsctrl[27749]: 2019-07-13 04:01:09.460561 [NOTICE] [OK] Updated license key has been created at ...al.key.
Jul 13 04:01:09 cpanel.example.com lswsctrl[27749]: [OK] litespeed: pid=27765.
Jul 13 04:01:11 cpanel.example.com systemd[1]: Started LiteSpeed HTTP Server.
Hint: Some lines were ellipsized, use -l to show in full.
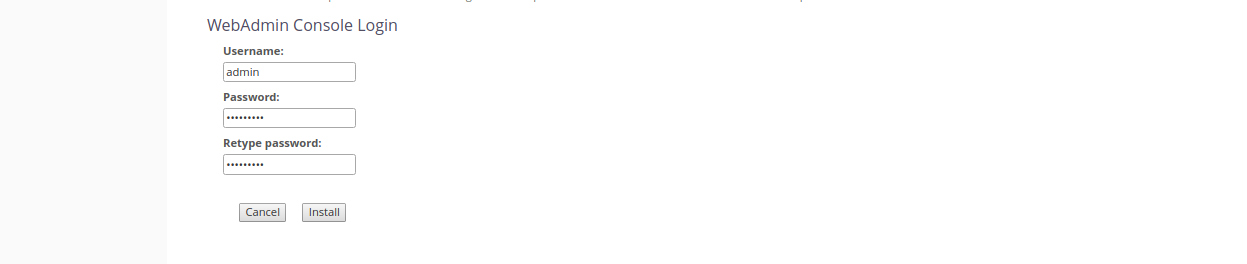
Now, open your web browser and type the URL https://your-server-ip:7080. You will be redirected to the LiteSpeed WebAdmin log in page:
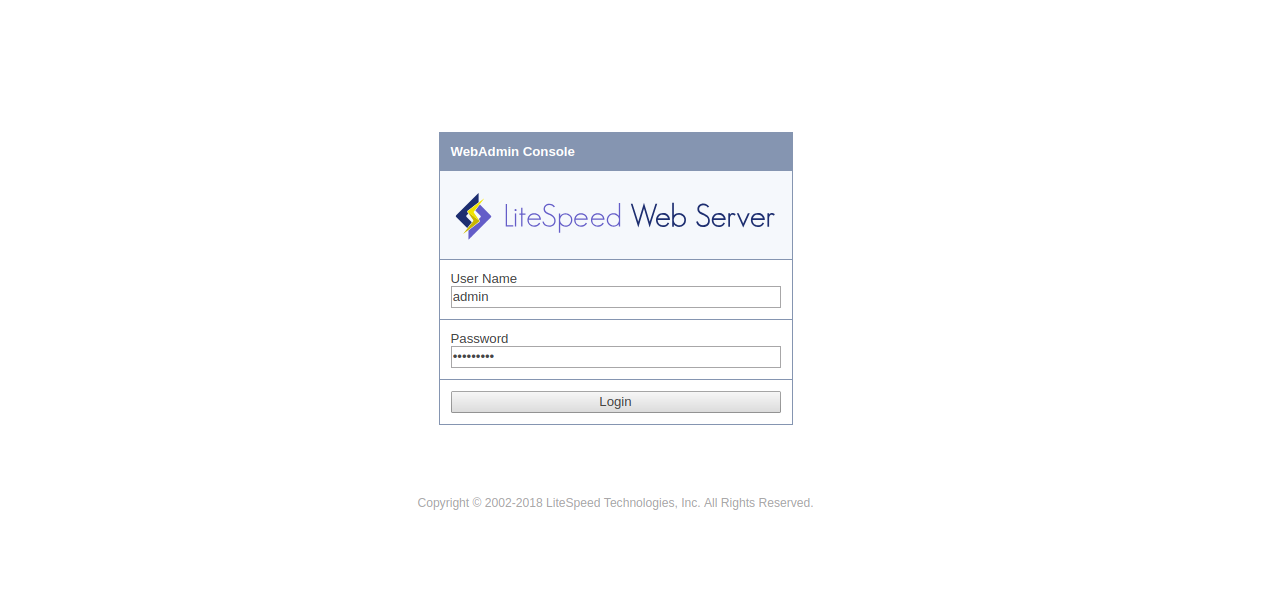
Provide your WebAdmin username and password, then click on the Login button. You should see the following page:
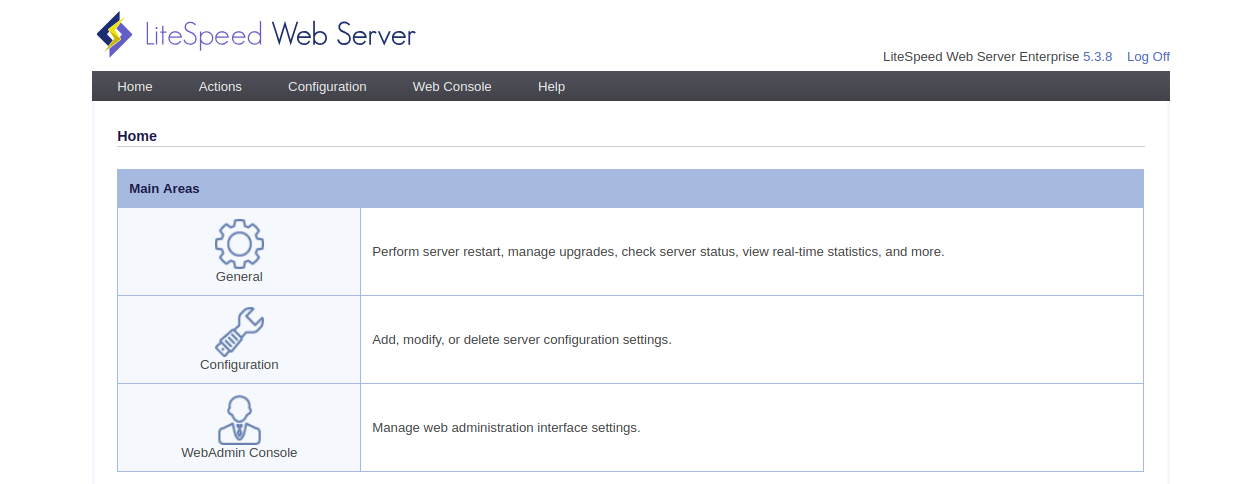
Congratulations! you have successfully installed and configured LiteSpeed on cPanel server. You can now easily create and manage websites from WebAdmin web interface. For more information, you can visit the LiteSpeed official doc at https://www.litespeedtech.com/docs.
Debian is an operating system similar to Unix-based systems, which is open source and maintained by multiple active users. However, when major changes are made to the source code and a new, stable release comes out, it’s provided a codename. The previous stable release, Debian 8, was named Jessie, while the newest stable release of Debian 9 is named Stretch. Each major update typically provides new package availability, changes to software, and other necessary updates. Additionally, Debian receives stable updates every two years, and each stable release typically receives support for three years.

Before we can proceed with upgrading to Debian 9, Stretch, the current stable release, you will need a node hosting a Linux Debian 8, Jessie, instance. The node you choose should be hosted on a cloud server or dedicated server, whichever you prefer.
Before proceeding with the installation, there’s one major change from Debian 8 to Debian 9. In Debian 9, MariaDB is replacing MySQL, which was the default. With this new release, MariaDB is now the default SQL-based system, and previously existing instances of MySQL will be replaced by the equivalent MariaDB instance.
Additionally, when the upgrade is complete, you will need to confirm the functionality of any third party applications. Changes to a release can render some services non-functional due to compatibility issues.
The first step in this update is to make sure your system is making sure your current node is completely upgraded, any relevant and necessary updates installed, and then freshly rebooted:
apt-get update

apt-get upgrade

apt-get dist-upgrade
Before continuing, it’s vital that an update of your Debian 8 machine or virtual machine is created. Once the upgrade has completed, it will not be possible to revert from Debian 9 to Debian 8.
After creating your backup, check the database for consistency, making sure there is no hold on the system package. A packaged hold cannot be upgraded, which will lead to system instability or a failure to boot:
dpkg -C

apt-mark showhold
Once confirming the system package is available, the package repository should be backed up and then updated:
cp /etc/apt/sources.list /etc/apt/sources.list_backup
Now let’s update your package repository from the previous stable release to the newest stable release:
sed -i 's/jessie/stretch/g' /etc/apt/sources.list
After pulling the newest stable release repository, it’s time to update your existing package with the new release repository:
apt-get update
It’s time to run your upgrade. When you run this upgrade, the system will prompt you, asking if you would like to restart the service automatically:
apt-get upgrade

apt-get dist-upgrade
Once complete, it’s time to reboot your system:
reboot
Onto your last step! Access your system information and confirm that the most recent, stable release is installed:
cat /etc/*release
Congratulations! You’ve successfully updated your cloud server or dedicated server node to the recent, stable Debian release, Debian 9. During this process, you’ve updated packages, made a backup just in case, and replaced your previous stable release, Jessie, with Stretch. If you found this guide helpful, please share it with other users working through the same process.
 Exim is a popular mail transfer agent (MTA) originally designed for use at the University of Cambridge to replace the existing mail systems in place. Although based on an older MTA design, Exim has since grown and splintered off into a unique concept; Exim aims at being flexible and working with a variety of Unix-like systems.
Exim has become exceptionally popular due to the straightforward setup configuration as well as its’ ability to manage multiple tasks simultaneously. Exim releases occur frequently and are listed on the Exim homepage, which encourages users to update to the newest version when possible.
Before you can get started installing your new Exim mail server on Ubuntu 17.04, you will need to confirm you have one node available, a Cloud Server or Dedicated Server; this server should have Ubuntu 17.04 installed.
You will also need to have Secure Shell (SSH) root access for your server after it’s running Ubuntu 17.04. If you are not familiar, SSH is a type of network protocol used when services are performed over an unsecured network. Using SSH, you can engage in these activities knowing they are being performed securely even over an unsecured connection.
Installing the Mail Server
Now that you’ve acquired your cloud server or dedicated server node, installed Ubuntu 17.04, and confirmed SSH root access to your node, we can begin setting up your Exim mail server.
Our first step is to confirm that your server is running the most recent software version and any repositories are up to date:
apt-get update && apt-get upgrade -y
After confirming your server is running current software, we can proceed with installing the mail server from Exim:
apt-get install exim4 -y
Once the installation has completed, it’s time to start configuring the Exim server using the following commands:
dpkg-reconfigure exim4-config
During the configuration process, the following answers should be used when you are prompted:
1- General type of mail configuration: Internet site; mail is sent and received directly using SMTP

2- System mail name: (please enter your server DNS hostname name)

3- IP-addresses to lsiten on for incoming SMTP connections: 127.0.0.1 ; ::1 (validate with ENTER)

4- Other destinations for which mail is accepted: [EMPTY]

5- Domains to relay mail for: [EMPTY]

6- Machines to relay mail for: [EMPTY]

7- Keep number of DNS-queries minimal (Dial-on-Demand)?:

8- Delivery method for local mail: mbox format in /var/mail/

9- Split configuration into small files?:
When the configuration process completes, it’s time to check that Exim is running correctly and the installation was successful:
systemctl status exim4
After confirming that Exim was installed successfully, make sure to force the startup of the Exim service whenever your system boots:
systemctl enable exim4
Congratulations! You’ve installed your Exim mail server on Ubuntu 17.04, enjoy!
You’ve successfully gone through the process of installing your own Exim server on a dedicated node running Ubuntu 17.04. You can now move your Exim server into production and begin using your new mail server. If you were able to follow this guide and found it useful, please share it with other users that may be searching for a simple guide on setting up an Exim server.
Exim was designed as a mail transfer agent (MTA) that was going to replace the preexisting system from the University of Cambridge. While Exim was based on the older MTA system, it has since grown into a unique, functional system; Exim has become popular due to the flexibility and compatibility with Unix-like operating systems.
The straightforward setup that comes with Exim allows users to complete setup easily, even without an in-depth knowledge of MTA systems. Additionally, Exim can handle a lot of tasks concurrently, and it is frequently updated with bug fixes and system updates.
Before we start installing your Exim mail server, we need to confirm you have a node available. This node can be on Cloud Server or a Dedicated Server, and it needs to have Ubuntu 14.04 LTS installed.
You also need to confirm you’ve set up Secure Shell (SSH) root access for your server, which you’ll complete after setting it up to run Ubuntu 14.04 LTS. If you’re not familiar, SSH is a network protocol that’s used when you need to execute secure services over an unsecured connection. By using SSH root access, you can engage in activities even if your connection is not secure.
Installing the Mail Server
Now that you have confirmed your node is available, Ubuntu 14.04 LTS is installed, and you have SSH root access on your node, it’s time to install Exim.
The first thing to do during this installation is to confirm your server is running the most recent, updated software version and that any repositories that need to be brought up to date are updated:
apt-get update && apt-get upgrade -y
After you’ve verified that your server is up to date, you can proceed with the installation of the Exim mail server :
apt-get install exim4 -y
The server will reach a point where it prompts you that the installation is complete, which means you can begin configuring your new Exim mail server. Follow the command below to start configuration:
dpkg-reconfigure exim4-config
During the configuration process, you will be asked a series of questions to guide you through the process. The answers listed below should be used to complete your configuration:
1- General type of mail configuration: Internet site; mail is sent and received directly using SMTP

2- System mail name: (please enter your server DNS hostname name)

3- IP-addresses to lsiten on for incoming SMTP connections: 127.0.0.1 ; ::1 (validate with ENTER)

4- Other destinations for which mail is accepted: [EMPTY]

5- Domains to relay mail for: [EMPTY]

6- Machines to relay mail for: [EMPTY]

7- Keep number of DNS-queries minimal (Dial-on-Demand)?:

8- Delivery method for local mail: mbox format in /var/mail/

9- Split configuration into small files?:

10- Root and postmaster mail recipient: [EMPTY]
Now that you’ve completed the configuration of your server, we can check that your new Exim mail server is running correctly:
systemctl exim4 status
Congratulations! You’ve completed all the steps necessary to install an Exim mail server on your dedicated node running Ubuntu 14.04 LTS!
You’ve completed the steps necessary to install Exim on your server running Ubuntu 14.04 LTS. Now that you’re completed the process, your Exim mail server is ready to move into production. If you found this guide useful and it helped you complete the setup of your new mail server, please share it with others that are searching for guidance on setting up an Exim server.
MySQL is a database management system that runs on multiple platforms, including Windows, Unix-based, and Linux platforms. MySQL is often used for web-based applications, online publishing, and some web development platforms.
Ubuntu is an open source operating system based on Linux and is a popular operating system choice for personal computers and mobile devices. Ubuntu is also a popular choice for running physical or virtual servers and is currently one of the most popular choices for running cloud hosting environments.
In order to follow this guide you will need to have the following in place:
• One node (Cloud Server or Dedicated Server) that has Ubuntu 14.04 LTS installed.
• SSH Root Access to your server
Before you can begin installing MySQL on Ubuntu 17.04, you need to have one node, a cloud server or a dedicated server, with Ubuntu 17.04 currently installed.
Additionally, Secure Shell (SSH) root access to your server running Ubuntu 17.04 is recommended. SSH, if you’re unaware, is a network protocol used when network services are being executed over an unsecured network; SSH allows for secure execution.
Installing MySQL
Now that your node is established, Ubuntu is installed, and you have SSH root access to your server, you want to verify that your server is up to date and current repositories are installed:
apt-get update && apt-get upgrade -y
Once you have confirmed the server is currently running the most recent version, you can begin the process to install MySQL. While the primary installation package is necessary, other packages may be optional and should be installed if necessary:
apt-get install mysql-server mysql-client -y
While you are installing MySQL packages, you will be prompted to select a new root password. That password will then be used to sign in to your MySQL as a super user. It’s recommended that you select a strong password, write it down if necessary, and keep it secured.
After the installation of MySQL is complete, you may need to secure your new MySQL. There is a script you may utilize from your command line to secure MySQL:
mysql_secure_installation
During this process, the script will prompt you for answers to several questions. You will not need to change your root password, but you may want to remove anonymous users and disable remote login, depending on your needs. You may follow the answers indicated below for an easy setup:
Enter password for user root: ENTER ROOT PASSWORD

Press y|Y for Yes, any other key for No: n

Change the password for root ? n

Remove anonymous users? y

Disallow root login remotely? y

Remove test database and access to it? y

Reload privilege tables now? y
Finally, you’ve completed the setup of your MySQL on Ubuntu 17.04. You are now able to log in using the root account and the password you setup earlier, entering them into the command line. Use the following command to log in:
mysql -u root -p
After entering the root username and password you created, you will be signed into the MySQL command line client.
Congratulations! Enjoy your new MySQL setup on your server running Ubuntu 17.04.
Conclusion
You’ve successfully completed the steps necessary to install MySQL on either a cloud or dedicated server that’s running Ubuntu 17.04. Your MySQL is ready to be placed into production. If you found this setup guide helpful, please share it with others that are looking to setup their own MySQL.

Minecraft servers are designed for cooperative play with other players online or through a local area network (LAN) connection. These servers can run on your hosted server, local dedicated hardware server, local gaming computer, or virtual private server hosted on a personal machine.
Each Minecraft server requires default software provided by Mojang, which functions on Windows, Mac OS X, or Unix-based systems. Additionally, Mojang offers different server options, including LAN servers, external server clients, a rented server, and different realms that may vary.
In order to follow this guide you will need to have the following in place:
• One node (Cloud Server or Dedicated Server) that has Ubuntu 14.04 LTS installed.
• SSH Root Access to your server
Server Configuration
To begin, you need to verify that your server is currently up to date:
apt-get update && apt-get upgrade -y
After confirming that your server is current, checking that the most recent version of Java has been installed is next:
java -version
If it’s confirmed that the latest version of Java is not installed, you may receive a warning stating “The program ‘Java’ can be found in the following packages.” If this is the case, you will need to install Java through the following command (confirming with the Enter/Return key when prompted):
add-apt-repository ppa:openjdk-r/ppa

apt-get update

apt-get install openjdk-8-jdk -y
During setup, you will also need to install a screen package that will allow your server to continue operating, regardless of your ssh connection status:
apt-get install screen -y
Installing Minecraft
To begin, you will establish a folder in your /home path:
mkdir /home/minecraft ; cd /home/minecraft
Following that, you will download the current version of the server software from Mojang:
wget -O minecraft_server.jar https://s3.amazonaws.com/Minecraft.Download/versions/1.12.1/minecraft_server.1.12.1.jar
Once the download has finished, you can start the server running as a daemon:
screen -S "Minecraft"
At this point, you have almost completed setting up your server for Minecraft, but you will need to accept and verify that the End User License Agreement (EULA) has been accepted as true. We encourage you to read through the EULA entirely before accepting it.
After you’ve read through the EULA, you will want to create a text file, called eula.txt, to set it as true:
touch eula.txt

echo "eula=TRUE" > eula.txt
Now that you have finished reading the EULA and accepted it, you can start your new server:
java -Xmx1024M -Xms1024M -jar minecraft_server.jar nogui
As your server starts, you will observe the following in your console window:
root@globotech-minecraftserver-ubuntu14:/home/minecraft# java -Xmx1024M -Xms1024M -jar minecraft_server.jar nogui

[15:12:05] [Server thread/INFO]: Starting minecraft server version 1.12.1

[15:12:05] [Server thread/INFO]: Loading properties

[15:12:05] [Server thread/WARN]: server.properties does not exist

[15:12:05] [Server thread/INFO]: Generating new properties file

[15:12:05] [Server thread/INFO]: Default game type: SURVIVAL

[15:12:05] [Server thread/INFO]: Generating keypair

[15:12:06] [Server thread/INFO]: Starting Minecraft server on *:25565

[15:12:06] [Server thread/INFO]: Using epoll channel type

[15:12:06] [Server thread/INFO]: Preparing level "world"

[15:12:06] [Server thread/INFO]: Loaded 488 advancements

[15:12:07] [Server thread/INFO]: Preparing start region for level 0

[15:12:08] [Server thread/INFO]: Preparing spawn area: 7%

[15:12:09] [Server thread/INFO]: Preparing spawn area: 14%

[15:12:10] [Server thread/INFO]: Preparing spawn area: 23%

[15:12:11] [Server thread/INFO]: Preparing spawn area: 31%

[15:12:12] [Server thread/INFO]: Preparing spawn area: 37%

[15:12:13] [Server thread/INFO]: Preparing spawn area: 46%

[15:12:14] [Server thread/INFO]: Preparing spawn area: 54%

[15:12:15] [Server thread/INFO]: Preparing spawn area: 63%

[15:12:16] [Server thread/INFO]: Preparing spawn area: 73%

[15:12:17] [Server thread/INFO]: Preparing spawn area: 84%

[15:12:18] [Server thread/INFO]: Preparing spawn area: 94%

[15:12:19] [Server thread/INFO]: Done (12.866s)! For help, type "help" or "?"
Congratulations! You’ve finished setting up your new Minecraft gaming server on Ubuntu 14.04, and you can exit the screen by hitting CTRL + a + d. If you choose to reattach the screen, you can do so in the following manner:
screen -R
If necessary, you can edit your server’s configuration through the following path:
nano /home/minecraft/server.properties
Your Minecraft server setup is complete, and you’re ready to begin utilizing the server for LAN or online gameplay in cooperative mode. If you found this setup guide useful, please share it with others looking to setup their game server.

Ark: Survival of the Fittest is a popular action game that features survival-themed crafting, combat, and most notably, the ability to tame and ride dinosaurs. Ark: Survival of the Fittest is a special game mode with fast-paced rounds in which the last player standing wins.
Ark: Survival of the Fittest must be played using specific servers. This guide will walk you through the steps of setting up this server on CentOS 7.
Here’s what you’ll need in order to install the Ark: Survival of the Fittest server:
• 1 server (Cloud Server or Dedicated Server) running a fresh installation of CentOS 7.
• Root access to the server
• For basic support of up to 10 players, 2 vCores and 6GB of RAM or the equivalent will be needed.
The very first step is to update your system. This is also the time to install the basic dependencies.
yum update -y

yum install nano wget tar glibc.i686 libgcc.i686 libstdc++.i686 -y
Create an user specifically to access the Steam related content you’ll need for installation. It’s unsafe to use the root user for this purpose.
adduser -s /usr/sbin/nologin steam
Let’s make some quick preparations to your system before installation. First, for the purposes of the server, you’ll need to increase the amount of simultaneous system files that can be opened by altering sysctl.conf.
echo "fs.file-max=100000" >> /etc/sysctl.conf

sysctl -p
Then, alter the system limits configuration file with the following:
echo "*               soft    nofile          1000000" >> /etc/security/limits.conf

echo "*               hard    nofile          1000000" >> /etc/security/limits.conf
Finally, enable the PAM limits module on the system to prepare it for use as a multiuser server.
echo "session required pam_limits.so" >> /etc/pam.d/system-auth
Now you can proceed with the installation of the Ark: Survival Evolved server.
cd /home/steam

/home/steam# su -s /bin/bash steam

wget https://steamcdn-a.akamaihd.net/client/installer/steamcmd_linux.tar.gz

tar -zxvf steamcmd_linux.tar.gz

rm steamcmd_linux.tar.gz

./steamcmd.sh
After entering the Steam command line interface, type this command to install the game server.
login anonymous

force_install_dir ./arkserver

app_update 445400 validate
You will have to wait while the server software downloads. This can take a variable amount of time depending on your connection, but you are done once you see the following.
Update state (0x61) downloading, progress: 99.95 (3222988684 / 3224465090)

Success! App '445400' fully installed.
Now that the server is installed, exit the command line interface with quit.
Switch over to the root user so you can set up the server configuration.
In order for the Ark server to automatically start on boot, you can create an init script. This is what you will name it:
nano /etc/systemd/system/arkserver.service
And now, simply add the following content to the file: (Make sure that the ExecStart line corresponds to what you had in the previous file)
[Unit]
Description=ARK Survival Server
[Service]
Type=simple
User=steam
Group=steam
Restart=on-failure
RestartSec=5
StartLimitInterval=60s
StartLimitBurst=3
ExecStart=/home/steam/arkserver/ShooterGame/Binaries/Linux/ShooterGameServer TheIsland?listen?SessionName=
ExecStop=killall -TERM srcds_linux
[Install]
WantedBy=multi-user.target
Now start the Ark server, and enable it to start on boot.
systemctl --system daemon-reload

systemctl start arkserver.service

systemctl enable arkserver.service
Use systemctl to verify that the server is actually running. Here’s the command you should use, and an example of expected output:
service arkserver status
? arkserver.service - ARK Survival Server

   Loaded: loaded (/etc/systemd/system/arkserver.service; disabled; vendor preset: disabled)

   Active: active (running) since Fri 2016-08-12 23:57:27 UTC; 3s ago

 Main PID: 27027 (ShooterGameServ)

   CGroup: /system.slice/arkserver.service

           ??27027 /home/steam/arkserver/ShooterGame/Binaries/Linux/ShooterGameServer TheIsland?listen?SessionName..
Adjust the firewall rules from the default settings. (If you have already altered the firewall in some way, you may need to make further adjustments.) You’ll have to open up these ports to allow traffic to flow to and from the Ark server:
firewall-cmd --add-port=27015/udp

firewall-cmd --add-port=7777/udp

firewall-cmd --add-port=32330/tcp
This is what each port is for:
• UDP 27015: Query port for Steam’s server browser
• UDP 7777: Game client port
• TCP 32330: RCON for remote console server access (optional)
Here’s an equivalent command you can use with iptables, if you prefer:
iptables -A INPUT -p udp -m udp --sport 27015 --dport 1025:65355 -j ACCEPT

iptables -A INPUT -p udp -m udp --sport 7777 --dport 1025:65355 -j ACCEPT

iptables -A INPUT -p tcp -m tcp --sport 32330 --dport 1025:65355 -j ACCEPT
Installation is now complete. If you’ve set it up properly, you should now be able to host games of Ark: Survival of the Fittest for up to 10 players. Add more vCores and RAM to enable even more players to join your server.