 Call us at 1-888-GTCOMM1
-

- Dedicated Hosting
- Cloud hosting
- Services
- Support
- Learning Center
- Referral Program
- Français
-
Why globotech
- Log in
Two-factor authentication (2FA) is an extra layer of security for your Globo.Tech Customer Portal access. By configuring 2FA, you ensure that you’re the only person who can access your account, as its stack-up with your password.
GloboTech Communications Customer Portal allow you to manage your resources, such as your Dedicated Servers, VPS Cloud Servers, RDNS, Credit Card details and so on. Theses are all good reason why you have to use 2FA.
With two-factor authentication, your account can only be accessed by entering the Google Authenticator code generated every 30 seconds. When you want to sign in, you’ll need to provide two information; your password and the six-digit verification code.
Because not only your password, but also the six-digit verification code is required at each sign-in, 2FA dramatically improves the security of your Globo.Tech Customer Portal access and all the personal information stored into your account.
Enabling the Two-Factor Authentication trough your customer portal is very easy. Let’s start!
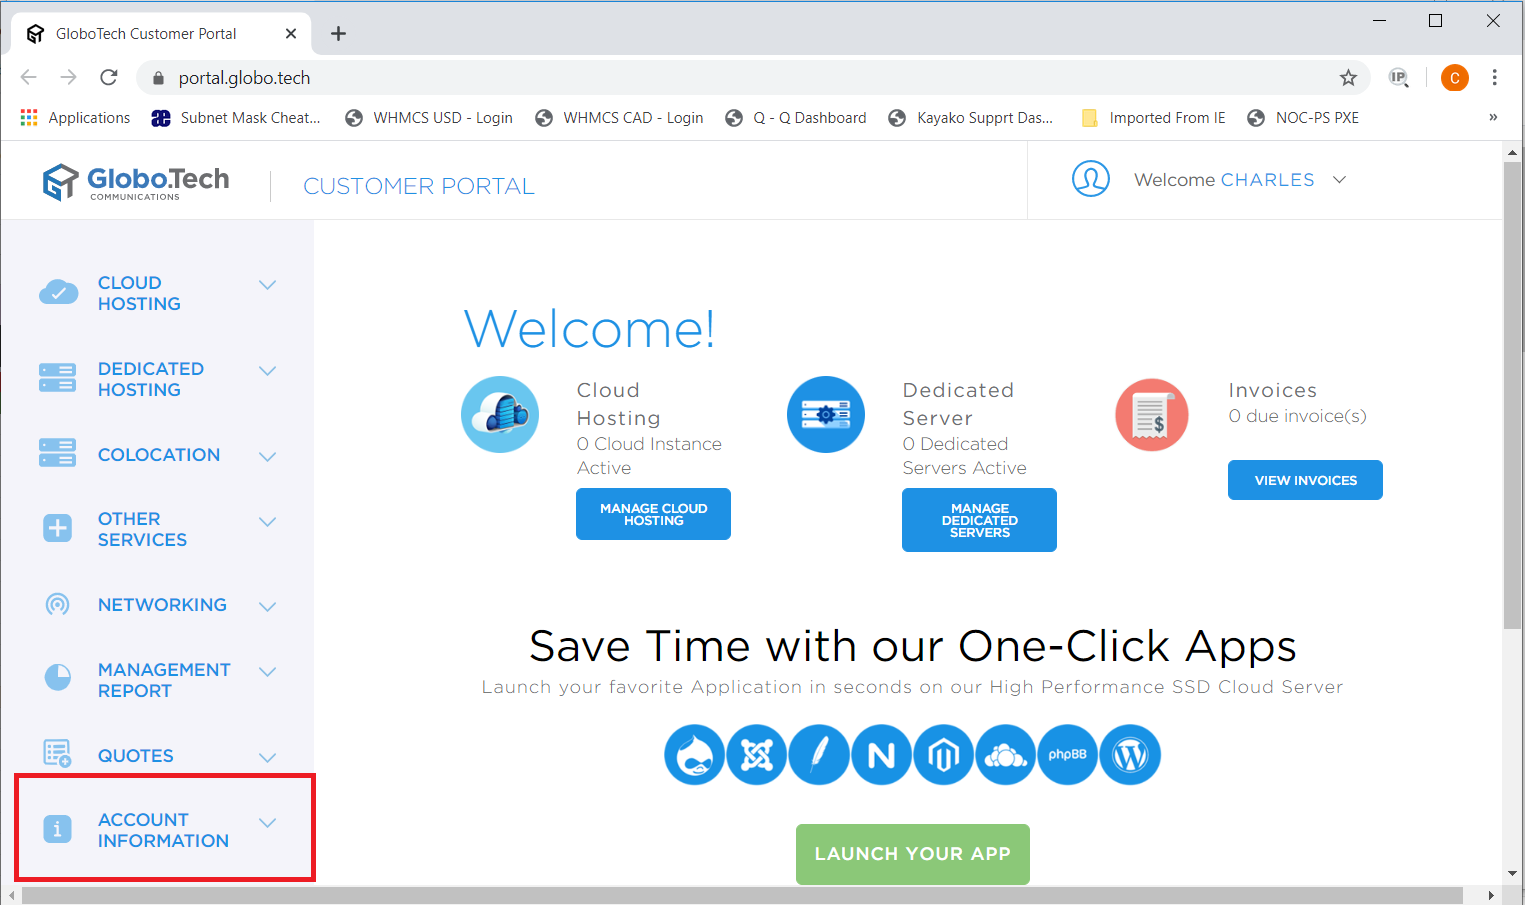
Step 1 – To enable 2FA, first log to your Customer Portal.
Step 2 – After you logged to your Customer Portal, click on Account information.
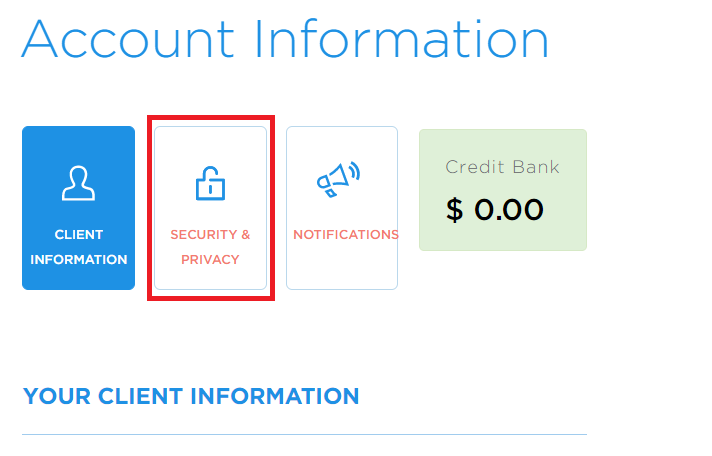
Step 3 – Then, you must click on Security & Privacy button.
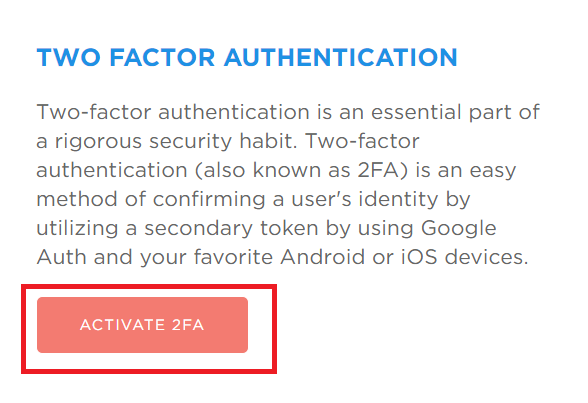
Step 4 – On the next page, you will see the following. You must click on “Activate 2FA“.
Step 5 – Now it’s time to scan the QR code with your phone. You will need to use Google Authenticator to do so. Once scanned, you will need to enter a six-digit verification code and then click on “Confirm 2FA code“.
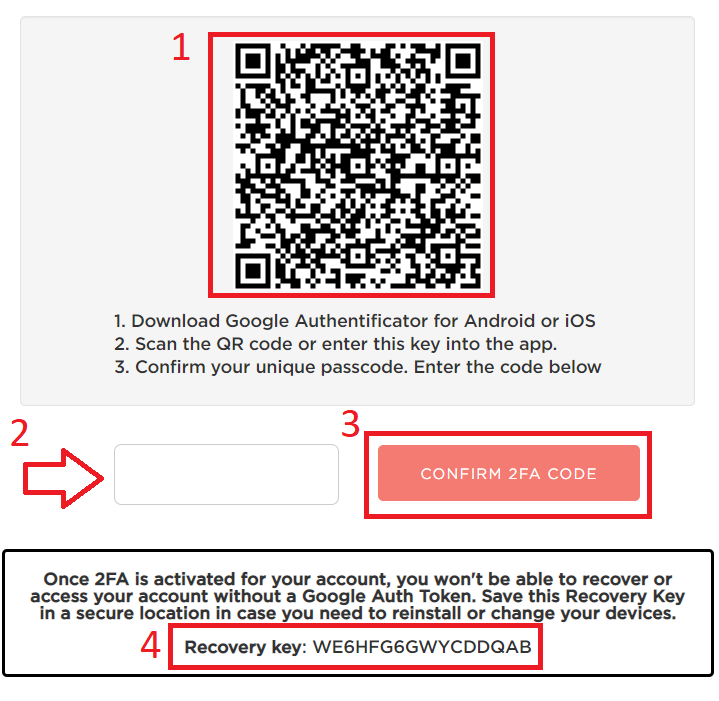
Step 5.1 – Upon activating your 2FA please make sure to keep the recovery key in a safe place. If you fail to do so and lose your phone or can’t open it anymore you won’t be able to regenerate your 2FA keys. Your access will therefore be lost and a manual reset of the 2FA on your account will have to be performed.
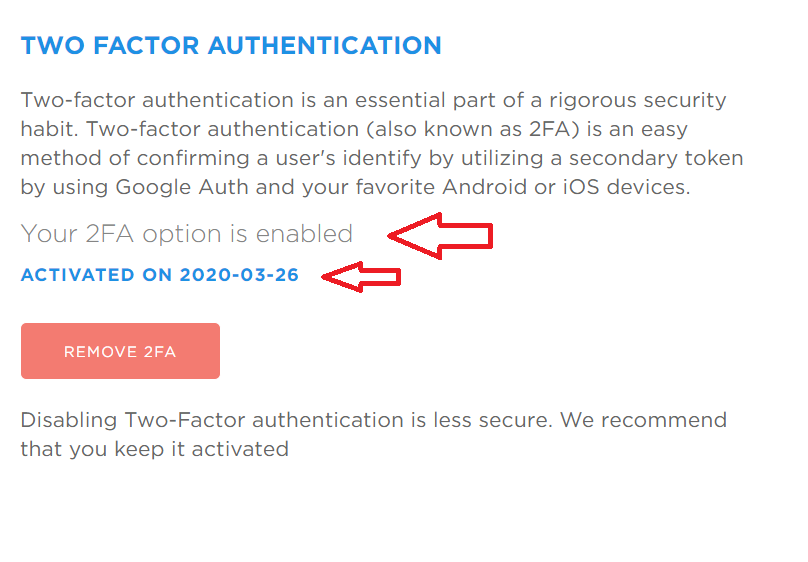
Step 6 – Upon completion you will be redirected back to a previous page and will see a notification informing you that 2FA has been enabled along with the timestamp of the activation.
By following all theses steps, you have successfully configured two-factor authentication for your Globo.Tech Customer Portal access. Your access to the Customer Portal is now much more secure, and you can rest assured that only you will be able to access it.
For any assistance with the activation of 2FA on your Customer Portal account, feel free to contact GloboTech Communication helpdesk.
Reverse DNS (RDNS) is used to resolve IP addresses to domain names. This is the opposite of the DNS lookup (Forward Lookup) where DNS maps a domain name to an IP address. DNS use A record to determine a domain name’s IP address while reverse DNS use PTR records to determine an IP address’ associated domain name. In this article, you’ll see how to manage your RDNS from your Customer Portal.
Normal DNS lookup queries that domain’s (www.globo.tech) DNS to determine the IP address of the “www.globo.tech” domain:
# nslookup www.globo.tech
 Server:         1.1.1.1
 Address:        1.1.1.1#53

 Non-authoritative answer:
 Name:   www.globo.tech
 Address: 67.43.229.6
Reverse DNS lookup queries by asking an IP address in which domains are attached to it.
# host 67.43.229.6
 6.229.43.67.in-addr.arpa domain name pointer globo.tech.
In short, the RDNS resolves to the GloboTech Instance host which is powering its DNS servers.
The RDNS is mainly used for outbound e-mail servers to trace the origin of an e-mail. This will also add credibility to the e-mail server itself so that the email they are receiving is not malicious spam.
You can manage the RDNS records for any of your GloboTech’s services using the Customer Portal.
Step 1: Login to your GloboTech Client Area
Step 2: In the left menu, click on the NETWORKING tab and then on Reverse DNS. You should see the assigned IP address of your instance:
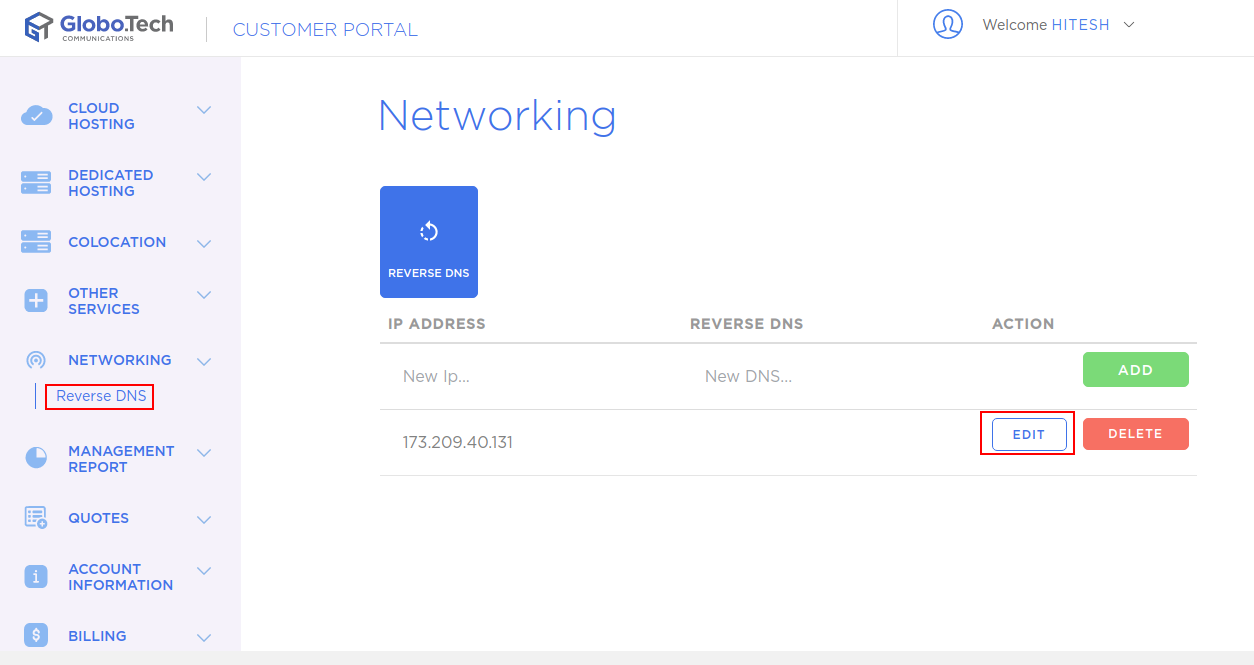
Step 3: Click on the EDIT button and enter the domain name that the IP address should be reporting to and click on the Tab key to apply the changes.
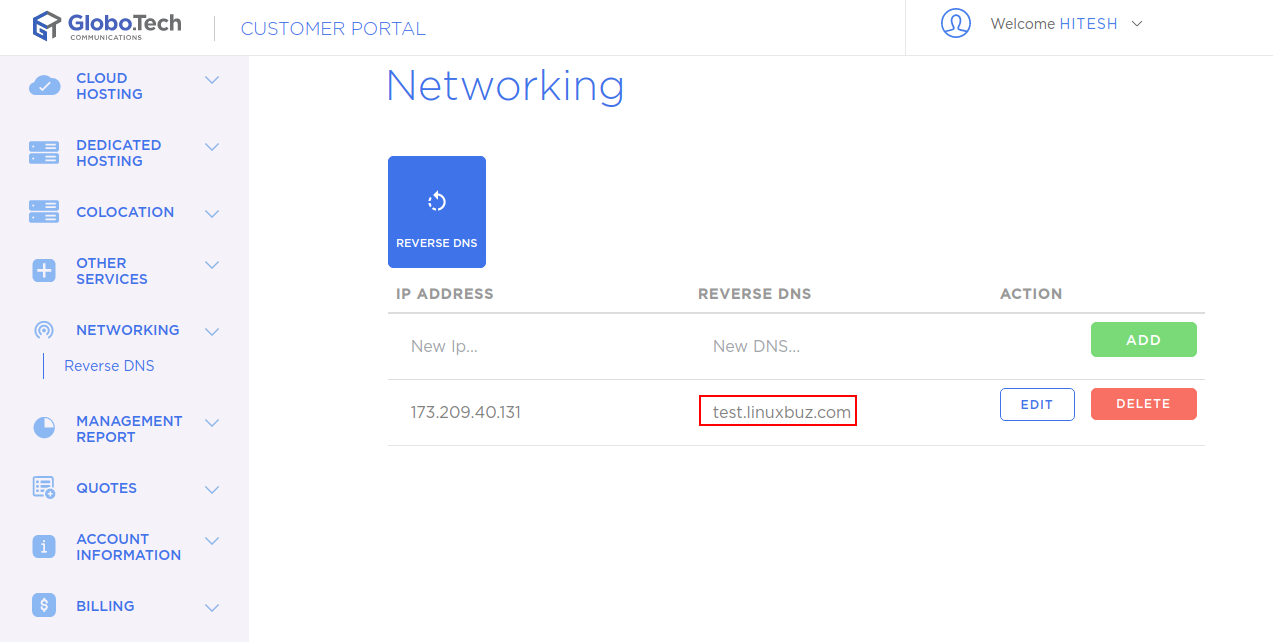
If the update was successful, you will see the following message.

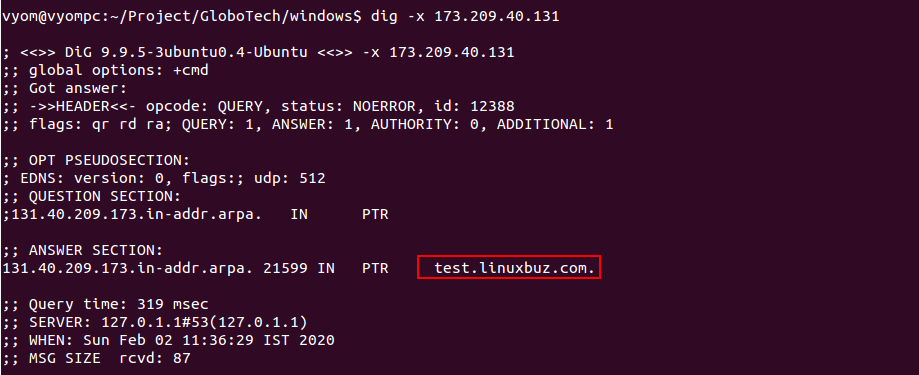
You can now test the Reverse DNS lookup with the following “dig” command:
dig -x 173.209.40.131
You should get something like this. In this example, the Reverse DNS was requested for IP 173.209.40.131, and the authoritative server replied “test.linuxbuz.com”:
You now know how to manage your own RDNS for all your GloboTech’s services, trough your Customer Portal access.
Feel free to contact our helpdesk for assistance with your GloboTech’s services, if needed.
The Intelligent Platform Management Interface, or IPMI for short, allows you to connect to your dedicated server in order to manage some low level functionalities such as BIOS modification, even if the server is down. It is a set of interfaces that operate independently of the server’s operating system, firmware, and even CPU, hooking into the hardware directly over the network. This guide will walk you through using GloboTech’s IPMI service.
This guide will assume that you are already a GloboTech customer, and that you have credentials for the customer interface. We also strongly suggest that you have an understanding of BIOS configuration beforehand.
Login to your GloboTech account
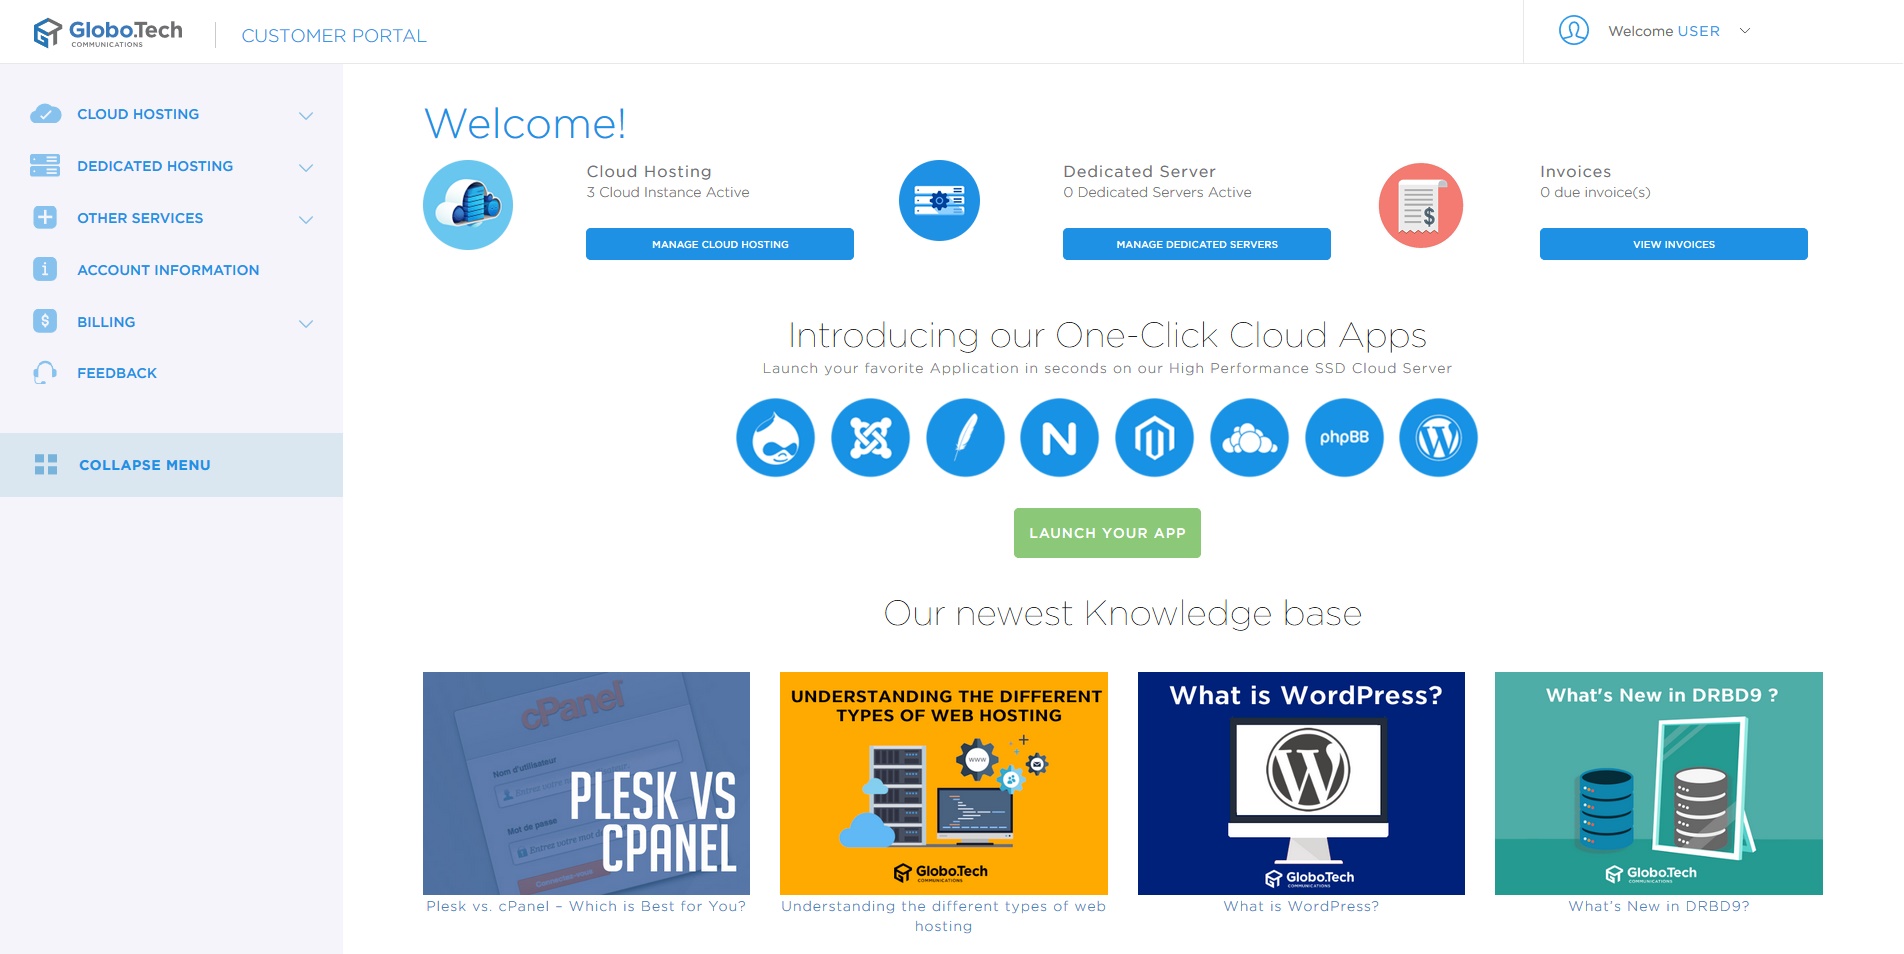
First, log in to your account at our portal: https://portal.globo.tech
Once you have logged in, you will land on a page which looks like the following screenshot:
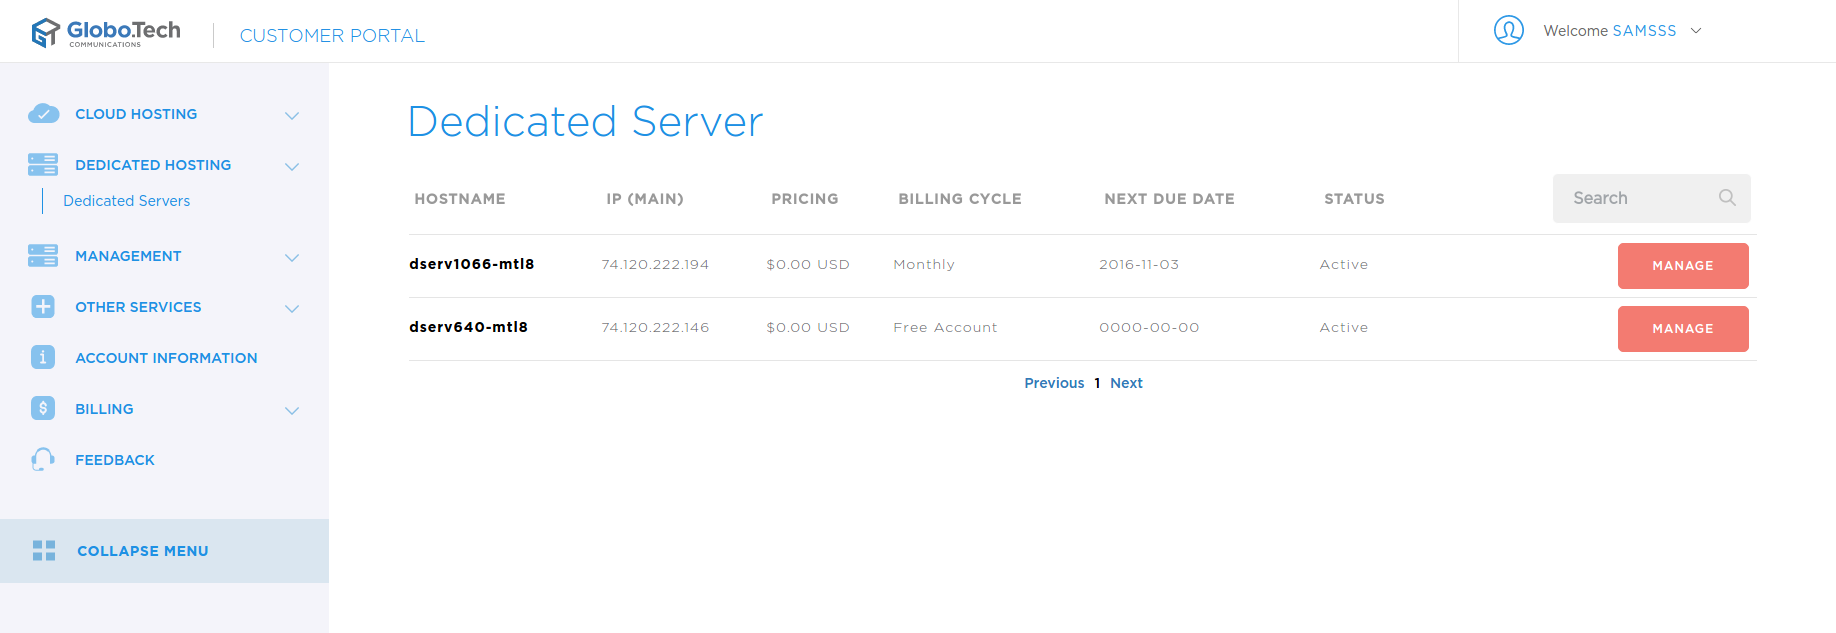
Go to the Dedicated Hosting tab
Click on the DEDICATED HOSTING option in the left-hand menu. Or, you can go directly to the Dedicated Hosting page using this url: https://portal.globo.tech/services/dedicated
You need to have at least one active Dedicated Server to see this page. If you haven’t any active Dedicated Server, don’t worry, as you can order one here. Otherwise, the page will simply list all dedicated servers in your account.
IPMI Management
Choose the Dedicated Server you want to be able to connect to by click on the MANAGE button of the server with which you want to open a IPMI connection. At the bottom of your Dedicated Server detail page, you will see a section called IPMI Management. Within this section, you will be able to manage current IPMI sessions or open new ones.
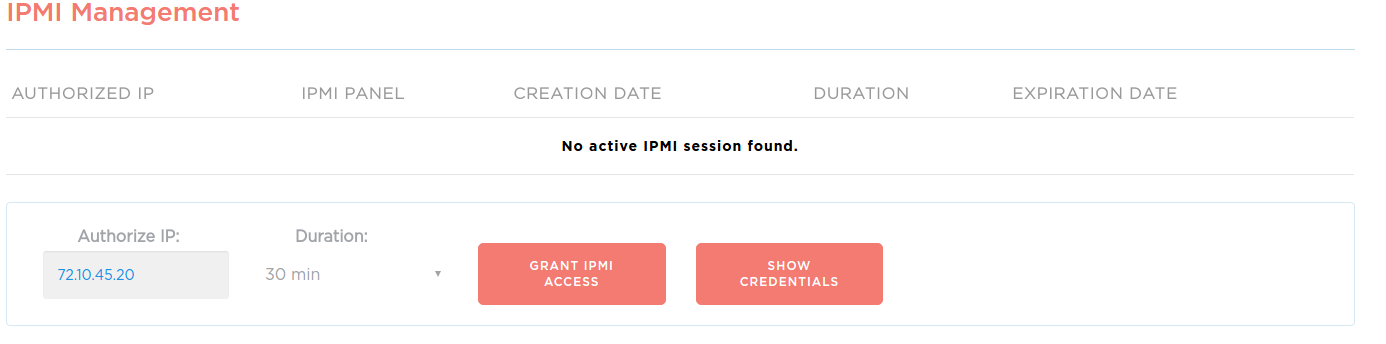
When activating your IPMI access, you will be able to specify specific IP addresses for extra security, so that only you have access to the IPMI connection. When creating your session, you will also be able to set a time range for the automatic expiration of the connection, for added security.
After inputting your IP and setting your desired session duration, click on the “GRANT IPMI ACCESS” button. At this point, you have authorized any device using the IP listed under AUTHORIZED IP to connect to the IPMI service of your Dedicated Server using the link provided under the IPMI PANEL.

Your authorized sessions will expire at the duration set time. If you would like to remove it sooner than that, you can also click on the Remove Access button and it will disable the access right away.
IPMI Username & Password
Finally, any IPMI panel you connect to will ask for a username and password. You can get those credentials by clicking on the button titled SHOW CREDENTIALS. This button will briefly display the credentials that are used by your current Dedicated Server IPMI service, as shown in the following picture:
