 Call us at 1-888-GTCOMM1
-

- Dedicated Hosting
- Cloud hosting
- Services
- Support
- Learning Center
- Referral Program
- Français
-
Why globotech
- Log in
Joomla! is a content management system (CMS), which is a system used for web publishing similar to other products like WordPress. Similar to other CMS, Joomla! is used to create a usable framework that encompasses page caching, printable page versions, news feeds, RSS feeds, blogs, search functions, and more; these are all functions used for standard web browsing.
After WordPress, Joomla! is considered the second most used CMS online, and has over 80 million downloads and roughly 7% of the market share for CMS. Joomla! was initially released in 2005, and is currently a free, open-source CMS that functions across multiple operating systems and platforms.

When you’re ready to install Joomla 3.7, you will need to have a node available; your node can be on a Dedicated or a Cloud Server, whichever you choose or are comfortable using. This node should have Linux Ubuntu 17.04 installed, which is the operating system we’re using during this tutorial.
During this tutorial, Joomla! will be written as “Joomla” when referring to the specific release, Joomla 3.7. In other instances, Joomla! is the appropriate spelling.
The first step in almost any successful installation is updating the operating system, making sure recent patches or bug fixes are installed. You can update your Ubuntu 17.04 using the following command:
apt-get update && apt-get upgrade -y
After confirming your node is running the updated version of Ubuntu 17.04, it’s time to install the Apache web server:
apt-get install apache2 -y
Once installed, you can start the Apache service and then enable the Apache service on boot:
systemctl start apache2.service

systemctl enable apache2.service
Now that Apache has been installed and enabled during the system boot, you can proceed with installing the MySQL server and client:
apt-get install mysql-server mysql-client -y
When complete, you can then start the process to install Joomla 3.7 by creating the database and then the user for Joomla.
During this process, you will be creating the database “dbjoomla” for use during your installation:
mysql -u root -p

create database dbjoomla;

grant all on dbjoomla.* to 'userjoomla'@'localhost' identified by 'passjoomla';

flush all privileges;

exit
Now it’s time to install PHP on your node and then install the required modules for use with your Joomla 3.7 instance:
apt-get install php libapache2-mod-php php-mysql php-curl php-gd php-pear php-imagick php-imap php-mcrypt php-pspell php-tidy php-xmlrpc php-xml -y
After that completes, it’s finally time to download and install Joomla 3.7. You can start by downloading the Joomla files and then unzipping the files:
apt-get install unzip -y

wget https://downloads.joomla.org/cms/joomla3/3-7-5/Joomla_3-7.5-Stable-Full_Package.zip

rm -rf /var/www/html/index.html

unzip Joomla* -d /var/www/html
Once the download and unzip have completed, it’s time to change the permissions of the directory for the web server:
chown -R www-data:www-data /var/www/html

chmod -R 755 /var/www/html
When the permissions have been updated, it’s time to restart the web server:
systemctl restart apache2
You’re almost done, it’s time to finish the installation with information for the database, including the user and password information:
http://your_ip
Congratulations! You’ve completed the installation of Joomla 3.7 on your cloud server or dedicated server node running Ubuntu 17.04. In this tutorial, you’ve updated your operating system, installed an Apache web server, MySQL server and client, PHP modules, and then completed a Joomla installation; you’re ready to move your node into production. If you found this guide helpful, please share it with others pursuing the same setup.
GloboTech Communications is not affiliated with or endorsed by The Joomla! Project™. It is not supported or warranted by The Joomla Project or Open Source Matters. The Joomla!® name and logo is used under a limited license granted by Open Source Matters the trademark holder in the United States and other countries.
While installing Joomla isn’t too difficult, there is much more to setting up a website. Not only must you configure the operating system and set up all necessary dependencies, but you’ll also need to keep these components up-to-date. You’ll also be perpetually updating Joomla to avoid the latest security flaws. Fortunately, our One Click App process makes it easy to both install and maintain Joomla with all the latest security fixes.
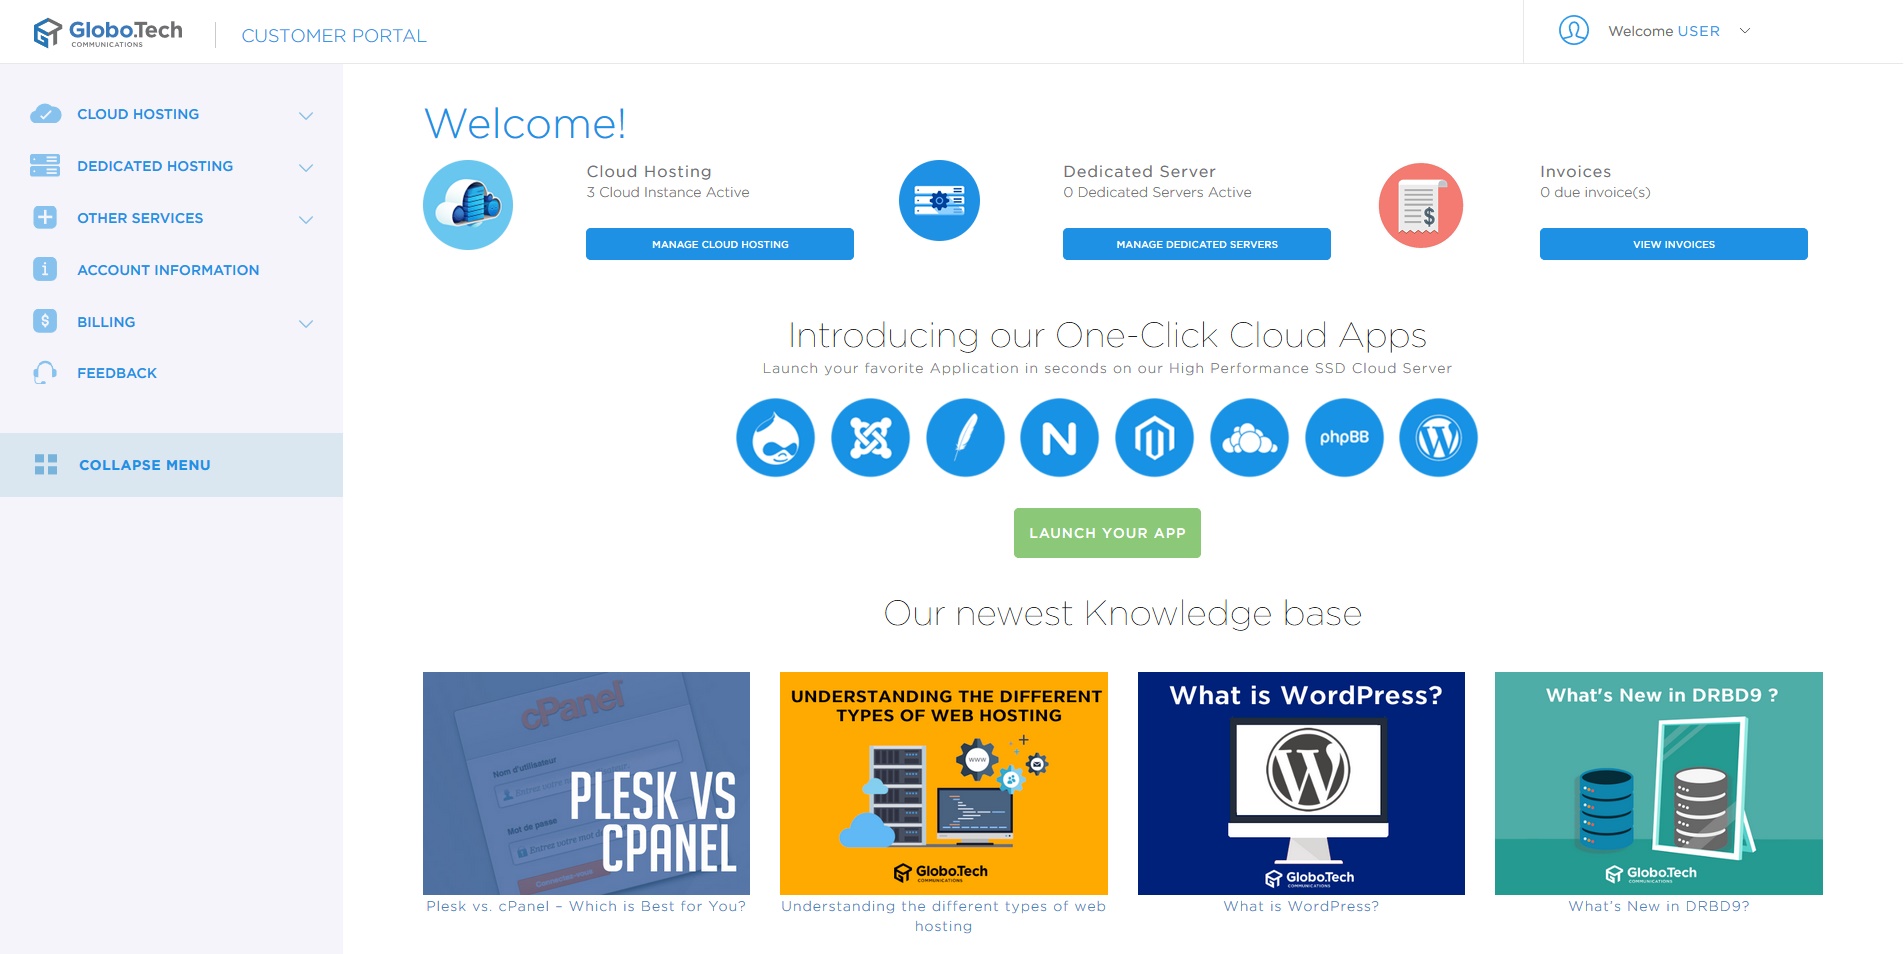
Begin by accessing your account. Once you’re logged in, you’ll see our administrative portal.
What is an OCA?
Normally, installing Joomla involves setting up an operating system and securing it against intrusion. You’d also install a database, set up an HTTP server, configure that server to run PHP, and configure Joomla to connect to the database. Our One Click Apps perform all of these steps automatically. This has several benefits.
Most obviously, you’ll save time. Our OCA images do in seconds what might normally take minutes, or even hours. Further, our images set up all of Joomla’s PHP dependencies so you aren’t stuck installing modules and reconfiguring Apache by hand. After all, you’re not interested in maintaining a server. You just want a Joomla website, and our OCAs do just that.
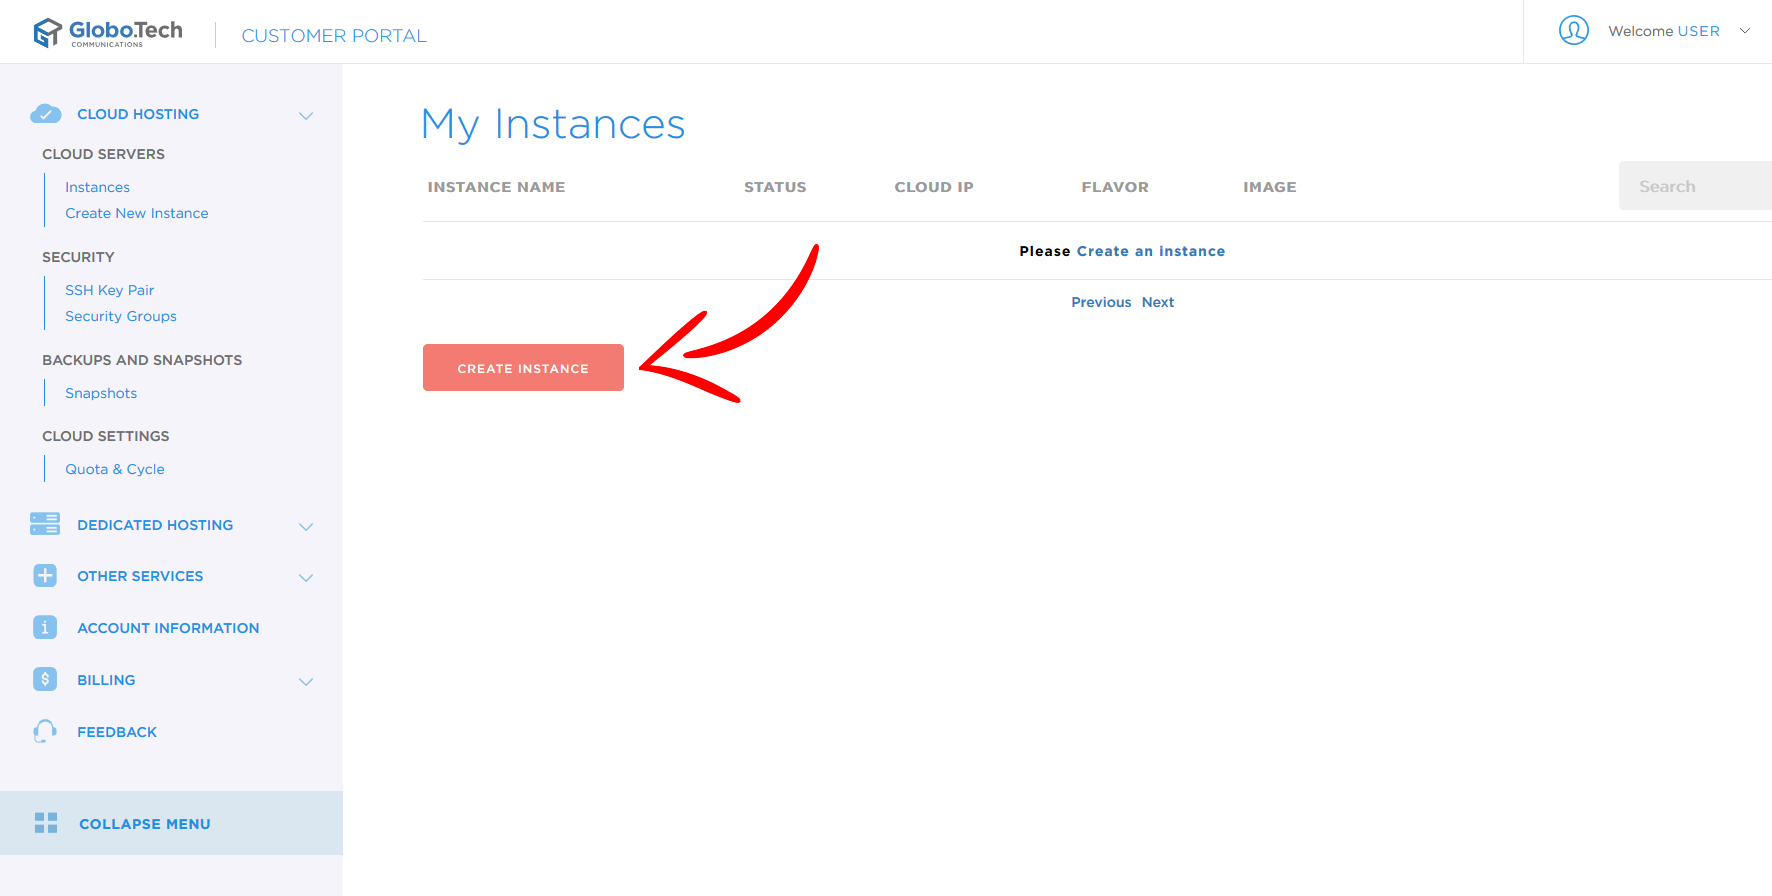
For the purposes of this guide, we’ll be using our Joomla image. Start by clicking “Cloud Hosting” in the left navigation menu. Next, click “Instances.” Here you’ll see all OCA instances active on your account if any are present. Click “Create Instance” to begin setting up your Joomla site.
At this point, you’re on the instance creation page. We’ll explain the various fields below.
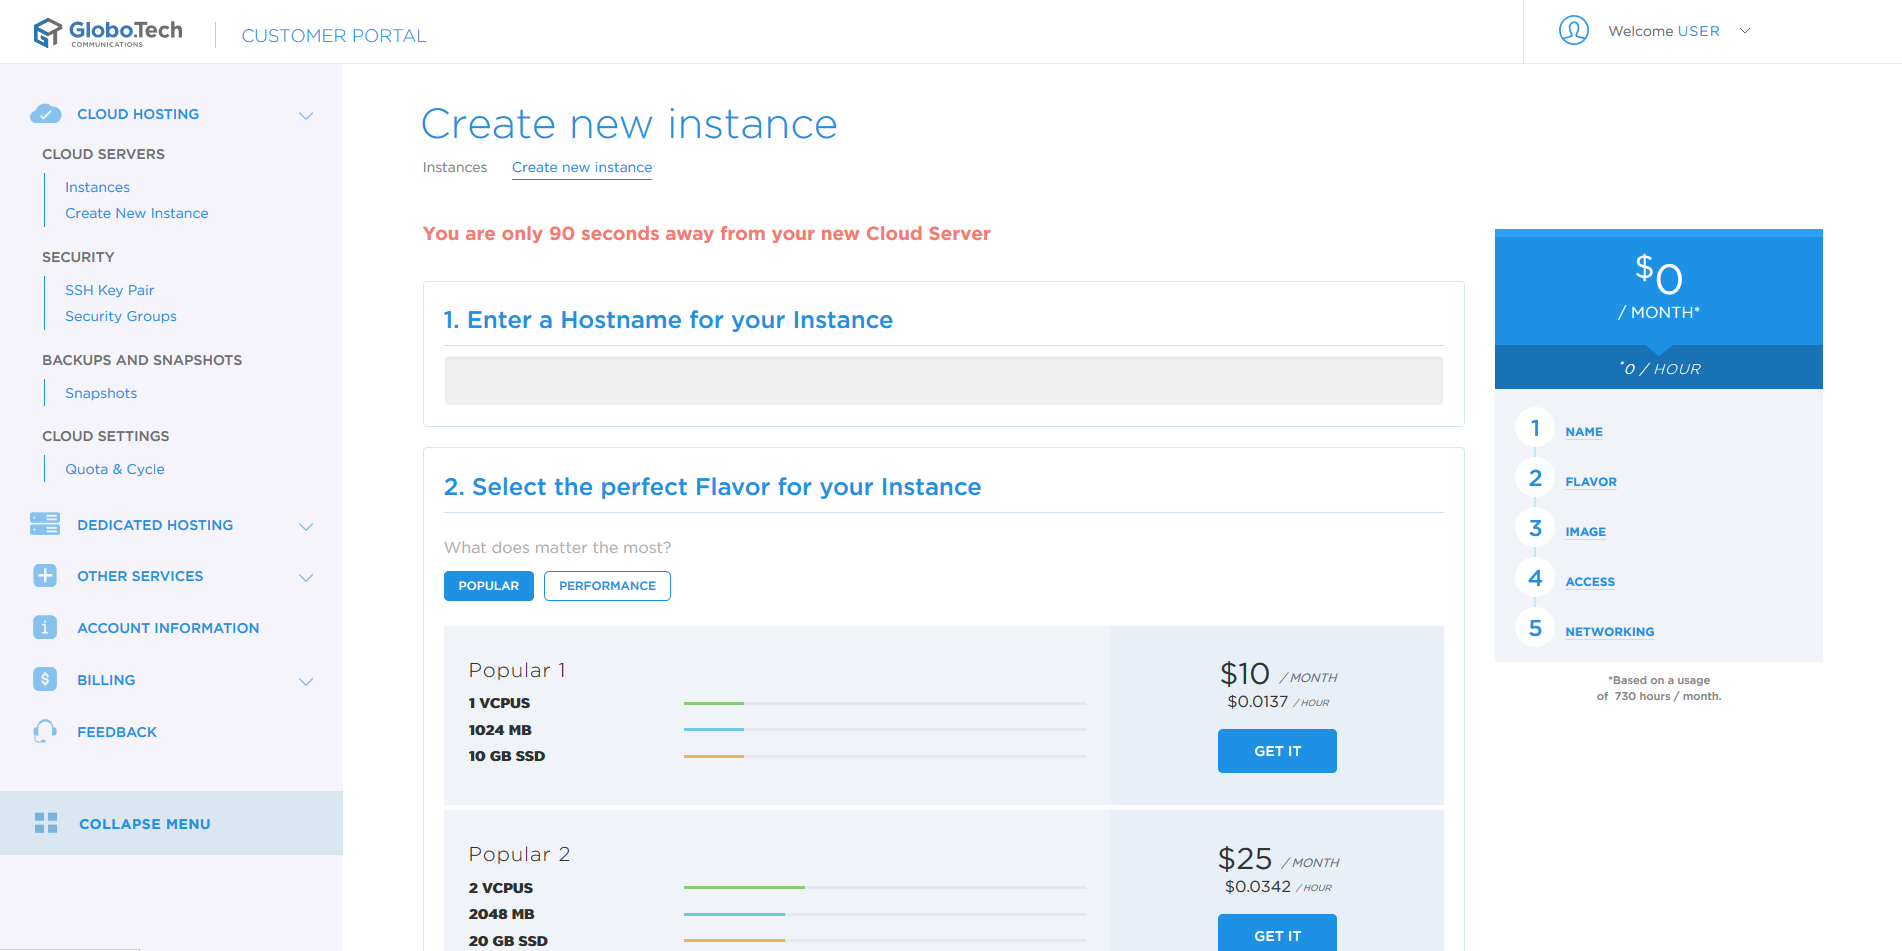
Start by setting an instance name.

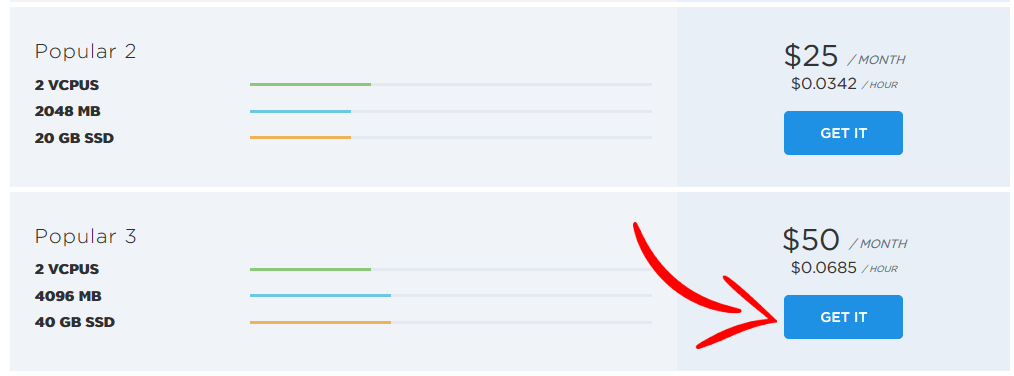
Next, select a flavor. Many variables are involved in setting up a server for your website, and it can be difficult knowing how much RAM, disk space, and CPU power are needed for any given site. Flavors abstract all of that away, letting you instead describe performance in terms of how popular your site is. You can probably begin with a Popular 2, though you’ll likely want a Popular 3 if you already have an active site. Don’t worry, this choice isn’t final. You can change your flavor selection later. When you’ve chosen your flavor, click “GET IT” and we’ll set everything up.
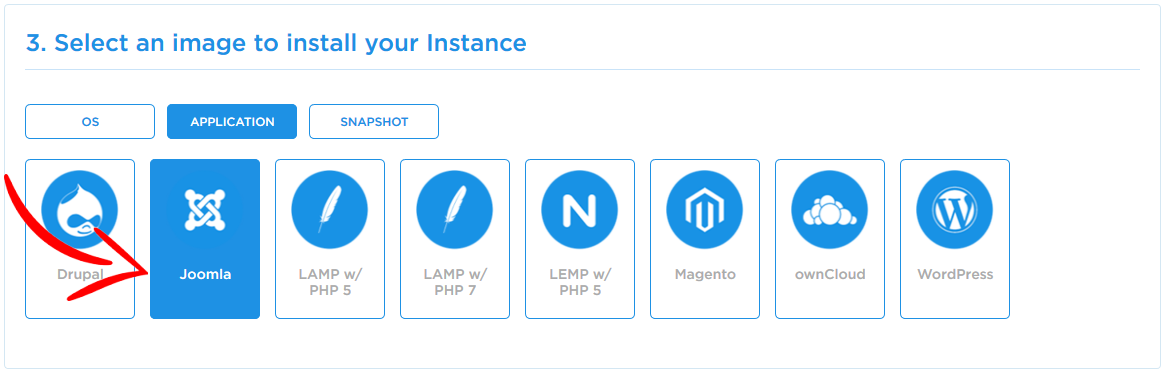
Next you’ll select the image that will be applied to your server. Since we’re using Joomla, start by selecting the Application tab. Then click Joomla.
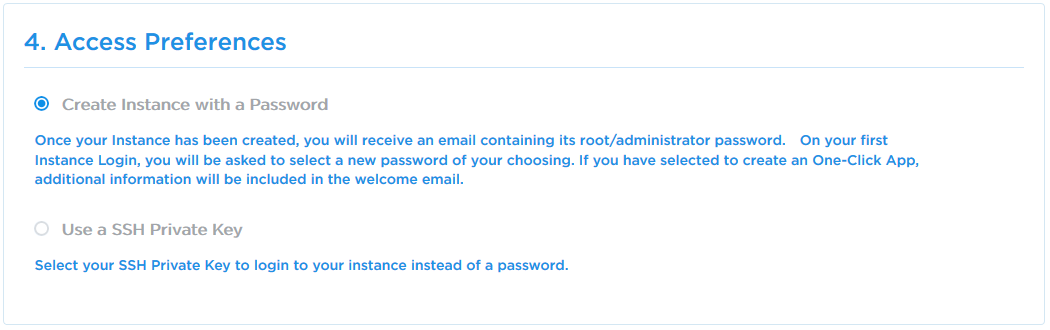
This screen determines whether your instance will be accessed via password, or with an SSH key. For this guide, we’ll select Password.
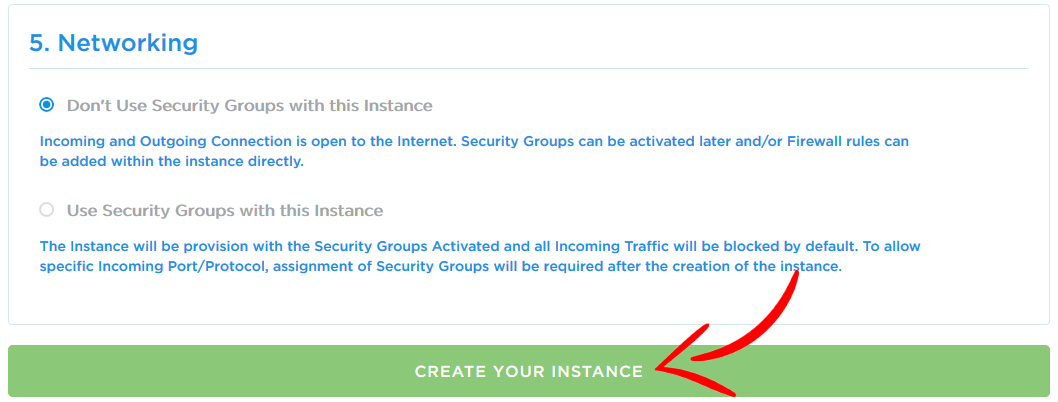
Here we choose whether to use security groups. Security groups are outside the scope of this guide–we have another article on those–so here we’ll choose to not use them. Once security groups are disabled, click “Create Instance” to continue.
We’ve created your server, and have emailed access credentials to your address on file. Check your email for these. Save this message, as it contains all necessary details for accessing your new Joomla site.
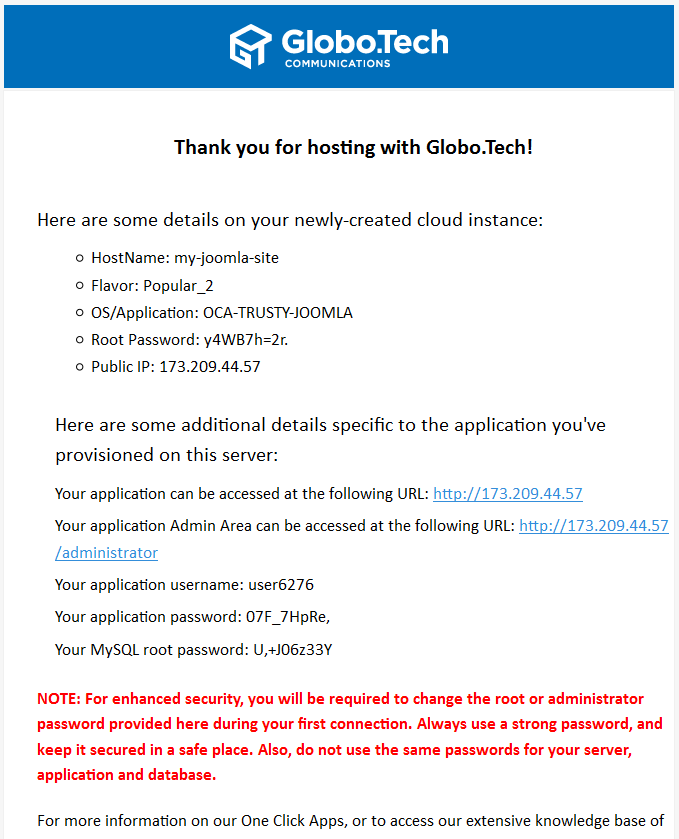
With these details in hand, let’s try connecting to your Joomla site.
Start by visiting your site’s main URL. In this example, the URL is http://173.209.44.57. It will, of course, be different for your own instance.

Next we’ll access Joomla’s administrative interface. Do this using the credentials you were emailed earlier.
In this example, the URL for the administrative interface is http://173.209.44.57/administrator, substituting your own IP address.
When you’ve entered your credentials and clicked “Log in,” you’ll be taken to Joomla’s administrative interface. Here is where you can publish content, configure your site, and change various aspects of how the site appears.
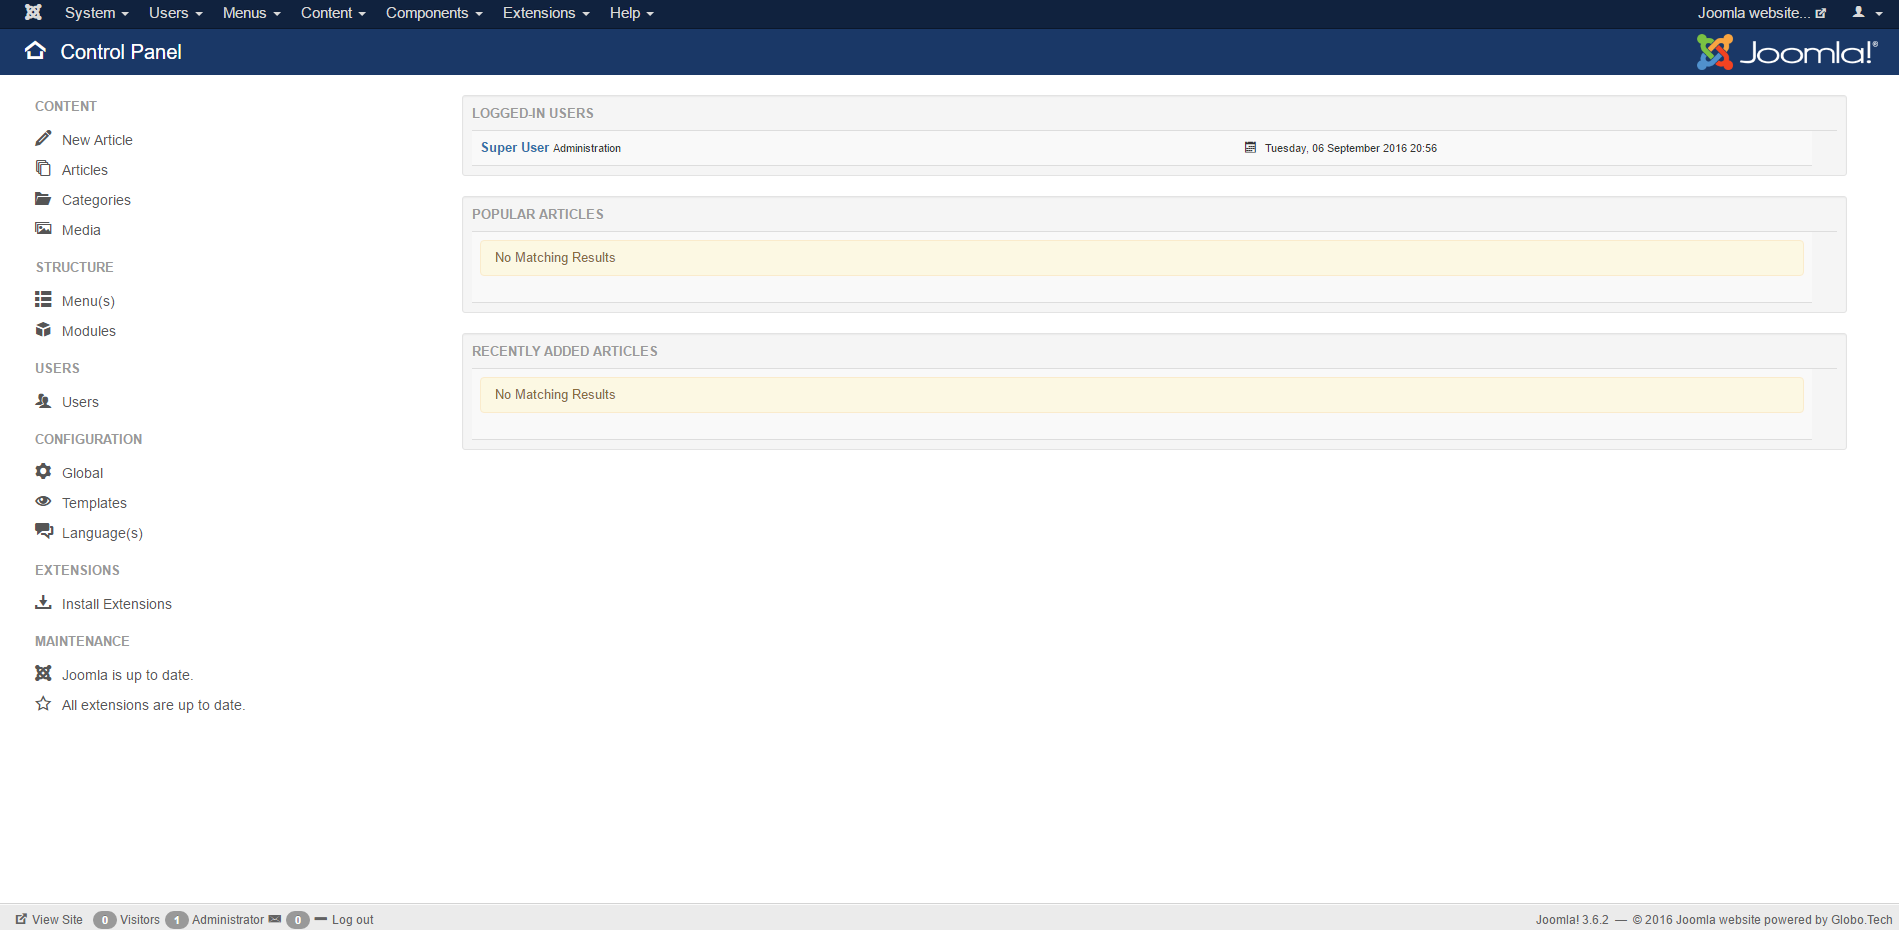
With this step complete, Joomla is up and running, and you can begin customizing your new website. Next you’ll want to configure Joomla and start adding content.
Ideally, your site will be reachable via a domain name so visitors don’t use your IP address directly.
You’ll need to purchase your own domain name before continuing. This can be accomplished either through a third party registrar, or directly from us. Get in touch and we can help with the process of acquiring and configuring your domain.
The screenshots in this guide will use the domain named MyJoomlaSite.com. Substitute your own when completing the following steps.
You will need two A records pointing at your IP address. Domain name registrars use different interfaces, so it is impossible to show exactly how this is done on every provider. You’ll need records for MyJoomlaSite.com and www.MyJoomlaSite.com set to the value of your IP address.
Unfortunately, DNS records take time to propagate throughout the internet. In some instances it can take as long as 48 hours, though records are generally available in only a few hours.
You’re now ready to configure your new Joomla site by installing themes and plugins. Details on doing so are beyond the scope of this tutorial, but Joomla’s own documentation is of great help with this stage. Visit it at https://docs.joomla.org/main_page.
We’ve achieved much in this guide, setting up an entire operating system and server stack for your Joomla website. Without our OCA system, you’d have had to do all of this from scratch, learning how to configure and maintain an entire operating system simply to run a Joomla site. Instead, you’re now up and running with one of the world’s best content management systems, and can instead focus on creating a great experience for your visitors.
Joomla is a popular content management system (CMS). A great choice for powering websites, blogs, and intranets, its MVC architecture makes it an excellent fit as a back-end for mobile and other API-driven applications. Because it is used by hundreds of businesses, non-profits, government agencies, and individuals, you gain the advantages of a rich third-party ecosystem and a community to count on.
This guide will get Joomla running on your Ubuntu 14.04 LTS server. The combination of this CMS and Ubuntu LTS gives you a reliable web presence hosted on an operating system with years of testing and available support.
You’ll need the following in place before getting started with this guide:
• 1 Node (Cloud Server or Dedicated Server) running Ubuntu 14.
• Root access
• LAMP stack configured
Let’s begin. Start by updating your package cache. This will ensure that downloads do not fail if package versions in the Ubuntu repositories differ from those in your cache. We’ll also install the unzip package. Joomla is shipped in a zip archive, but the Ubuntu LTS base distribution does not include tools to manipulate zip files.
apt-get update

apt-get install unzip -y
Joomla requires that you have a few PHP modules available in addition to those provided in the standard LAMP stack. Here we’ll install the extra dependencies it needs to run.
apt-get install php5-mysql php5-curl php5-gd php5-intl php-pear php5-imagick php5-imap php5-mcrypt php5-memcache php5-ming php5-ps php5-pspell php5-snmp php5-tidy php5-xmlrpc -y
php5enmod mcrypt
We must now create Joomla’s database, along with a database management system (DBMS) user with the necessary permissions to modify the schema and change the database’s contents.
mysql -u root -p
create database joomla;

create user joomlauser@localhost IDENTIFIED BY 'joomlapassword';

GRANT all ON joomla.* TO joomlauser@localhost;

flush privileges;

exit
Let’s download the Joomla archive into the document root of your web server. We’ll also unzip it once the download is complete.
wget https://github.com/joomla/joomla-cms/releases/download/3.6.2/Joomla_3.6.2-Stable-Full_Package.zip

unzip -q Joomla*.zip -d /var/www/html
Apache must make various changes to its document root directory in the course of running Joomla. Here we’ll ensure that it has the ability to modify the document root in the ways the CMS expects.
chown -R www-data. /var/www/html/

chmod 755 -R /var/www/html/
While earlier we installed Joomla’s dependencies, Apache does not automatically detect the presence of new PHP modules. Before we can run our content management platform, we’ll need to restart Apache so Joomla can find its libraries.
service apache2 restart

service mysql restart
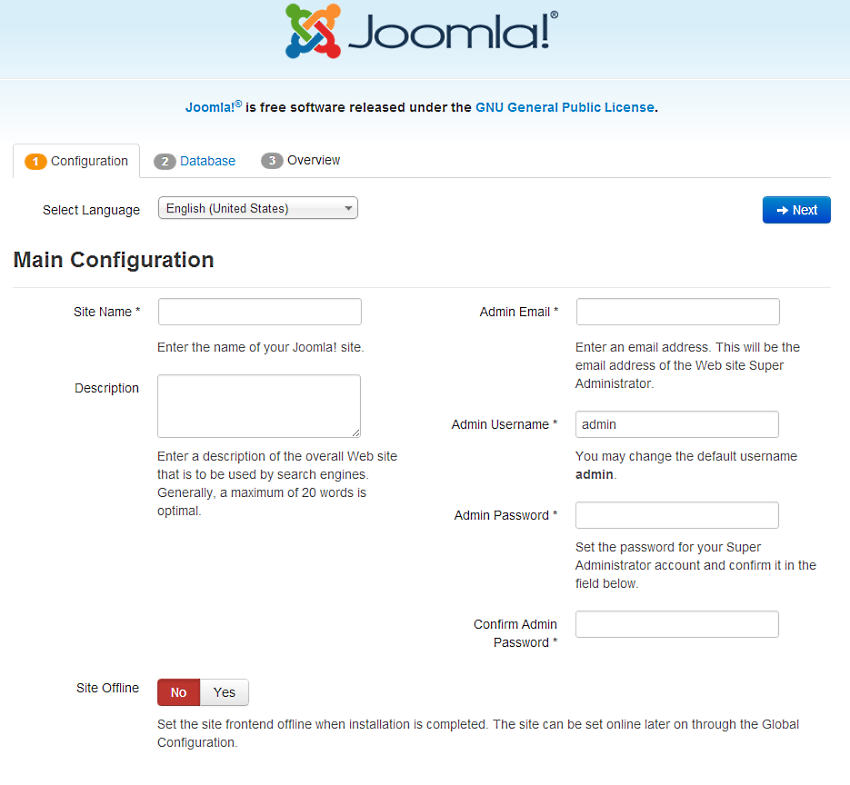
We’re almost done. To complete the installation, access your new instance at http://your_ip/installation. Follow the prompts to integrate Joomla with its database and to begin setting up your new website.
When the installer is finished, you’ll want to remove the installation directory. While it is likely impossible for remote users to run the installer again, it is better to be safe than sorry, and deleting the installer prevents remote exploits that might compromise your site or its database.
cd /var/www/html/

rm -rf installation/
You’re now ready to make this site your own, changing its appearance and adding content to suit your requirements. Joomla is a great web platform, so if you know anyone who needs a good site but isn’t quite sure what to use, share this guide with them so they too can run Joomla on their own Ubuntu server.
Joomla is a powerful content management system for building websites and apps. Written in PHP, Joomla powers a variety of websites, including portals, intranets, online publications, e-commerce shops, and government apps. Joomla also has a rich ecosystem of plugins, themes, and professional consultants to ease the process of building whatever you might want on its rich platform. Best of all, it is freely available and open source, meaning anyone can install Joomla and customize it to meet their needs. Here we will learn how to get Joomla up and running quickly on an Ubuntu 16.04 server.
Confirm that you have the following before you follow this guide:
• 1 Node (Cloud Server or Dedicated Server) running Ubuntu 16.
• Root access to the node or one sudo non-root user
• A LAMP stack with Apache, PHP and MySql
At this guide’s conclusion, your server will be running the Joomla CMS, and is ready for you to build out your desired site or app.
Let’s get started. To begin, we’ll install some basic packages that are necessary to install Joomla. We’ll also update the repository list.
apt-get update && apt-get install unzip -y
Joomla stores its content in a database. As such, we’ll need to ensure that this database exists before continuing.
mysql -u root -p
create database joomla;

create user joomlauser@localhost IDENTIFIED BY 'joomlapassword';

GRANT all ON joomla.* TO joomlauser@localhost;

flush privileges;

exit
Several additional PHP modules are required by Joomla. Install those next.
apt-get install php7.0-mysql php7.0-curl php7.0-json php7.0-cgi php7.0 libapache2-mod-php7.0 php7.0-mcrypt php7.0-xml php7.0-xmlrpc
Now we’ll fetch Joomla, which is shipped as a zip archive. After retrieving it, we’ll unzip it in the document root directory of your Apache server.
rm -rf /var/www/html/*

wget https://github.com/joomla/joomla-cms/releases/download/3.6.0/Joomla_3.6.0-Stable-Full_Package.zip

unzip -q Joomla*.zip -d /var/www/html
You’ll find the latest version of Joomla at https://www.joomla.org/download.html.
Apache will need some access permissions on its document root directory, so Joomla can update the directory contents as it runs. Here we grant it the permissions it needs to do so.
chown -R www-data.www-data /var/www/html

chmod -R 755 /var/www/html

systemctl restart apache2.service
The rest of Joomla’s installation is done online. Visit http://your_ip/ to access Joomla’s web-based installer.
Once you’ve completed the online installation, you’ll want to remove the installation directory. While efforts are made to prevent it from running again, removing the installation directory prevents malicious users from running it again later.
cd /var/www/html/

rm -rf installation/
You now have Joomla running on your Ubuntu 16.04 server. It is now time to begin building your site, developing your app, or otherwise transforming this basic installation into the website you imagine. If this guide was helpful to you, kindly share it with others who may also be interested.
Joomla is an easy to use content management system (CMS) that can ease the process of running a website or blog. Joomla is the second most used CMS on the web, right behind WordPress in popularity. It has the shortest average delay between updates out of the three major CMS platforms (WordPress, Joomla and Drupal), making it one of the most secure choices for hosting a website.
Written in PHP, Joomla runs on a LAMP stack and is extensible using the thousands of free extensions available online. The code is open-source and licensed under the GNU General Public License.
To complete this guide, you will need the following:
• 1 Node (Cloud Server or Dedicated Server) running CentOS 7.
• All commands should be run as the root user
• A LAMP stack with Apache, PHP and MySql
Joomla needs certain PHP modules to be installed. You can find these in the EPEL repository. Add the EPEL repository to your system if you don’t already have it and install the following modules.
yum -y install epel-release

yum install -y php-mysql php-curl php-gd php-pear php-memcache php-pspell php-snmp php-xmlrpc php-mcrypt
Next, create a database and user that your CMS will use to store your website data.
mysql -u root -p
create database joomla;

create user joomlauser@localhost IDENTIFIED BY 'joomlapassword';

GRANT all ON joomla.* TO joomlauser@localhost;

flush privileges;

exit
Now you can download the CMS. Make sure to unzip it into the Document root directory.
wget https://github.com/joomla/joomla-cms/releases/download/3.6.0/Joomla_3.6.0-Stable-Full_Package.zip

unzip -q Joomla*.zip -d /var/www/html
Change the permissions of the Document root directory in order that Apache, and thereby your web users, can access it.
chown -R apache:apache /var/www/html

chmod -R 755 /var/www/html

chcon -R -t httpd_sys_rw_content_t /var/www/html/
In order for Apache to recognize the new modules and permissions, you will have to restart its daemon.
systemctl restart httpd.service
In order to complete the setup for your CMS’ installation, visit the following address in a web browser:
http://your_ip/installation/
This online setup is where you can change your site name and description. You can also set the admin username, password and contact email here.
When installation is complete, for security reasons you must remove the installation directory.
cd /var/www/html/

rm -rf installation/
Now that Joomla is installed, be sure to keep current with the latest security updates as they are released. Whatever kind of site you decide to host, enjoy the easy moderation and versatile extensibility that comes with choosing Joomla as your CMS solution. If this guide was helpful to you, kindly share it with others who may also be interested.