 Call us at 1-888-GTCOMM1
-

- Dedicated Hosting
- Cloud hosting
- Services
- Support
- Learning Center
- Referral Program
- Français
-
Why globotech
- Log in
In this tutorial, we will explain how to install and run malware scan with Maldet on CentOS 8 server.
Malware is the name of a number of malicious software including, spyware, ransomware and viruses. It was designed to cause your system, delete your personal data and gain unauthorized access to a network. Maldet stands for “Linux Malware Detect” is a malware scanner for Linux operating system. It can be used to scan your server for malicious files.
Maldet is written in Perl, so you will need to install Perl in your system. You can install it using the following command:
dnf install perl -y
Next, download the latest version of the Maldet with the following command:
wget http://www.rfxn.com/downloads/maldetect-current.tar.gz
Once downloaded, extract the downloaded file with the following command:
tar -xvzf maldetect-current.tar.gz
Next, change the directory to the extracted directory and install the Maldet using the following command:
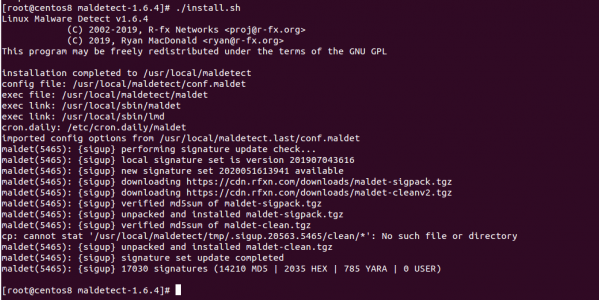
cd maldetect-1.6.4 && ./install.sh
Once the Maldet has been installed, you should see the following screen:
The basic syntax of the Maldet command as shown below:
maldet [OPTION] [Directory Path]
A brief explanation of each option is shown below:
-b : This option is used to execute operations in the background.
-u : This option is used to update malware detection signatures from rfxn.com.
-l : This option is used to view maldet log file events.
-d : This option is used to update the installed version from rfxn.com.
-a : This option is used to scan all files in the path.
-p : This option is used to clear logs, session and temporary data.
-q : This option is used to quarantine all malware from the report.
-n : This option is used to clean & restore malware hits from the report.
The Maldet default configuration file is located at /usr/local/maldetect/conf.maldet.
You can edit it with the following command:
nano /usr/local/maldetect/conf.maldet
Change the following lines as per your need:
 # To enable the email notification.
 email_alert="1"

 # Specify the email address on which you want to receive an email notification.
 email_addr="user@domain.com"

 # Enable the LMD signature autoupdate.
 autoupdate_signatures="1"

 # Enable the automatic updates of the LMD installation.
 autoupdate_version="1"

 # Enable the daily automatic scanning.
 cron_daily_scan="1"

 # Allows non-root users to perform scans.
 scan_user_access="1"

 # Clean string based malware injections.
 quarantine_clean="1"
Save and close the file when you are finished.
You can scan any directory with Maldet using the -a option. For example, to scan the directory /etc, run the following command:
maldet -a /etc/
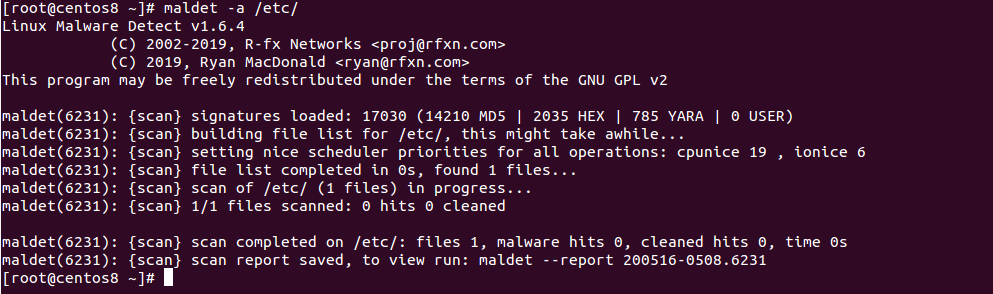
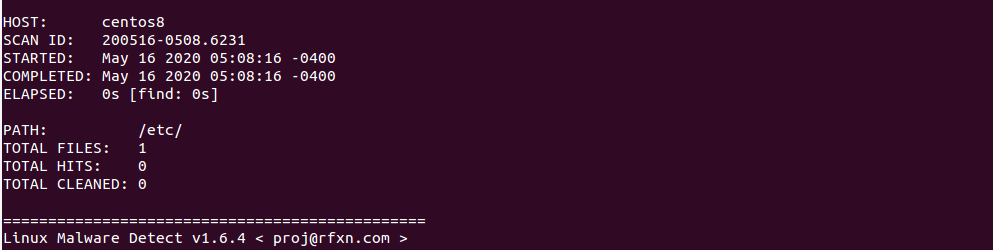
From the above screen, you will get the scan report ID. You can view the detailed report using the report ID:
maldet --report 200516-0508.6231
You should see the scan report in the following screen:
If you want to put the infected files to quarantine, run the following command:
maldet -q 200516-0508.6231
If you want to clean on all malware results from a previous scan, run the following command:
maldet --clean 200516-0508.6231
If you want to scan a very large directory then you can use -b option to execute operations in the background.
For example, scan the root partition (/) in the background with the following command:
maldet -b -a /
You should see the following screen:

You can now check the log file with the following command:
tail -f /usr/local/maldetect/logs/event_log
You should see the following screen along with report ID.

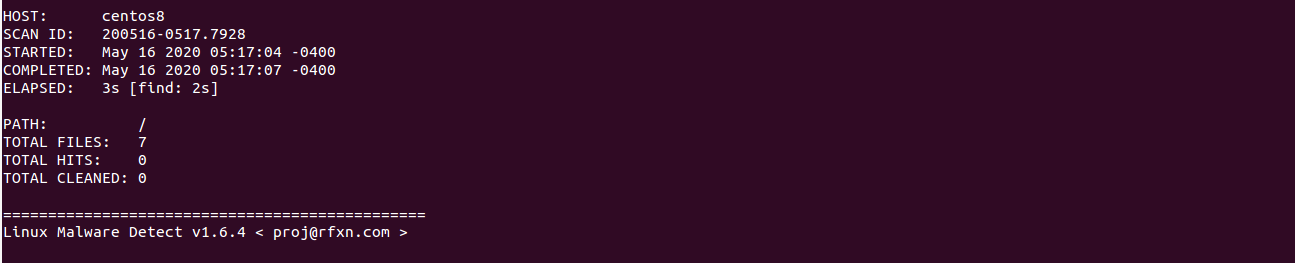
You can now use this report ID to see the scan report as shown below:
maldet --report 200516-0517.7928
You should see the scan report in the following screen:
If you want to clear logs, quarantine queue, session and temporary data from the previous scan, you can use -p option as shown below:
maldet -p
You should see the following screen:

Now, verify the log data with the following command:
maldet -l
In the above guide, you learned how to install and run malware scan with Maldet on CentOS 8. I hope you can now scan your server with Maldet and remove the malware easily.
An SSL Certificate is a small data file that creates a secure link between a website and a visitor’s browser. See how to install an SSL certificate on Microsoft Windows server 2019 using IIS.
SSLs has a public and private key that can be used to establish an encrypted connection between a web browser and a web server. The main reason for using SSL Certificates is to protect your sensitive information and your website.
In this tutorial, we will show you how to install an SSL certificate on Windows server 2019 with IIS.
When you are applying or Ordering an SSL certificate, you will need to create CSR (Certificate Signing Request) on your server and send it to a Certificate Authority. The CSR validates the information the CA requires to issue a certificate. After validating the CSR, the Certificate Authority will use this data to generate and issue the SSL certificate.
You can create a CSR by following the below steps:
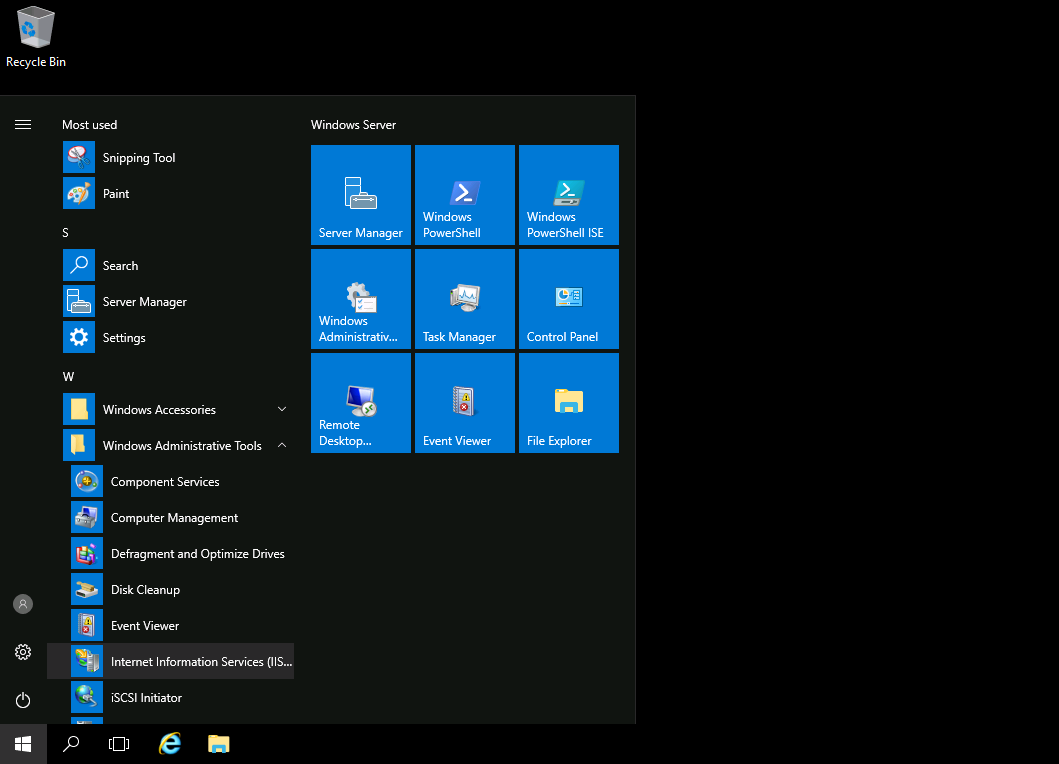
Step 1 – Go to Start > Administrative Tools > Internet Information Services (IIS) Manager, as shown below:
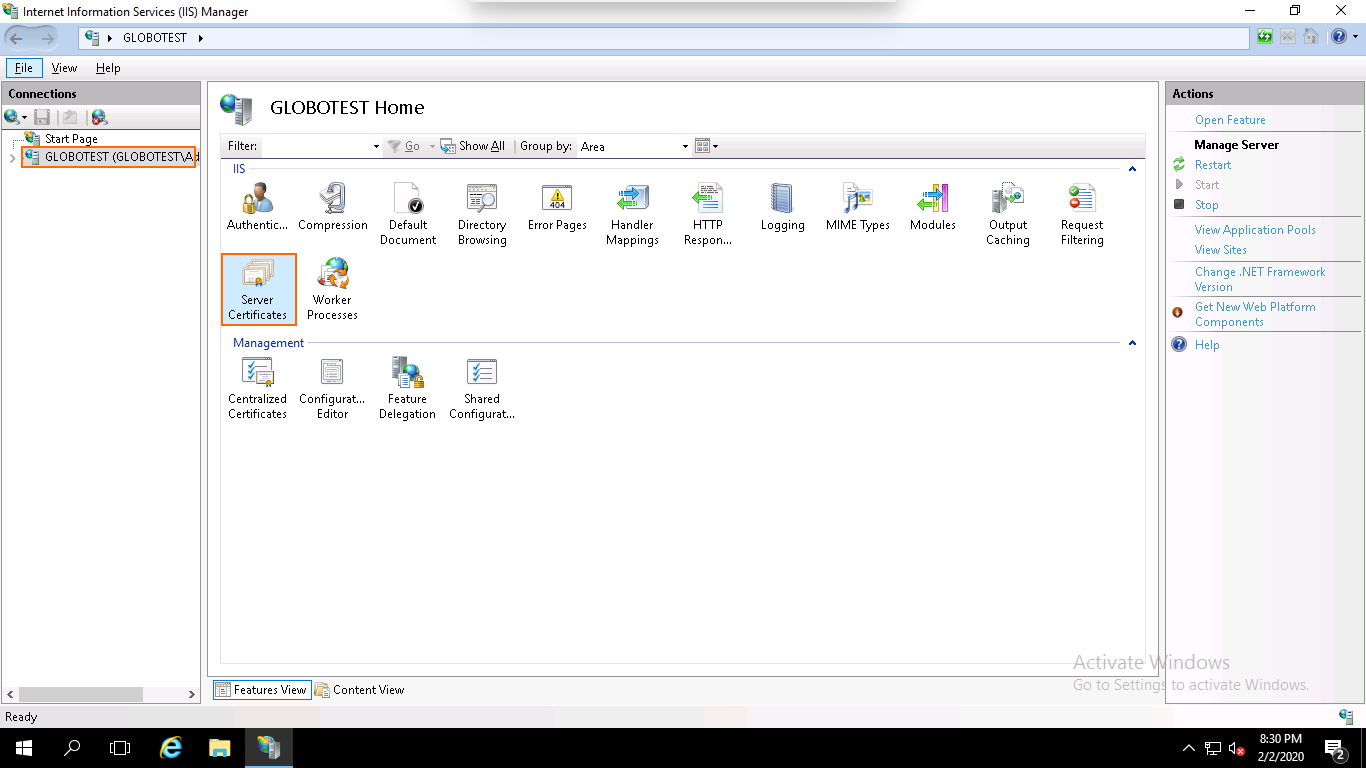
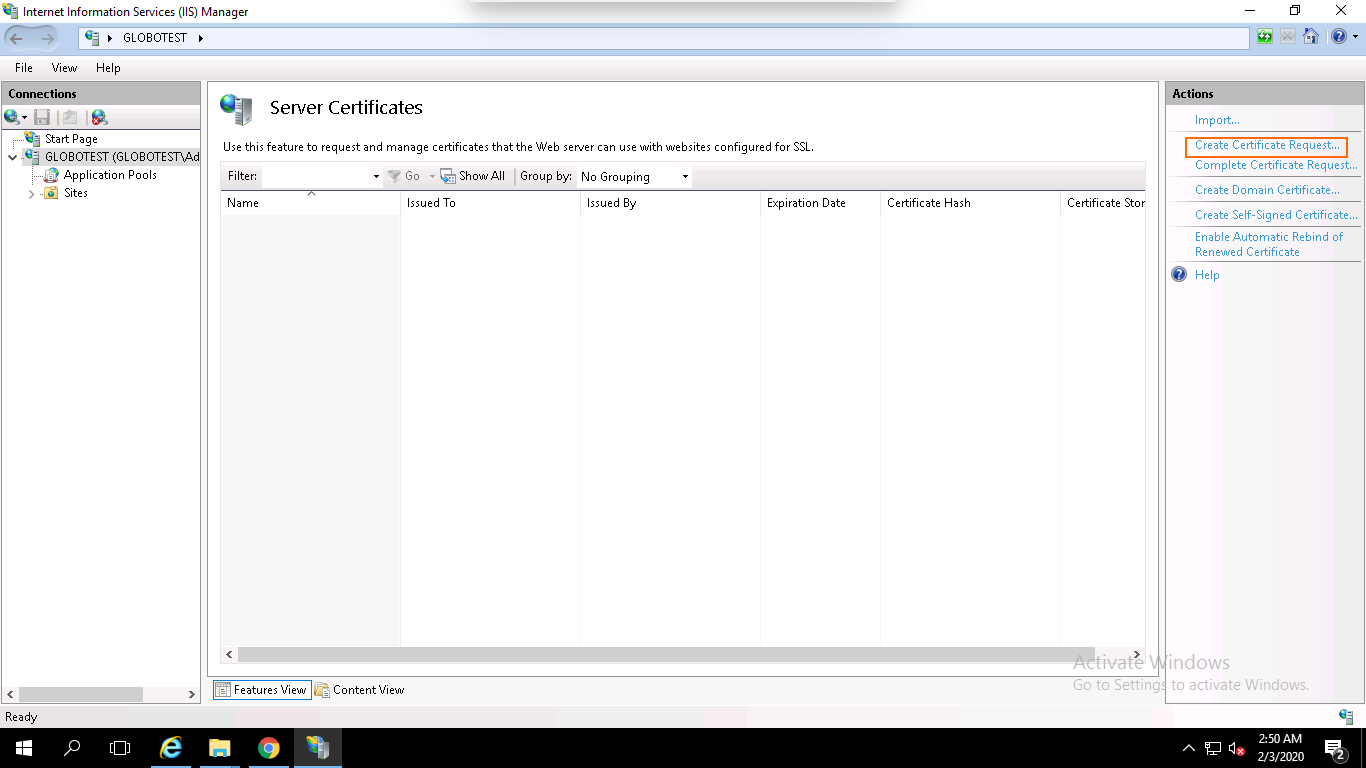
Step 2 – In the left pane, click on the server name and double click on the Server Certificates. You should see the following page:
Step 3 – In the right pane, click on the Create Certificate Request. You should see the following page:
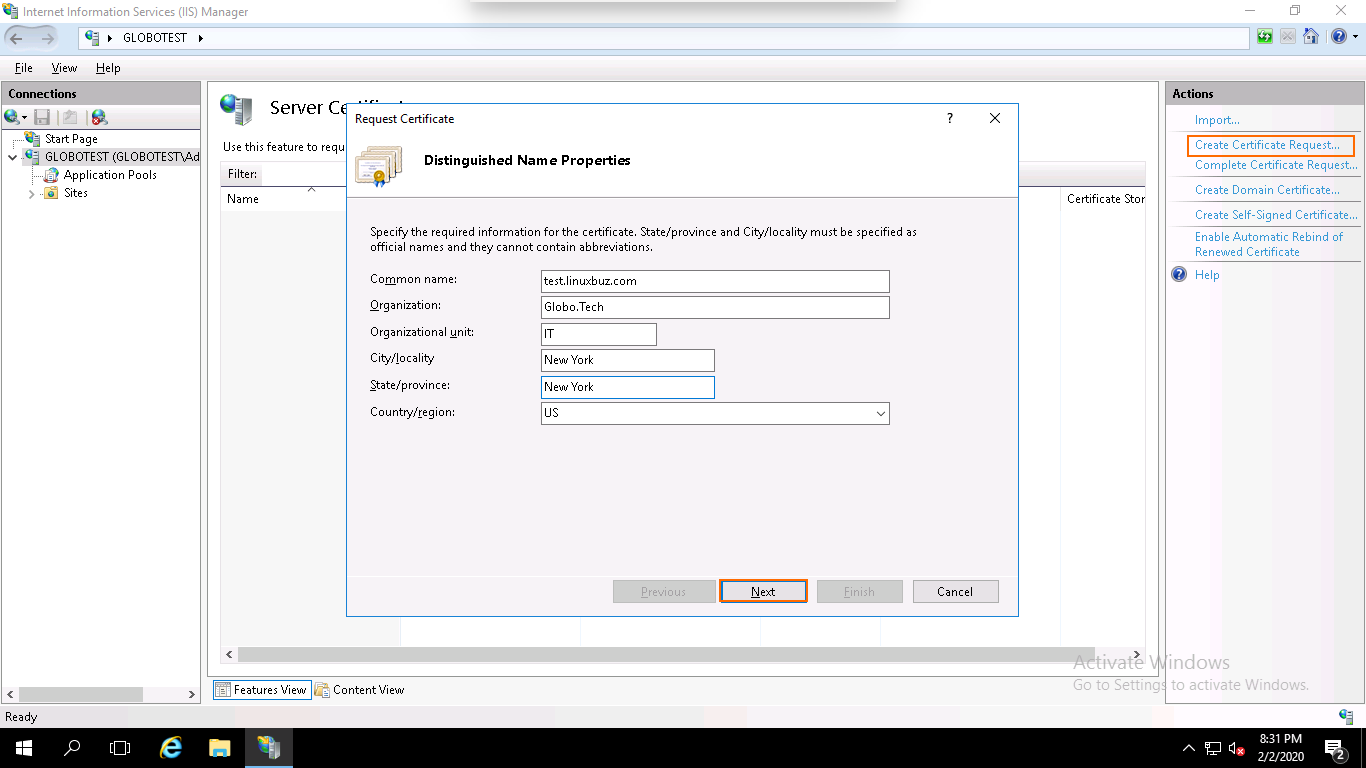
Step 4 – Provide your domain name, company name, department name, city, state, country name and click on the Next button. You should see the following page:
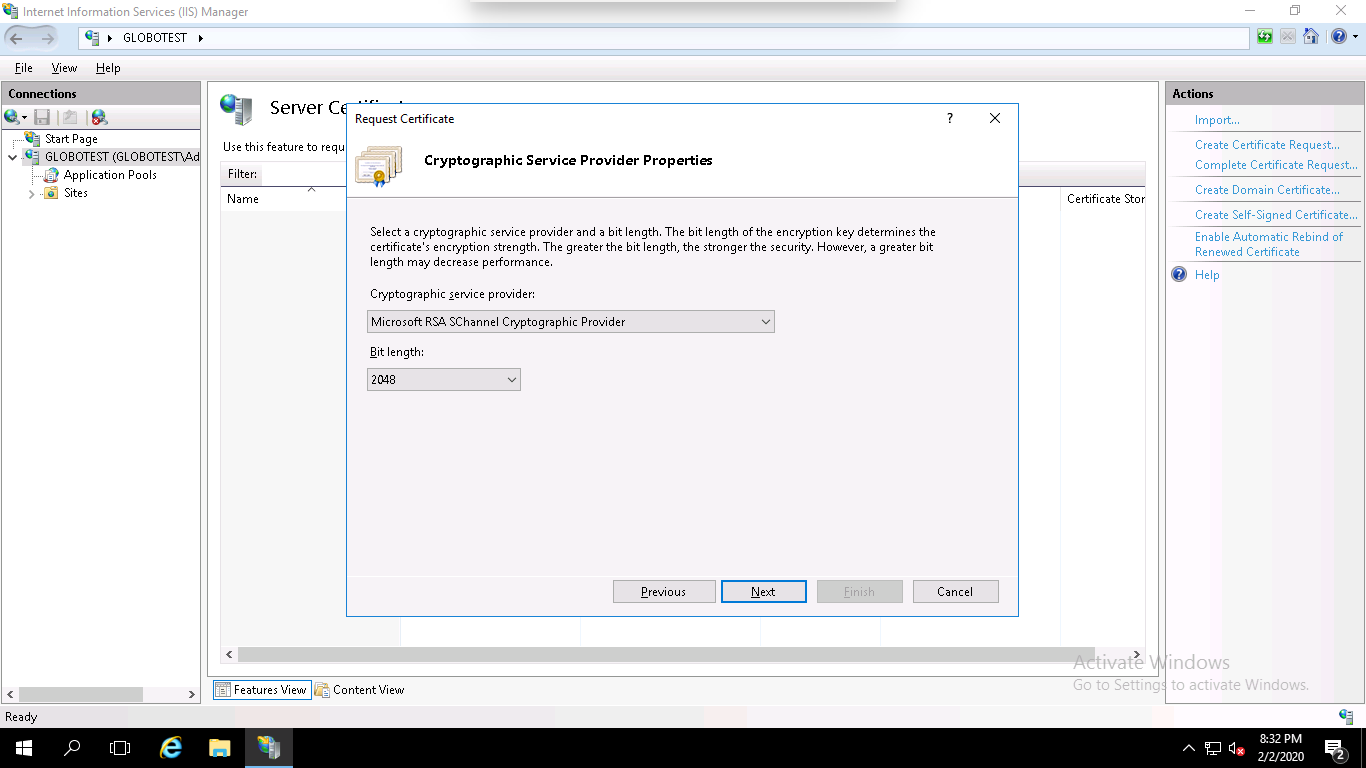
Step 5 – Select the Cryptographic Service Provider, 2048 as a bit length and click on the Next button. You should see the following page:
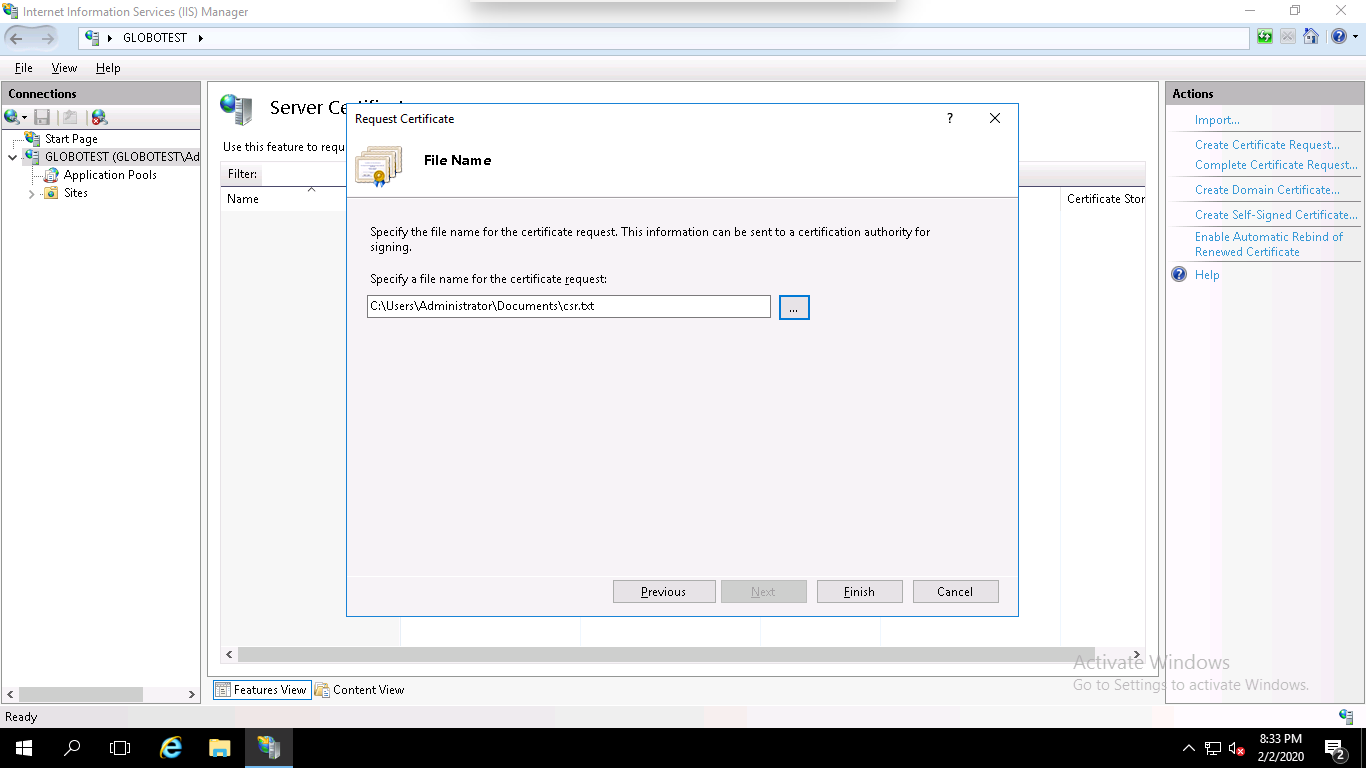
Step 6 – Specify the filename and the location where you want to save the CSR, and click on the Finish button to create a CSR certificate.
Step 7 – After generating the CSR, you will need to give this CSR file to the Certificate Provider in order to purchase the new SSL certificate.
Make sure that you get an SSL certificate in P7B or CER format. Once you received the SSL certificate file from the Certificate Authority save it on the server where you created the CSR.
Next, you will need to install the SSL certificate on your IIS website. You can install it by following the below steps:
Step 1 – Go to Start > Administrative Tools > Internet Information Services (IIS) Manager as shown below:

Step 2 – In the left pane, click on the server name and double click on the Server Certificates. You should see the following page:
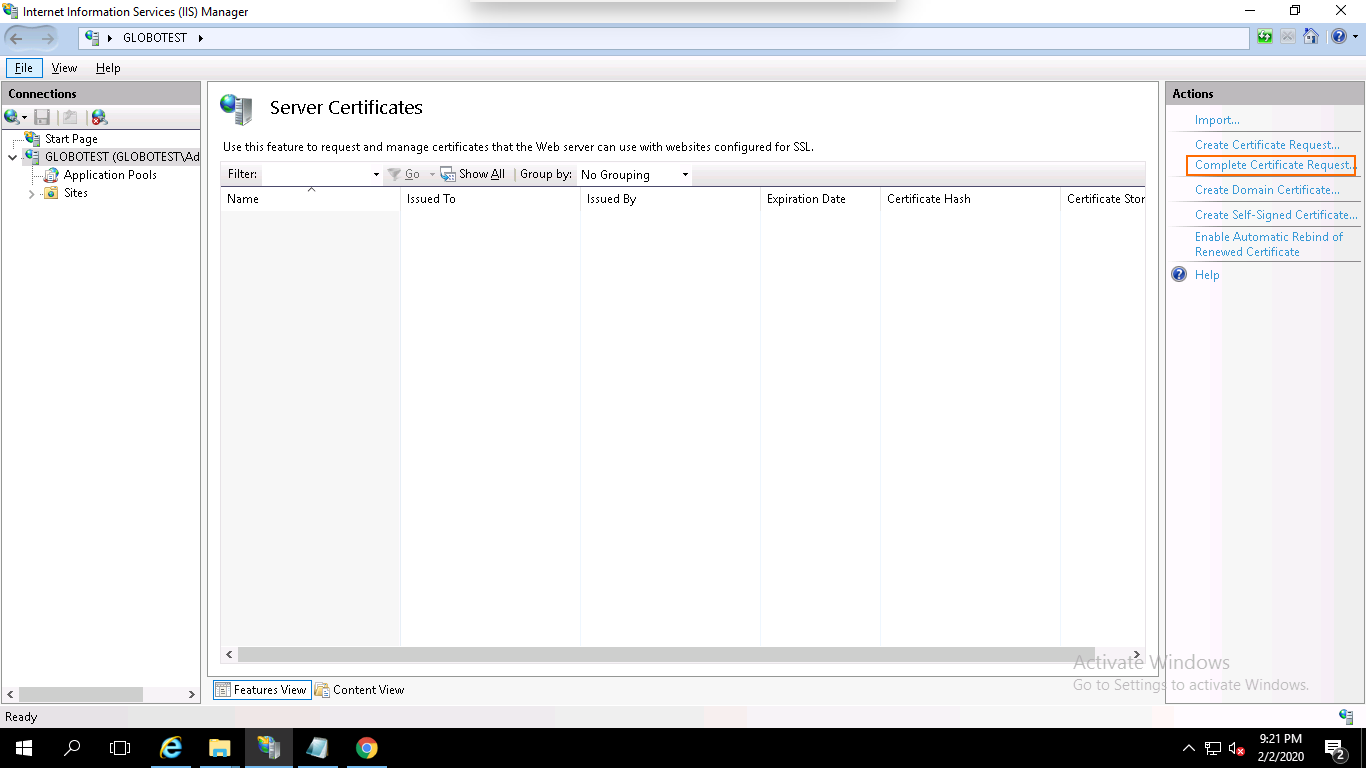
Step 3 – In the right pane, click on Complete Certificate Request. You should see the following page:
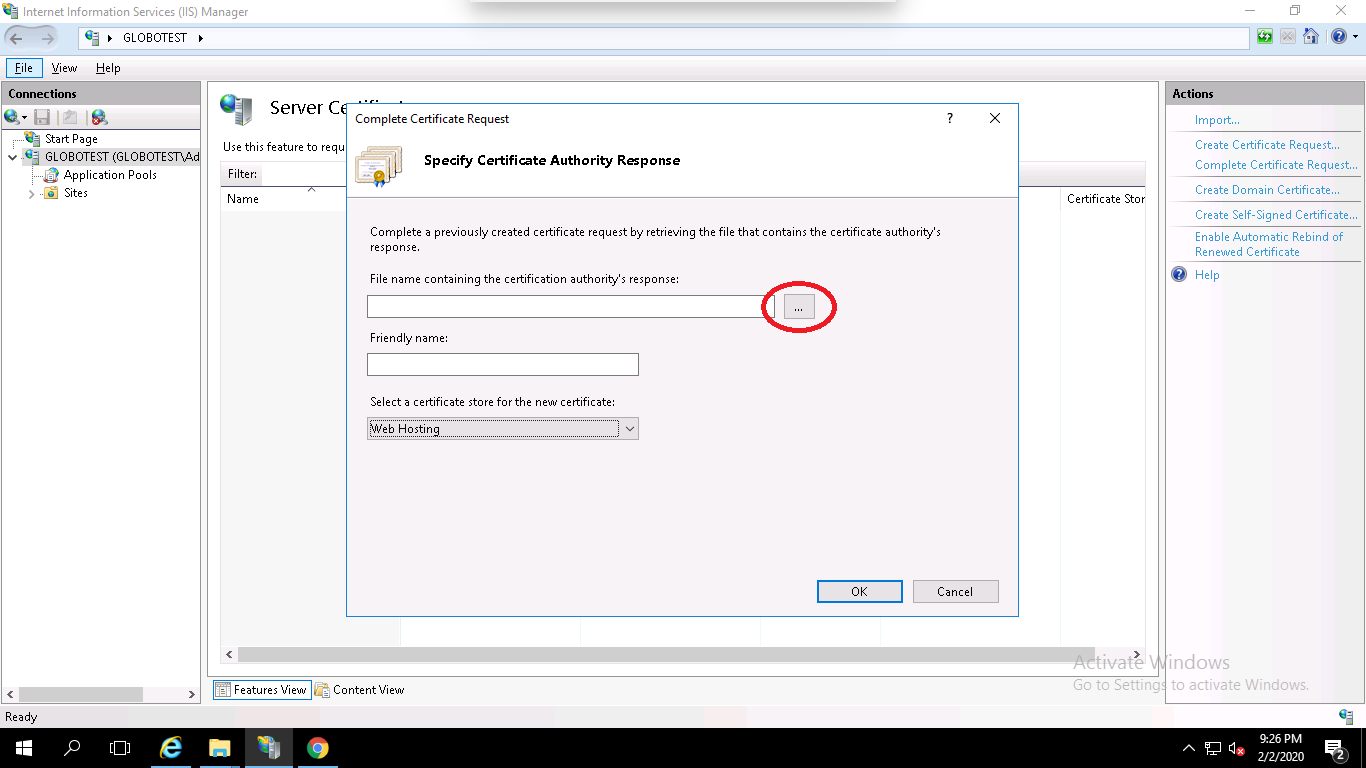
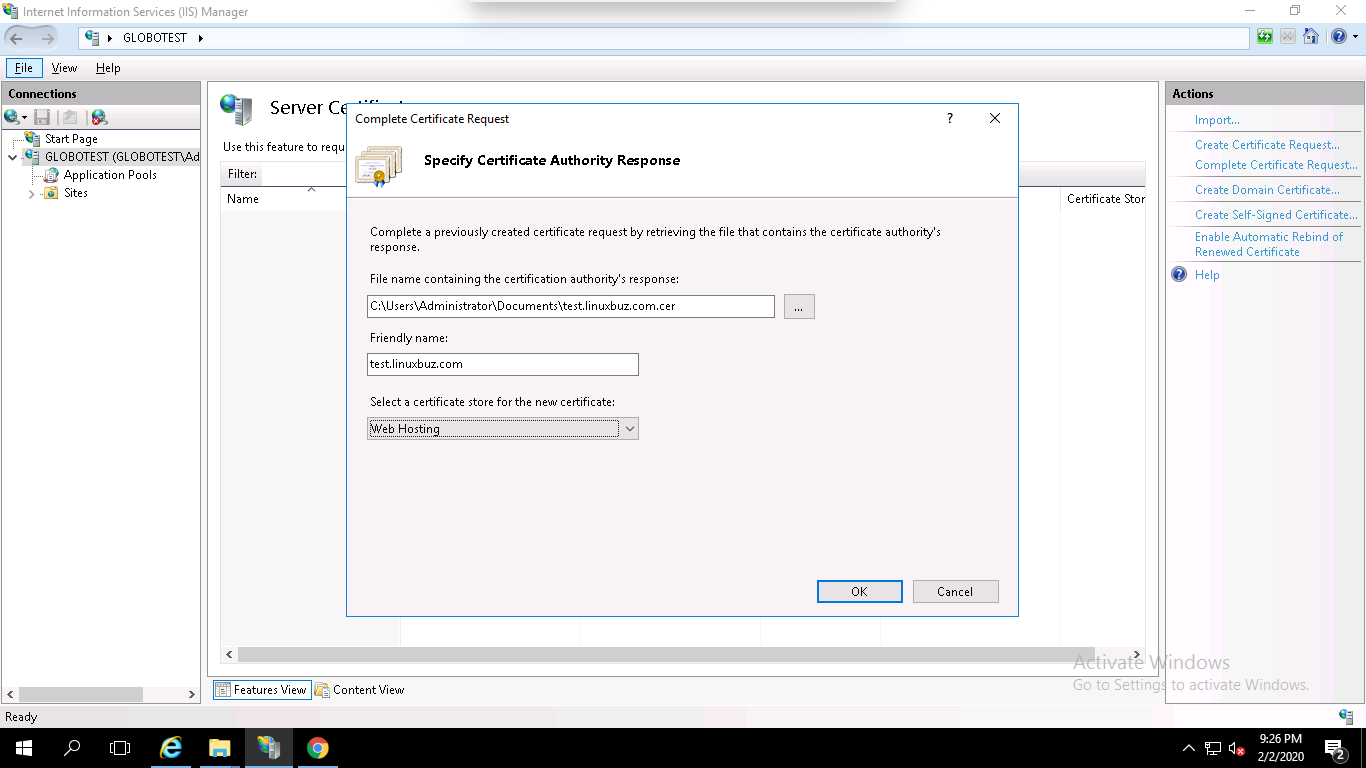
Step 4 – Browse the certificate file (.cer), provide your domain name, select Web Hosting in the certificate store option and click on the OK button.
At this point, you have successfully installed your SSL certificate. Next, you will need to assign the certificate to your website.
You can assign the certificate by following the below steps:
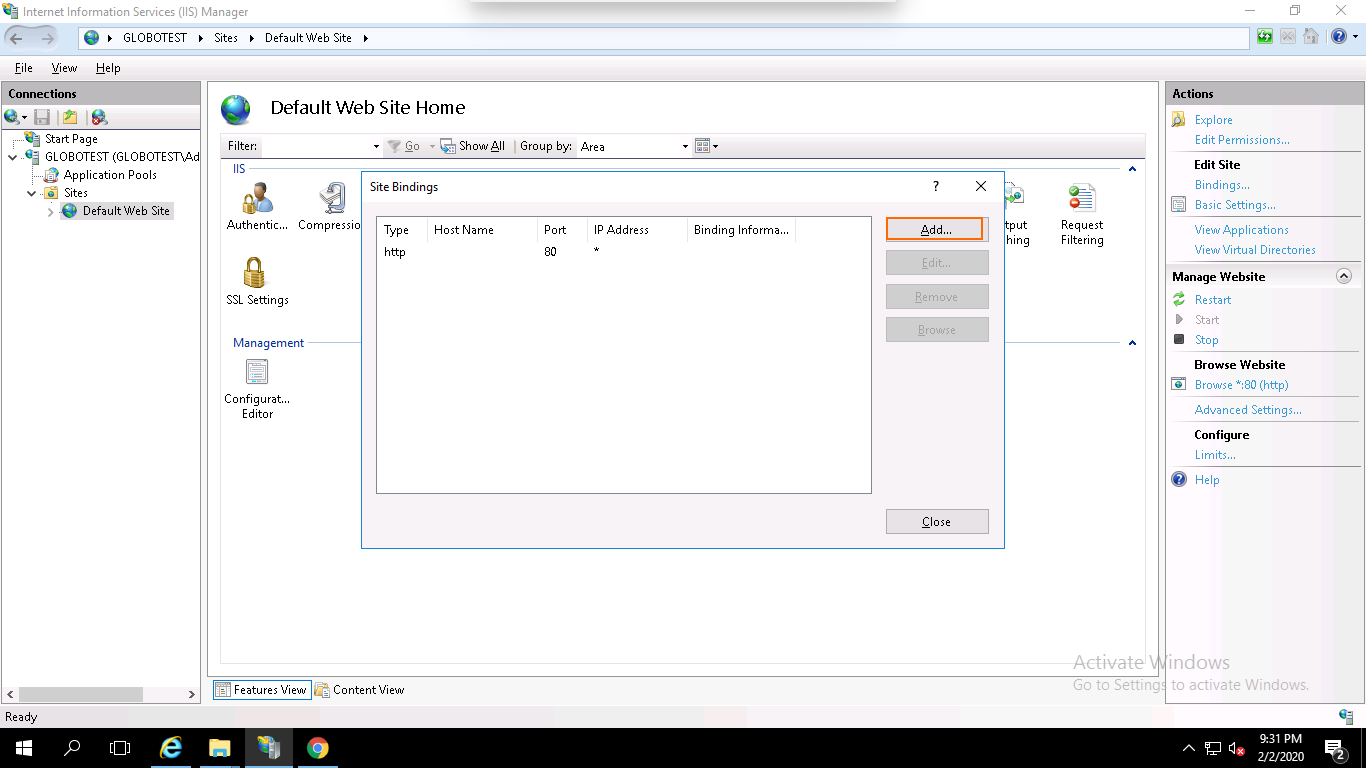
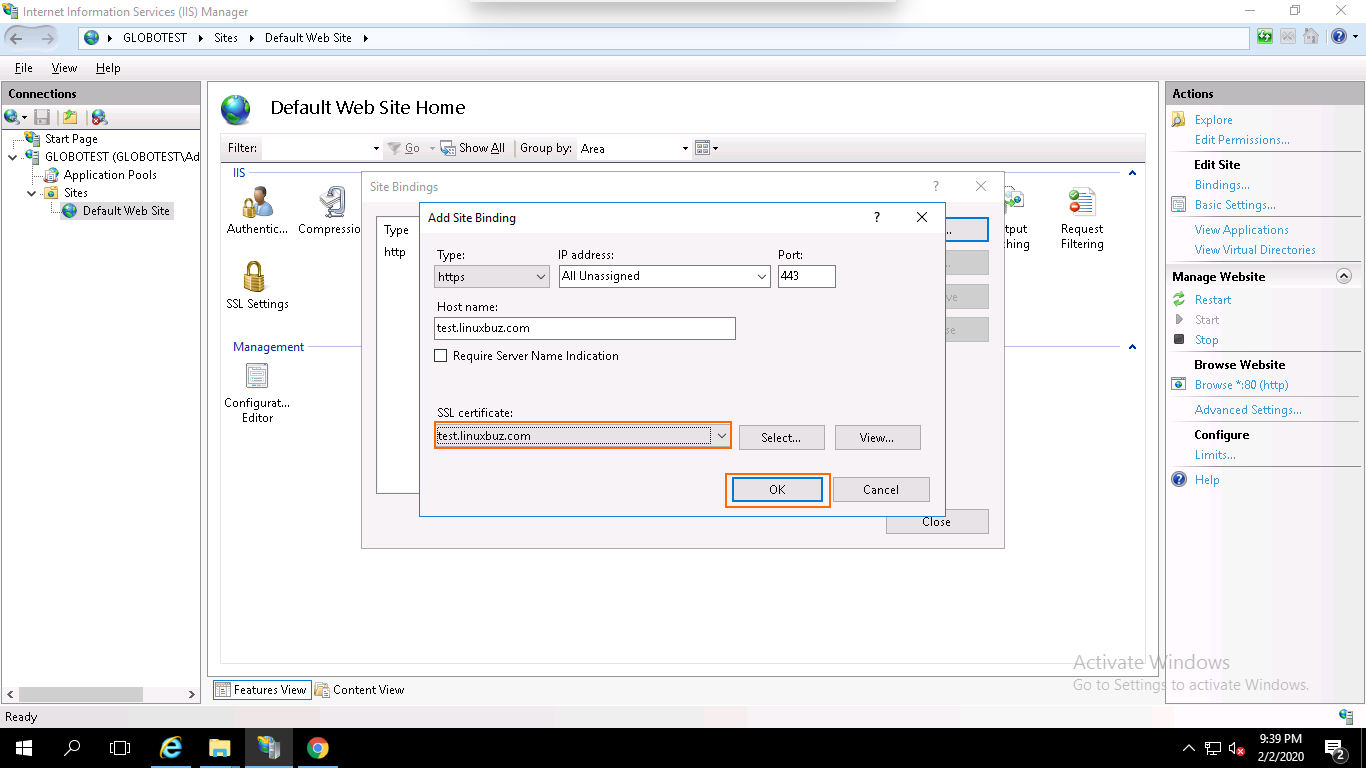
Step 1 – Open the IIS Manager, expand the server name and click on the Default Website then click on the Bindings in the right pane. You should see the following page:

Step 2 – Click on the Add button. You should see the following page:
Step 3 – Select https, select the IP address of your website or leave it unassigned, type port 443, type your domain name, select the domain name on which you want to install SSL and click on the OK button to install the certificate.
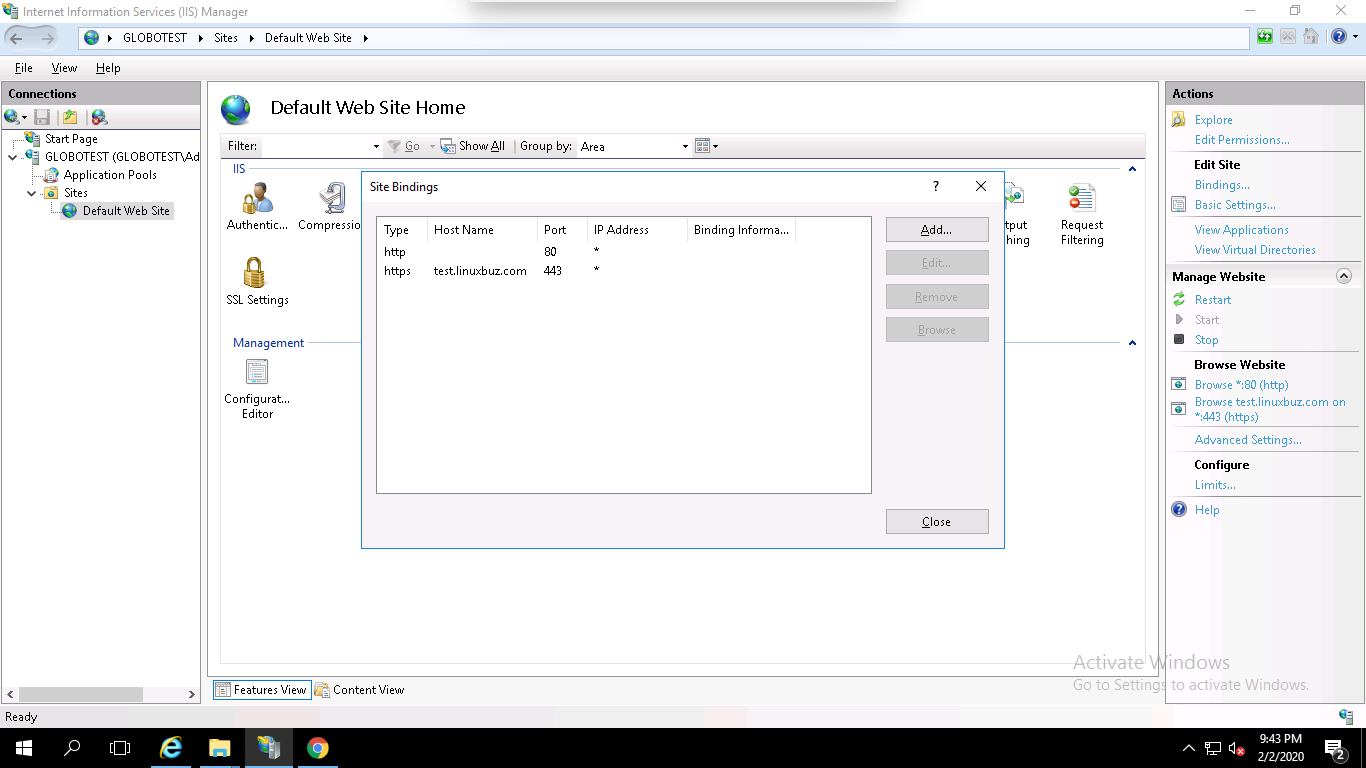
Your SSL certificate is now installed and the website configured to accept secure connections as shown below:
Congratulations! you have successfully installed an SSL certificate on Windows server 2019 using IIS. Your website is now secured with an SSL certificate.
In this article we will show your how to set up SSH server with Two-Factor Authentication (2FA) for Ubuntu and Debian.
SSH, also known as “Secure Shell“, is a network protocol that can be used to login remote system securely over an unsecured network. You can control your whole server with SSH. So securing SSH is a very important part of any system administrator. By default, SSH uses a password to authenticate the system. You can also use SSH key instead of a password. But, this is only a single factor authentication.
It is always recommended to use Two factor authentication to add an extra layer of security. In two factor authentication, you will need to provide your system user password and another password generated on a mobile device. This will significantly enhance your server’s security.
In this tutorial, we will show you how to secure SSH with two factor authentication.
In order to set up SSH Server with Two-Factor AuthenticationFirst, you will need to install Google Authenticator PAM module to your system. You can install it by running the following command:
apt-get install libpam-google-authenticator
Once installed, run the Google Authenticator with the following command:
google-authenticator
During the execution, you will need to answer some questions as shown below:
Do you want authentication tokens to be time-based (y/n): y
 Warning: pasting the following URL into your browser exposes the OTP secret to Google:
 https://www.google.com/chart?XXXl=otpauth://totp/root@debian%3Fsecret%3DMSKINXX2OQV54BRLGIJOERK5WE%26issuer%3Ddebian
Press y and hit Enter to continue. You should see a QR code in the following screen:
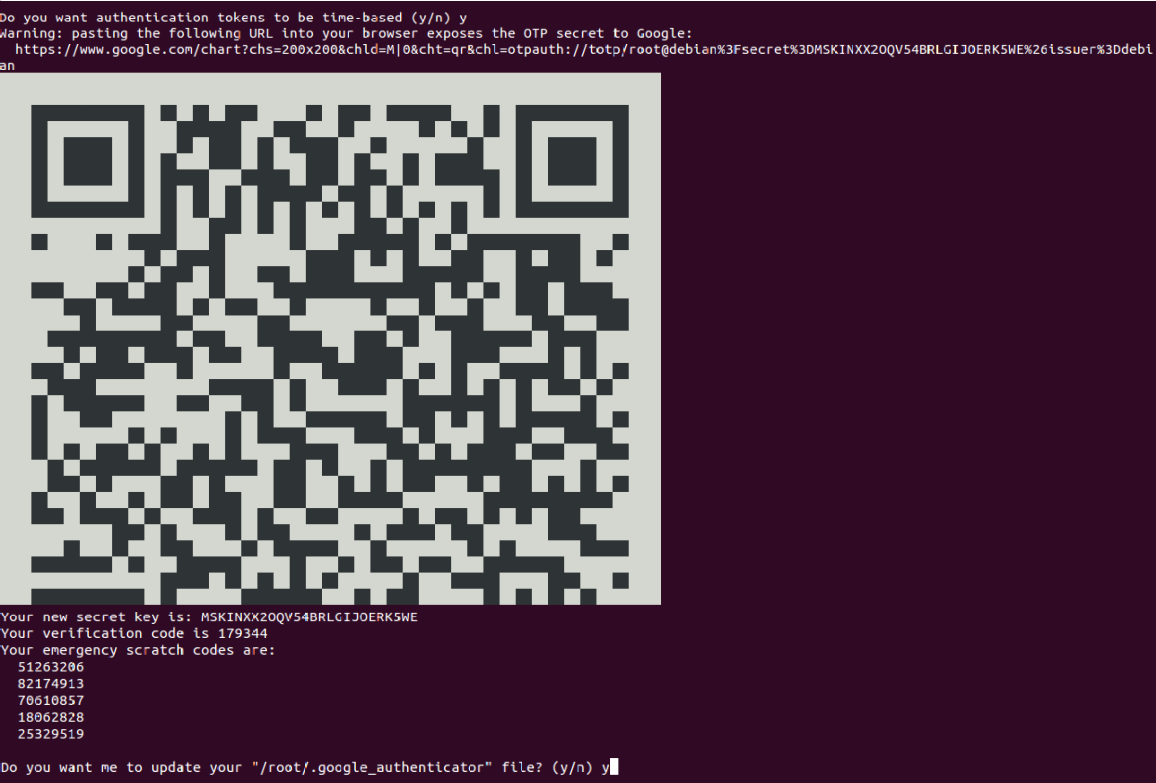
Next, open Google Authenticator on your Mobile and scan the QR code. Once the QR code is scanned, you should see a six-digit one-time password on your phone:
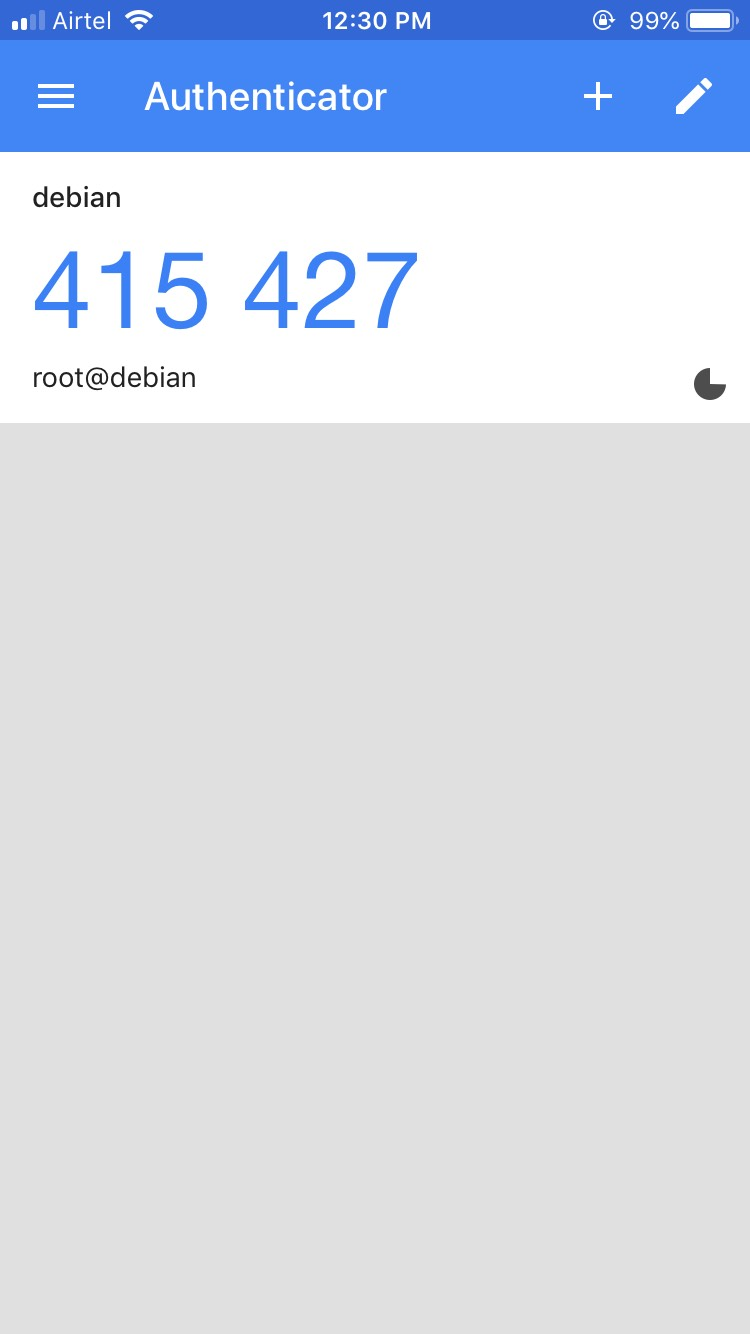
By default, it lasts for 30 seconds. Remember this password, you will need it later in order to log in to Ubuntu server via SSH.
You can also see the secret key, verification code and emergency scratch code in the above output. It is recommended to save it to a safe place for later use.
Next, answer all the questions with y and hit Enter to update your Google Authenticator configuration file as shown below:
 Do you want me to update your "/root/.google_authenticator" file? (y/n) y

 Do you want to disallow multiple uses of the same authentication
 token? This restricts you to one login about every 30s, but it increases
 your chances to notice or even prevent man-in-the-middle attacks (y/n) y

 By default, a new token is generated every 30 seconds by the mobile app.
 In order to compensate for possible time-skew between the client and the
 server, we allow an extra token before and after the current time. This
 allows for a time skew of up to 30 seconds between authentication server
 and client. If you experience problems with poor time synchronization, you
 can increase the window from its default size of 3 permitted codes (one
 previous code, the current code, the next code) to 17 permitted codes (the
 8 previous codes, the current code, and the 8 next codes). This will
 permit for a time skew of up to 4 minutes between client and server.

 Do you want to do so? (y/n) y

 If the computer that you are logging into isn't hardened against brute-
 force login attempts, you can enable rate-limiting for the authentication
 module.
 By default, this limits attackers to no more than 3 login attempts every
 30s.

 Do you want to enable rate-limiting? (y/n) y
Next, you will also need to configure SSH to use Google Authenticator. You can do it by editing the file /etc/ssh/sshd_config:
nano /etc/ssh/sshd_config
Find and change the following lines to yes:
 UsePAM yes
 ChallengeResponseAuthentication yes
Save and close the file when you are finished. Then, restart SSH service to apply the configuration:
systemctl restart ssh
Next, you will also need to define PAM rules for SSH service in /etc/pam.d/sshd file:
nano /etc/pam.d/sshd
Add the following line after @include common-auth :
auth required pam_google_authenticator.so
Save and close the file.
Your SSH server is now configured with two factor authentication. It’s time to test it.
Log in to another system, open your terminal and connect your server with SSH as shown below:
ssh root@192.168.0.4
You will need to provide your system password and Verification code generate by Google Authenticator.
 Password:
 Verification code:
After successful login, you should see the following output:
 Linux debian 4.19.0-5-amd64 #1 SMP Debian 4.19.37-5 (2019-06-19) x86_64
 The programs included with the Debian GNU/Linux system are free software;
 the exact distribution terms for each program are described in the
 individual files in /usr/share/doc/*/copyright.
 Debian GNU/Linux comes with ABSOLUTELY NO WARRANTY, to the extent
 permitted by applicable law.
 Last login: Mon Sep  9 01:12:32 2019 from 192.168.0.3
Congratulations! you have successfully set up SSH server with two-factor authentication for Ubuntu and Debian. I hope you have now enough knowledge to protect your SSH server with Google Authenticator.
Let’s Encrypt is a free Certificate Authority that provides a free SSL/TLS certificates for your domain; see how to install Let’s Encrypt SSL on a LAMP on CentOS 7. Let’s Encrypt provides a Certbot tool to obtain and install TLS/SSL certificates automatically on both Apache and Nginx web server. The certificate is valid for 90 days. So you will need to renew it before it expired. Let’s Encrypt is a nonprofit certificate authority managed by the Internet Security Research Group. Its main aims is to create a more secure and privacy-respecting Web by adopting HTTPS.
In this tutorial, we will learn how to install an SSL on a LAMP server with Let’s Encrypt on CentOS 7.
Before starting, it is recommended to update your system’s packages to the latest version. You can update them by running the following command:
yum update -y
Next, you will need to disable SELinux on your system. You can do this by editing /etc/selinux/config file:
nano /etc/selinux/config
Make the following changes, the line starting by SELINUX= :
SELINUX=disabled
Save and close the file, when you are finished. Then, restart your system to apply the configuration changes.
You will need to install Certbot Let’s encrypt client to your server. Certbot is a simple and easy to use tool to install and manage SSL certificate. By default, Certbot package is not available in the CentOS 7 default repository. So you will need to install the EPEL repository to your system. You can install it with the following command:
yum install epel-release
Next, install Certbot client and other packages with the following command:
yum install certbot python2-certbot-apache mod_ssl
Once the installation has been completed successfully, you can proceed to fetch and install the SSL certificate for your domain.
Now, fetch and install a Let’s Encrypt SSL for your domain named blog.linuxbuz.com using the following command:
certbot --apache -d blog.yourdomain.com
You will need to provide an email address and agree to the terms of service:
 Saving debug log to  /var/log/letsencrypt/letsencrypt.log

 Plugins selected: Authenticator apache, Installer apache

 Enter email address (used for urgent renewal and security notices) (Enter 'c' to cancel): your@yourdomain.com

 Starting new HTTPS connection (1): acme-v02.api.letsencrypt.org

 - - - - - - - - - - - - - - - - - - - - - - - - - - - - - - - - - - - - - - - -
 Please read the Terms of Service at https://letsencrypt.org/documents/LE-SA-v1.2-November-15-2017.pdf. You must agree in order to register with the ACME server at https://acme-v02.api.letsencrypt.org/directory
 - - - - - - - - - - - - - - - - - - - - - - - - - - - - - - - - - - - - - - - -

 (A)gree/(C)ancel: A

 - - - - - - - - - - - - - - - - - - - - - - - - - - - - - - - - - - - - - - - -
 Would you be willing to share your email address with the Electronic Frontier Foundation, a founding partner of the Let's Encrypt project and the non-profit organization that develops Certbot? We'd like to send you email about our work encrypting the web, EFF news, campaigns, and ways to support digital freedom.
 - - - - - - - - - - - - - - - - - - - - - - - - - - - - - - - - - - - - - - - -

 (Y)es/(N)o: Y

 Starting new HTTPS connection (1): supporters.eff.org
 Obtaining a new certificate
 Performing the following challenges:
 http-01 challenge for blog.yourdomain.com
 Waiting for verification...
 Cleaning up challenges
 Created an SSL vhost at /etc/httpd/conf.d/blog.yourdomain.com.conf
 Deploying Certificate to VirtualHost
 /etc/httpd/conf.d/blog.yourdomain.com.conf
Next, you will need to choose whether or not to redirect HTTP traffic to HTTPS:
 Please choose whether or not to redirect HTTP traffic to HTTPS, removing HTTP access.

 - - - - - - - - - - - - - - - - - - - - - - - - - - - - - - - - - - - - - - - -

 1: No redirect - Make no further changes to the webserver configuration.
 2: Redirect - Make all requests redirect to secure HTTPS access. Choose this for new sites, or if you're confident your site works on HTTPS. You can undo this change by editing your web server's configuration.

 - - - - - - - - - - - - - - - - - - - - - - - - - - - - - - - - - - - - - - - -

 Select the appropriate number [1-2] then [enter] (press 'c' to cancel): 2
Select option 2 and hit ENTER.
Once the installation is completed successfully, you should see the following output:
 Redirecting vhost in
/etc/httpd/conf.d/blog.linuxbuz.conf to ssl vhost in /etc/httpd/conf.d/blog.linuxbuz-le-ssl.conf

 - - - - - - - - - - - - - - - - - - - - - - - - - - - - - - - - - - - - - - - -
 Congratulations! You have successfully enabled https://blog.linuxbuz.com
 You should test your configuration at:
 https://www.ssllabs.com/ssltest/analyze.html?d=blog.linuxbuz.com
 - - - - - - - - - - - - - - - - - - - - - - - - - - - - - - - - - - - - - - - -

 IMPORTANT NOTES:

 - Congratulations! Your certificate and chain have been saved at:
   /etc/letsencrypt/live/blog.yourdomain.com/fullchain.pem
   Your key file has been saved at:
   /etc/letsencrypt/live/blog.yourdomain.com/privkey.pem

 - Your cert will expire on 2019-10-22. To obtain a new or tweaked
   version of this certificate in the future, simply run certbot again
   with the "certonly" option. To non-interactively renew *all* of
   your certificates, run "certbot renew"

 - Your account credentials have been saved in your Certbot
   configuration directory at /etc/letsencrypt. You should make a
   secure backup of this folder now. This configuration directory will
   also contain certificates and private keys obtained by Certbot so
   making regular backups of this folder is ideal.

 - If you like Certbot, please consider supporting our work by:

   Donating to ISRG / Let's Encrypt:   https://letsencrypt.org/donate
   Donating to EFF:                    https://eff.org/donate-le
Now, open the following link in your preferred web browser to check your SSL certificates: https://www.ssllabs.com/ssltest/analyze.html
By default, Let’s Encrypt certificates are expired after 90 days. So you will need to renew them before expiry date to avoid any problems.
You can renew the certificates with the following command:
certbot renew
You can also automate the renewal process by setting up a cron job.
To do so, edit the cron job with the following command:
crontab -e
Add the following line:
52 10 * * * root /usr/bin/certbot renew >/dev/null 2>&1
Save and close the file. The above command will run on every day at 10:52.
In this tutorial, we have learned how to secure Apache web server with Let’s Encrypt free SSL on CentOS 7. I hope you can now easily secure your web server with Let’s Encrypt.
The Linux name is a broad identifier for a variety of operating systems that are based on the Linux kernel; these operating systems are free and open-source, providing a variety of solutions for users of different skill levels. Using Linux-based systems, the user often has more reliance on system commands and command line tools; maintaining file permissions and attributes is one example of this. Linux file permissions, the permissions allowing users to access different system objects, files, and directories, are modified with the chmod command. Maintaining proper file permissions is essential in shared environments where multiple users do not share the same access requirements to files and systems.
To get started understanding more about file permissions and attributes, you should have a cloud server or dedicated server node running a current version of whichever Linux operating system you choose. For beginners, Linux Ubuntu is a popular distribution providing a user-friendly interface. Research the available options and choose a distribution that works for you.
When using the chmod command to alter your file permissions and attributes, there are different aspects of the command syntax that you may encounter.
For instance, there are implementation options that you may encounter, such as recursive (-R), force (-f), and verbose (-v). The recursive implementation is the most commonly used, and it is used to apply permissions to all the documents within the specified directory. The force implementation can be used when implementation should move forward even if errors occur, while the verbose implementation shows the objects as they’re processed.
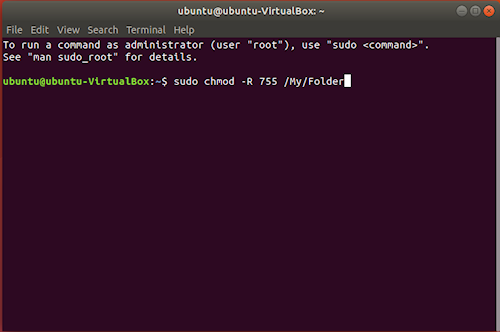
An example would be to give read, write, execute access (7) to owner (u) and group (g) , but no access (0) to others (o); using the recursive function (-R) to apply the same level of permissions to all documents contained within /my/directory.
sudo chmod -R 770 /my/directory
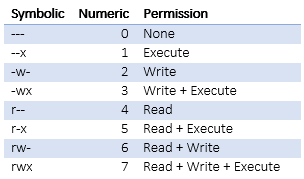
Permissions can be assigned as read (r), write (w), and execute (x) access; this is considered symbolic mode.
When the permissions are displayed, they are displayed in a combination of letters indicating the permissions for the owner, the group, and anyone else. To see an example of the notation in your Linux operating system, open terminal and type ls -l /etc, which will list the content of /etc including permissions.
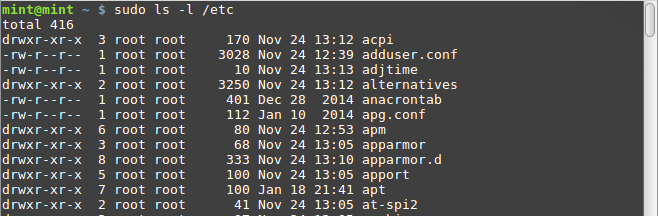
An example of this would be “drwxrwx—,” which shows that the owner (drwxrwx—) and those in the group (drwxrwx—) can read, write, and execute; anyone else outside (drwxrwx—) of the specified owner and group have no permissions. The dash (-) will occur where a permission is not given.
You can also use the symbolic mode in more specific instances where you want to make changes to specific users. There are four references; owner (u), group (g), others (o), and all (a or ugo).
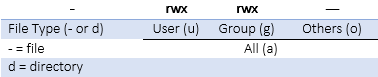
The owner is the owner of the file while the group is users that are part of the file’s group membership. The others identifier encompasses users that are neither owner nor group members, and all can be used when the permissions want to be set for all three previous user groups simultaneously.
When adding permissions to these users, the plus sign (+) is used to add the specified mode to the specified class, the minus sign (-) is used to remove the specified mode from the specified class, and the equal sign (=) is used when the specified mode should be the exact mode for the specific class.
An example of this would be “u+w,” which would add write permission to the user.
sudo chmod u+w /my/directory/
Another example would be “g-w,” would remove write permissions for the group.
sudo chmod g-w /my/directory/
Permissions may also be displayed in numeric mode, numbering from 0 to 7. The permissions, in ascending order, are no permission (0), execute (1), write (2), write and execute (3), read (4), read and execute (5), read and write (6), and read, write, and execute (7).
For instance, in the symbolic system, a permission could be displayed as “-rw-r–r–,” which could be translated into the numeric mode as “664”. This would indicate the first two users can read and write in this directory, while the third user can only read in this directory.
sudo chmod -R 644 /my/directory/
Hopefully, this introduction to Linux file permissions and the chmod command have given you more insight into your Linux operating system. It’s important to learn more about the ins and outs of the Linux system, making changes and updates to your operating system can be accomplished with simple commands, but it’s important to understand what commands you can use and how to utilize the command input systems.
Ecryptfs is a powerful but simple to use tool for encrypting directories. Perhaps you are keeping sensitive information in your home directory, and wish to secure those files from an attacker who gains access to your server but not your user credentials. Or maybe your database contains sensitive details that you wish to encrypt at rest. With Ecryptfs, it is easy to secure individual directories in a way that they cannot be accessed without a user logging into the account that owns the key. In this guide, we’ll encrypt the contents of a directory on an Ubuntu 16.04 server.
You’ll need the following in place before we begin:
• 1 server (Cloud Server or Dedicated Server), running a fresh installation of Ubuntu 16.04.
• Root access
Begin by installing the necessary packages.
apt-get install ecryptfs-utils -y
File encryption is a powerful tool, but its capabilities and limitations need to be understood before it is used for serious tasks. For purposes of illustration, we’ll create a test directory in /home so you can get a sense for how your encrypted filesystem will work.
mkdir /home/globotech
Now we’ll encrypt the contents of the globotech directory we’ve just made.
mount -t ecryptfs /home/globotech/ /home/globotech/
You’ll be prompted to choose a password, and to set an encryption type.
With these set, check if the contents of the directory are encrypted.
mount
[...]

cpu,cpuacct on /run/lxcfs/controllers/cpu,cpuacct type cgroup (rw,relatime,cpu,cpuacct,nsroot=/)

devices on /run/lxcfs/controllers/devices type cgroup (rw,relatime,devices,nsroot=/)

blkio on /run/lxcfs/controllers/blkio type cgroup (rw,relatime,blkio,nsroot=/)

name=systemd on /run/lxcfs/controllers/name=systemd type cgroup (rw,relatime,xattr,release_agent=/lib/systemd/systemd-cgroups-agent,name=systemd,nsroot=/)

lxcfs on /var/lib/lxcfs type fuse.lxcfs (rw,nosuid,nodev,relatime,user_id=0,group_id=0,allow_other)

tmpfs on /run/user/0 type tmpfs (rw,nosuid,nodev,relatime,size=101628k,mode=700)

/home/globotech on /home/globotech type ecryptfs (rw,relatime,ecryptfs_sig=9cff1b579bb64c22,ecryptfs_cipher=aes,ecryptfs_key_bytes=16,ecryptfs_unlink_sigs)
Next we’ll add a file with test content to this directory.
touch /home/globotech/file.txt

echo "Good Morning" > /home/globotech/file.txt
Unmount the encrypted globotech directory.
umount /home/globotech
With the directory unmounted, try to read the file you’ve just created.
cat /home/globotech/file.txt
z6<"3DUfw`M\`

W_65"I??_aO?EXgd+?+-   RK[a+?`,[-+=?Mec8 Td8Y  ?IV-[2d!fXMQYeQS+?!-SB

g7?%?¼hH+H?'F\++}H.+I;?2-/I!P[KE)

E

DFL'|Ug{_:4?2T0G-\H:

1q?X    vfq?,Xy*e~ox<lI619q2?~<   Q6):O%8 _&+)sMYW0lS!;0?n%#??5ÿ?D}F?j_sWNv

B

ZakBD

;T?t[IZlAOs]0??Q)N~Pp&hIbG@,?f

[...]
You’ll notice that the file is encrypted and the content is inaccessible. Without the password, an attacker cannot gain access to the file you’ve just made.
If you’d like access to your file again, run the same command you ran previously:
mount -t ecryptfs /home/globotech/ /home/globotech/
Use the same password to access your files. Please keep this password safe. If it is lost, no one will be able to regain access to your files, not even your service provider.
cat /home/globotech/file.txt
Good Morning
Encryption is a powerful way to protect your files in the event of a compromised server or stolen laptop. Everyone should encrypt their sensitive data, so share this article with anyone who may not know how easy encrypting directories can be. If you found this article helpful, feel free to share it with your friends and let us know in the comments below!
Though Linux is a less targeted operating system, it’s still important to monitor for malware. One of the best tools out there for doing so is Linux Malware Detect, which uses a variety of metrics to identify and remove malware. When used in conjunction with ClamAV, the well known antivirus solution for Linux (as well as Mac and Windows), Linux Malware Detect provides a very good defense against malicious software.
The steps of this guide requires you to have the following:
• 1 server (Cloud Server or Dedicated Server) running Ubuntu 16.
• Root access to the server
In order to install Linux Malware Detect, you’ll first need to download the installation tarball from the project’s web site. You can find it at this address.
wget http://www.rfxn.com/downloads/maldetect-current.tar.gz
Take your tarball and extract it into /usr/src/. Change into the resulting directory.
cd /usr/src

tar -xvf maldetect-current.tar.gz

cd maldetect*
An installation script is available for you to install LMD. Run it using this command:
./install.sh
Now let’s configure our Linux Malware Detect installation. We’ll need to make a few basic modifications to the default configuration file, so go ahead and open it in a text editor:
nano /usr/local/maldetect/conf.maldet
Here are the settings as they should look:
email_alert="1"

email_addr="youremail@localhost"

quarantine_hits="1"

quarantine_clean="1"

quarantine_suspend_user="1"

scan_clamscan="1"
Next, we’ll be installing ClamAV, so that Linux Malware Detect can use it as its antivirus engine.
apt-get install clamav -y

freshclam
You can do a lot with Linux Malware Detect. Here’s a sample of some commands you may find useful.
To update the library of malware detection signatures:
maldet -u
To update Linux Malware Detect’s malware versions:
maldet -d
To scan all the files residing in a specific directory:
maldet -a /path
To put all threats that Linux Malware Detect has identified into quarantine:
maldet -q SCANID
To restore files from quarantine:
maldet –s SCANID
With Linux Malware Detect and ClamAV, you can rest easy knowing that you’ve got one of the premiere antimalware and antivirus solutions available for Linux. If you found this article helpful, feel free to share it with your friends and let us know in the comments below!
SSH is a useful program for remotely logging in to a computer over the internet or a network. It creates a secure connection so powerful commands and tools can be safely used. In order to do this it needs a ‘port’: a number on the server that identifies which program can connect. However, two programs trying to use the same port can cause network conflicts. And although the default port is usually fine, sometimes the way other programs are set up stop it from working properly.
The following guide explains how to change the port SSH connects to on a CentOS 6 server.
Confirm that you have the following before you follow this guide:
• 1 Node (Cloud Server or Dedicated Server) running CentOS 6.
• Root access to the node.
In order to change the port, the first step is editing the config file for ‘sshd’, which is the SSH daemon. Use this command to edit it:
nano /etc/ssh/sshd_config
The default port for SSH is 22. Change this number to whatever you need, but be sure to avoid ports already in use by the server which are commonly used by other programs. This means most ports below 1024, but be sure to check what is in use to avoid conflicts later.
[...]

# The strategy used for options in the default sshd_config shipped with

# OpenSSH is to specify options with their default value where

# possible, but leave them commented.  Uncommented options change a

# default value.

#Port 22 <----------------------------------------------- You need to remove the comment (#) and change the value by the port you want
#AddressFamily any
#ListenAddress 0.0.0.0
#ListenAddress ::
[...]
After the config file has been edited and saved, the SSH daemon needs to be restarted for the changes to take effect. Use this:
service sshd restart
Or this:
/etc/init.d/sshd restart
If SELinux is enabled on the server, its security features will block the connection unless the port is also added there. Use this command, and insert the port number that was set in the sshd config file:
semanage port -a -t ssh_port_t -p tcp xxxx
Finally, the firewall will also need to be modified to allow the port through. If you used SSH for this guide, logging out before this last step will mean you can't log back in! Use this command, again substituting the port number used in the sshd config:
-A INPUT -m state --state NEW -m tcp -p tcp --dport xxxx -j ACCEPT
You can now securely connect to the server with SSH on the chosen port. If this guide was useful to you, share it with your friends!
If you administer a remote server, then you’re doubtlessly familiar with Secure Shell, or SSH. It’s a protocol that was first designed in 1995 and is still the gold standard for secure remote login and monitoring of systems. The current version is SSH-2, which fixed many vulnerabilities present in the original SSH-1 protocol.
Because SSH is so ubiquitous, it’s also a common vector of attack for intruders. There are many methods for improving SSH security, including disabling password login (using a key instead) and disabling login as root. One can also use the obfuscation technique of simply changing your SSH port from the default 22 to something else. This has the added benefit of cutting down on the amount of automated bot attacks that clutter up your logs.
This guide will walk you through the process of changing the SSH port on a server running Ubuntu 14.
Confirm that you have the following before you follow this guide:
• 1 Node (Cloud Server or Dedicated Server) running a fresh installation of Ubuntu 14.
• Root access to the node.
sshd is the daemon that runs SSH on Linux. Its configuration file has many options that you can tweak to alter the daemon’s behavior on your machine. Open the file and edit it with the text editor of your choosing.
nano /etc/ssh/sshd_config
It’s a simple matter to change the Port 22 default to your port of choice.
[...]

# What ports, IPs and protocols we listen for

Port 22 <----------------------------------------------------------------------- Change this value (22) by the port you want
# Use these options to restrict which interfaces/protocols sshd will bind to
#ListenAddress ::
#ListenAddress 0.0.0.0
Protocol 2
# HostKeys for protocol version 2
HostKey /etc/ssh/ssh_host_rsa_key
HostKey /etc/ssh/ssh_host_dsa_key
HostKey /etc/ssh/ssh_host_ecdsa_key
HostKey /etc/ssh/ssh_host_ed25519_key
#Privilege Separation is turned on for security
UsePrivilegeSeparation yes
[...]
Of course, you'll have to make sure not to use a port that's already in use by the server. Additionally, avoid the well-known ports 0-1023 and the registered ports 1024-49151, as they are generally reserved for other protocols and services. 49152 through 65535 are your best bet for a new port for your SSH service.
Now, restart the SSH daemon so it will reflect the changes you've made.
service ssh restart
or
/etc/init.d/ssh restart
Naturally, you'll need to verify that the port is allowed in your firewall. Otherwise, as soon you log out, if the firewall is set to port 22 you won't be able to log back in again.
ufw allow xxxx/tcp
Make sure xxxx is the port you set in the ssh config file.
Now that you have changed SSH's default port, you can rest assured that your server is more secure. Remember to define the new port with the 'p' flag the next time you log into your server. If this guide was useful to you, share it with your friends!
This guide will go over the basic steps you should take in order to transfer firewall rules from one server to another.
You’ll need the following in place before getting started with this guide:
• 2 Node (Cloud Server or Dedicated Server)
You’ll be transferring rules from one to another, so if you like, make sure they each have different firewall rules before beginning the guide so as to demonstrate its effectiveness.
First, check current iptables rules on server1.
iptables -S
Output Sample:
-P INPUT ACCEPT

-P FORWARD ACCEPT

-P OUTPUT ACCEPT

-A INPUT -m conntrack --ctstate RELATED,ESTABLISHED -j ACCEPT

-A INPUT -p tcp -m tcp --dport 22 -j ACCEPT

-A INPUT -p tcp -m tcp --dport 80 -j ACCEPT

-A INPUT -p tcp -m tcp --dport 443 -j ACCEPT

-A INPUT -s 1.2.3.4/32 -j DROP
You have the option to save server1’s iptables rules to a file. This is the command to do so.
iptables-save > iptables-rules-file
Now you can copy the file from server1 to server2. This is really all you’ll need to reinstate the rules on the other server.
scp iptables-rules-file root@ip.of.server.2:/root
Restore the rules on server2 from the file you just transferred.
iptables-restore < /root/iptables-rules-file
Review your iptables rules on server2 to make sure that they were indeed copied over.
iptables -S
Here's a sample of the output you should expect to see.
-P INPUT ACCEPT

-P FORWARD ACCEPT

-P OUTPUT ACCEPT

-A INPUT -m conntrack --ctstate RELATED,ESTABLISHED -j ACCEPT

-A INPUT -p tcp -m tcp --dport 22 -j ACCEPT

-A INPUT -p tcp -m tcp --dport 80 -j ACCEPT

-A INPUT -p tcp -m tcp --dport 443 -j ACCEPT

-A INPUT -s 1.2.3.4/32 -j DROP
With that, you should now have successfully migrated your iptables rules from one server to another. Refer to the man pages for iptables to get an idea of what else you can do with this versatile program. If you liked this KB article, please share it with your friends.