 Call us at 1-888-GTCOMM1
-

- Dedicated Hosting
- Cloud hosting
- Services
- Support
- Learning Center
- Referral Program
- Français
-
Why globotech
- Log in
OpenVPN® is open-source software that lets the user implement and create virtual private networks; these networks serve as a secure connection between two points, allowing traffic to move unobstructed while remaining private and secure. OpenVPN allows peers to use a pre-shared secret key, certificate, or username and password combination to authenticate traffic and communications. It can also function in multi-client environments, providing each client with an authentication certificate from the server.
OpenVPN was first published in 2001 and has become a favorite VPN solution for multiple platforms and device types; OpenVPN functions on Windows, Mac OS X, iOS, Android, and many Linux-style systems. Additionally, OpenVPN has been enhanced and modified for use across different router firmware implementations.
To get started installing OpenVPN, you will need a node running on a cloud server, dedicated server, or virtual private server; your operational needs or personal preference can be the deciding factor. When you’ve chosen a node, it will need to have an up-to-date version of CentOS 7 running.
CentOS 7 is a popular Linux-style operating system and you can learn more about the CentOS Project on the project website.
Additionally, you may choose to use a domain or sub-domain later in this guide. If you’re choosing to use a domain or sub-domain, you may want to set this up before setting up OpenVPN.
Once you’ve chosen your cloud, dedicated, or virtual private server node, verified your CentOS 7 installation, and have root access available, you’re ready to begin. As mentioned above, if you are using a domain or sub-domain for this setup, you may want to have that available before walking through the steps to install OpenVPN.
The first step during this installation is to make sure your server node is up-to-date and then reboot, processing any updates if needed:
yum update -y && sleep 5 && reboot
After your system reboots, you can install the EPEL (Extra Packages for Enterprise Linux) repository:
yum install epel-release -y
When complete, it’s time to install OpenVPN and EasyRSA (a small key management package for use with OpenVPN) for generating RSA keys:
yum install openvpn easy-rsa -y
Once OpenVPN and EasyRSA are installed, you can copy the example configuration:
cp /usr/share/doc/openvpn-*/sample/sample-config-files/server.conf /etc/openvpn
Now it’s time to edit the server configuration file:
nano /etc/openvpn/server.conf
This step is optional, but if you want to push all traffic through the VPN, you will want to uncomment the following line:
dh dh2048.pem

user nobody

group nobody
After you’ve edited the configuration file, create a folder to store the key. Then copy the key and the script:
mkdir -p /etc/openvpn/easy-rsa/keys

cp -rf /usr/share/easy-rsa/2.0/* /etc/openvpn/easy-rsa
When you’ve finished copying the keys and script, you can edit the vars file to make changes to the default value:
nano /etc/openvpn/easy-rsa/vars
Now copy the OpenSSL configuration:
# These are the default values for fields

# which will be placed in the certificate.

# Don't leave any of these fields blank.

export KEY_COUNTRY="CA"

export KEY_PROVINCE="QC"

export KEY_CITY="Montreal"

export KEY_ORG="Globotech"

export KEY_EMAIL="abuse@example.com"

export KEY_OU="IT"

# X509 Subject Field

export KEY_NAME="server"

export KEY_CN=vpn.example.com
Then copy the OpenSSL configuration:
cp /etc/openvpn/easy-rsa/openssl-1.0.0.cnf /etc/openvpn/easy-rsa/openssl.cnf
It’s time to start generating keys and certificates. Then you can load the vars file to automate the setup process:
cd /etc/openvpn/easy-rsa

source ./vars
Before proceeding, we want to use a fresh install to clean up a bit. Make sure to do this on a fresh install, since you will lose all your certificates:
After cleaning up, we’re going to generate keys making sure to match our KEY_NAME value:
./build-ca

./build-key-server server

./build-dh
Take the generated key, copy it, and place the copy in your OpenVPN folder:
cd /etc/openvpn/easy-rsa/keys

cp dh2048.pem ca.crt server.crt server.key /etc/openvpn
Now we’re going to generate our client certificate, replacing the “client” with the username you choose:
cd /etc/openvpn/easy-rsa

./build-key client
When complete, we want to configure the routing parts of CentOS 7 for use with the VPN installation:
yum install iptables-services -y

systemctl mask firewalld

systemctl enable iptables

systemctl stop firewalld

systemctl start iptables

iptables --flush
We want to add some forwarding rules before enabling our VPN service:
iptables -t nat -A POSTROUTING -s 10.8.0.0/24 -o eth0 -j MASQUERADE

iptables-save > /etc/sysconfig/iptables

nano /etc/sysctl.conf
net.ipv4.ip_forward = 1
Once you’ve completed your configuration and forwarding rules, it’s time to enable the OpenVPN service and start it up:
systemctl -f enable openvpn@server.service

systemctl start openvpn@server.service
After starting and enable the service, we want to configure the client, copy the “ca” certificate, and copy the “client” key. Each of these copied files is necessary to use the VPN:
/etc/openvpn/easy-rsa/keys/ca.crt

/etc/openvpn/easy-rsa/keys/client.crt

/etc/openvpn/easy-rsa/keys/client.key
To get started using the VPN, we need to create a .ovpn file configuration for use with OpenVPN:
nano client.ovpn
client

dev tun

proto udp

remote "your_server_ip" 1194

resolv-retry infinite

nobind

persist-key

persist-tun

comp-lzo

verb 3

ca ca.crt

cert client.crt

key client.key
Once you’ve created your .ovpn file it’s time to use the certificate:
Windows: Copy all file to C:Program FilesOpenVPNconfig

MacOS: Import .ovpn file with Tunnelblick

Linux: sudo openvpn --config client.ovpn
Congratulations, you’ve installed OpenVPN on your cloud or dedicated server node running CentOS 7. If you found this guide on how to install OpenVPN helpful, please share it with other users going through the same process. Additionally, check out our other guides and learn more about other options available for your cloud server or dedicated server nodes.
Short for Internet Protocol address, an IP address is a number that is assigned to every device on a network, allowing the device to communicate inside and outside the network while providing identification. There are different types of IP addresses. The most commonly used are static and dynamic addresses.
Static IP addresses mean the IP address for the specific device does not change when prompted by the client/server protocols; static IP addresses are named as such because they remain the same. Conversely, dynamic IP addresses change when prompted by the client/server protocol.
Static IP addresses are useful when a device on the network needs to be assigned a consistent address that data can be sent to, without concern about the address changing or losing data transmission.
In a previous tutorial, we’ve covered how to assign a static IP address to your node running Windows Server 2016. If you’re looking to assign another static IP, this tutorial will help guide you through the process.
To start assigning an additional static IP on your Windows Server 2016 instance, you will need a node that’s either on a Dedicated or a Cloud Server. You can choose whichever node type you’re more comfortable with or have available.
When you’ve selected your node, make sure to update the Windows Server 2016 software, as well as any hardware required for your node. Additionally, make sure you have administrative access to your node, you will need this to set the additional static IP address.
The steps to assign an additional static IP address are very similar to assigning the first static IP address, though the process will not work if there is not a static IP address already in place.
Your first step to assigning this additional address is connecting to your node, which can happen through the console or a remote desktop connection.
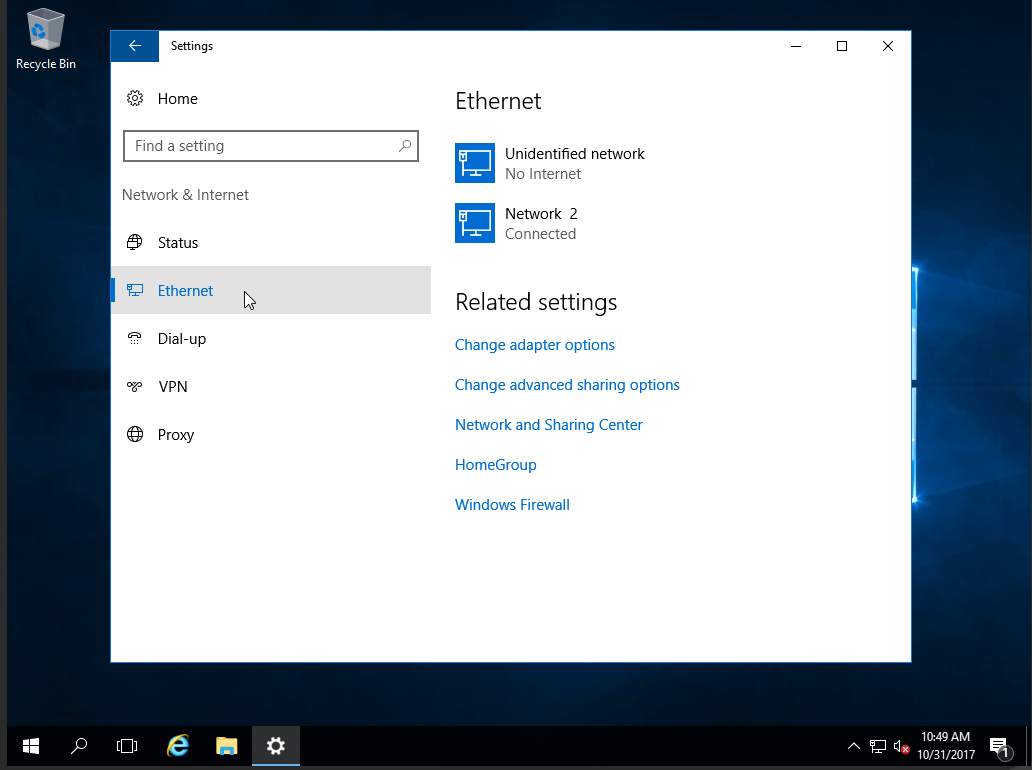
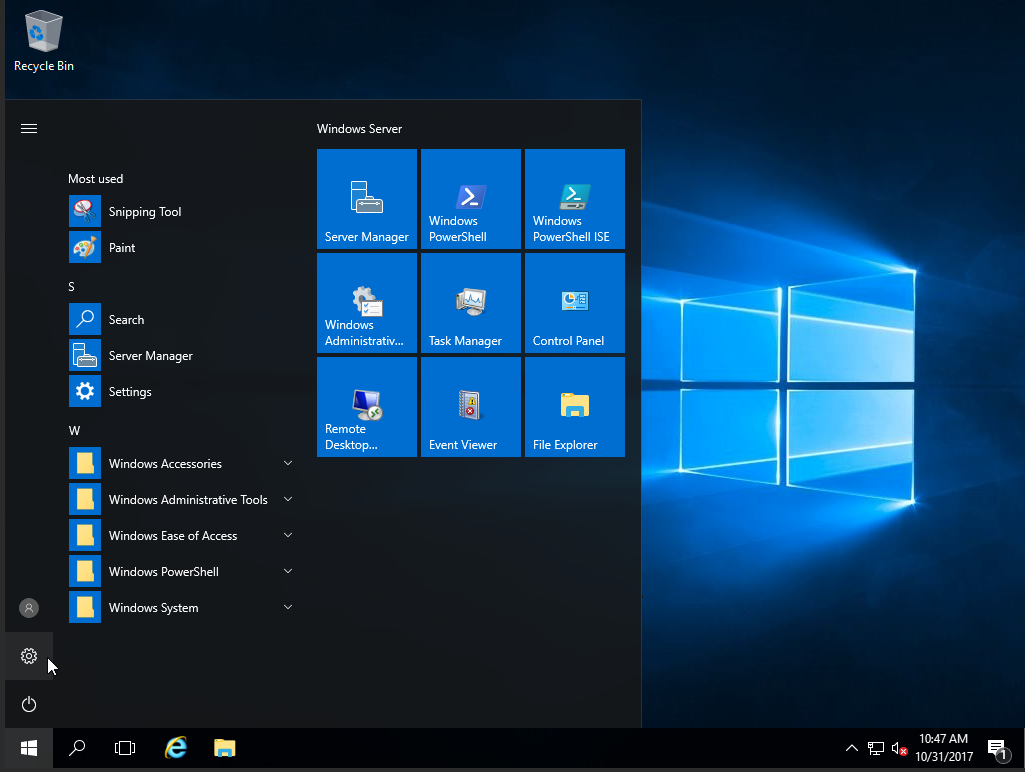
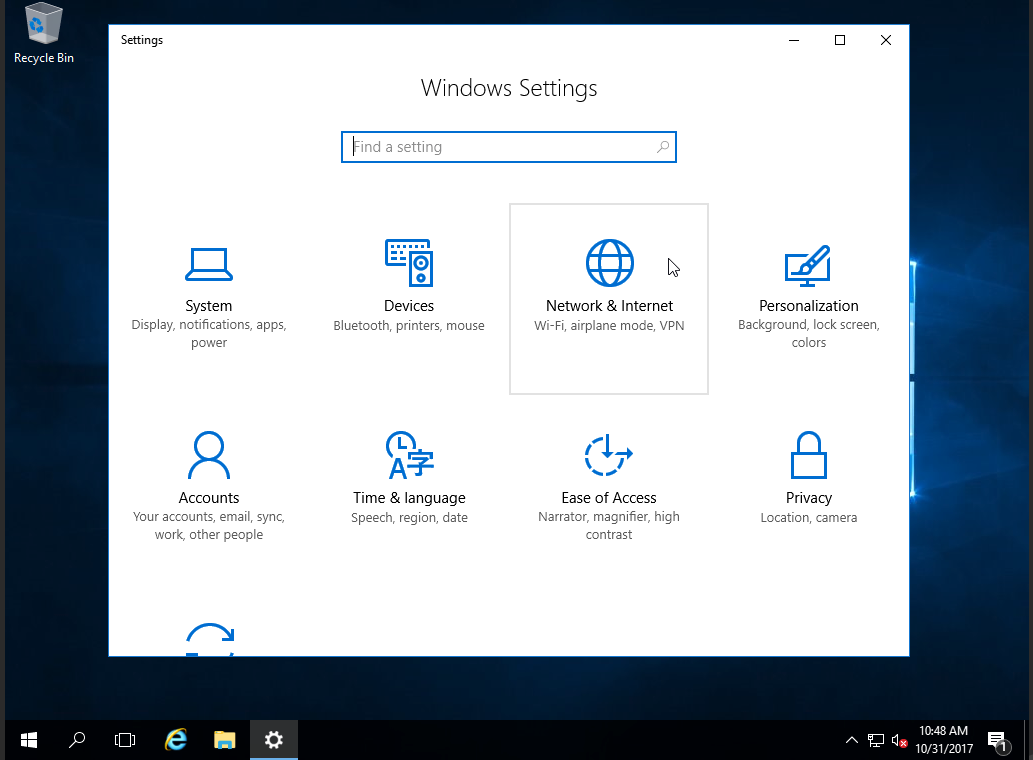
Once the console or remote connection is open, you will need to open the settings:

In the settings option, select network and internet settings:

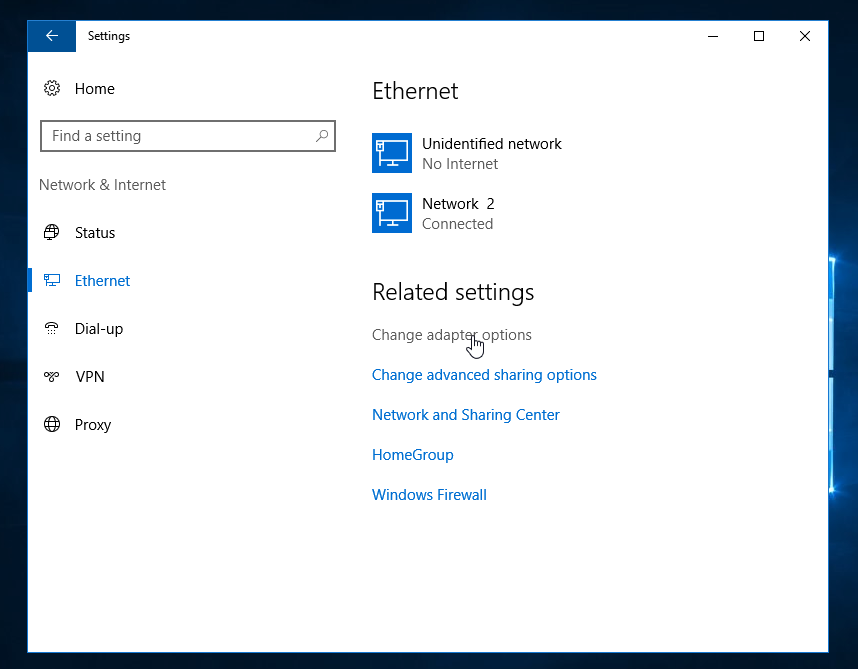
When these settings open, you will need to choose the Ethernet option:
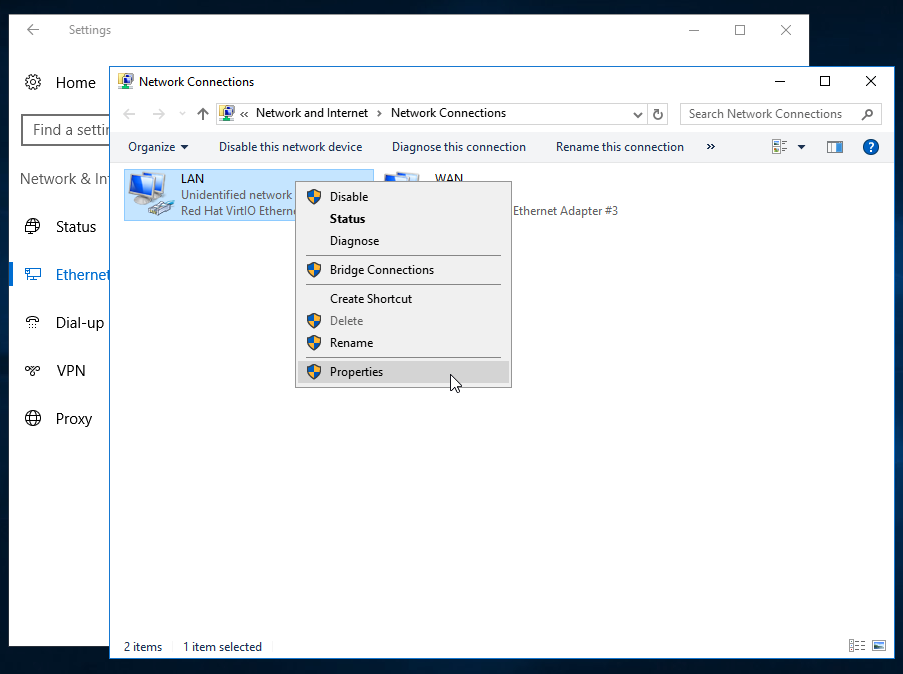
After choosing Ethernet, select the Change Adapter option:

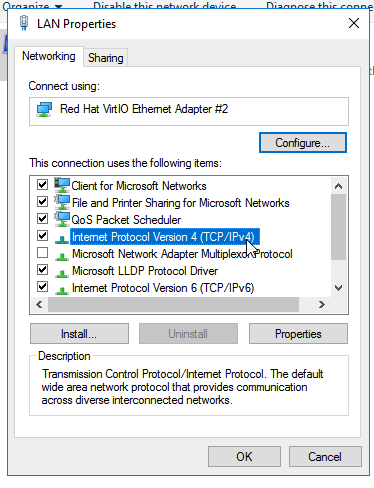
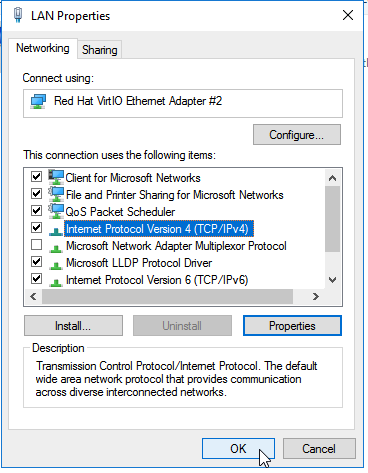
When the options load, right click on the interface you’re configuring (this is usually the network connection you’re configuring) and then choose properties:
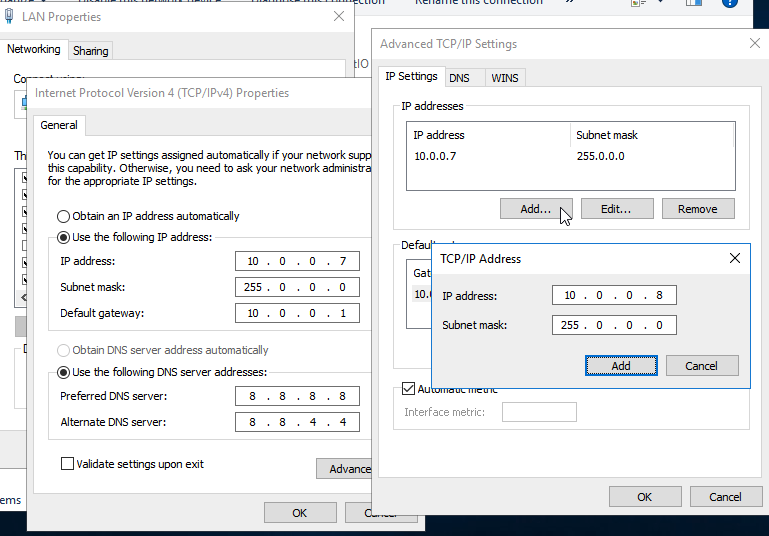
Now that you’ve selected the correct interface, choose Internet Protocol Version 4 (TCP/IPv4) and click on properties again:

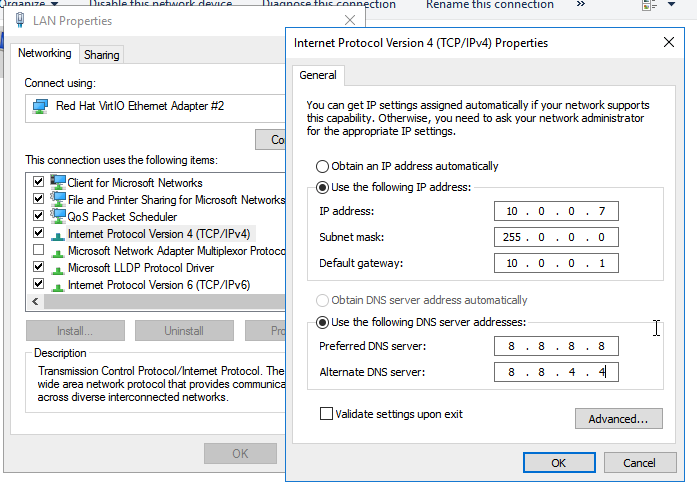
This will prompt you to fill in some information, including the Network Mask, Default Gateway, and the DNS IP. However, it’s important to have the first static IP address in place; otherwise, the options will not be present:

After filling in the required information, click on the advanced option. Inside the IP section of the new window, add your additional static IP address:
Click OK after completing this information, as well as OK on the next two windows.
Congratulations, you’ve successfully given your node running Windows Server 2016 an additional static IP address. Your node will no longer be provided a dynamic address whenever prompted by the client/server protocols. If you found this guide useful during the setup of your additional address, please share it with other users going through the same process.
Using OpenVPN allows you to securely and safely access the internet, especially when you’re connected to a public or untrusted network. OpenVPN is a solution that will enable you to create a wide array of network configurations; the configurations allow customized private network solutions that can meet a variety of needs. OpenVPN is an open-source software that employs Secure Socket Layer (SSL) protocols for additional security.
OpenVPN allows authentication through pre-shared secret keys, certificates, or a username and password combination. Through this authentication, secure point-to-point connections are established with high-level encryption protocols.
When you decide to install and update OpenVPN on Ubuntu 16.04, you will first need a node running Linux Ubuntu 16.04 LTS; the node you choose can be on a cloud server or a dedicated server. It’s important to verify that your operating system is running the most recent version, including any updates or patches that may need to be installed.
The first step in any successful implementation is updating the system, verifying that all necessary updates have been pushed and the install itself is clean. You can check this by running the following commands:
$ apt-get update

$ apt-get upgrade
Once the updates are pushed, you can then proceed with installing OpenVPN and EasyRSA on your node:
$ apt-get install openvpn easy-rsa
Now that OpenVPN and EasyRSA have been installed, it’s time to set up the CA Directory and then move to it:
$ make-cadir ~/openvpn-ca && cd ~/openvpn-ca
You will need to edit the vars file to match the information you have:
$ nano vars
export KEY_COUNTRY="US"

export KEY_PROVINCE="CA"

export KEY_CITY="SanFrancisco"

export KEY_ORG="Fort-Funston"

export KEY_EMAIL="me@myhost.mydomain"

export KEY_OU="MyOrganizationalUnit"
If needed or if you choose, you can edit the keyname as well:
export KEY_NAME="server"
After setting up the directory, editing the vars file, and editing the keyname if you chose to do so, it’s time to build the CA Authority:
$ source vars

$ ./clean-all

$ ./build-ca
At this point you will receive a set of prompts, you may type Enter at each prompt.
When the prompts have completed, it’s time to create the server certificate, the key, and the encryption files. If you opted to change the KEY_NAME value earlier, you would need to verify that you’re building the correct key at this time:
$ ./build-key-server server
Make sure to accept the default entry during the build.
Now it’s time to generate the DH Key:
$ ./build-dh
After generating the DH Key, the TLS Key will need to be generated:
$ openvpn --genkey --secret keys/ta.key
There are two options for building a certificate here, once that generates a password and one that does not create a password.
No Password Option
It’s time to generate a client key pair and certificate, replacing “client” with the name of your generated certificate:
$ cd ~/openvpn-ca

$ source vars

$ ./build-key client
Password Option
If you would prefer to have a password assigned to your certificate during this build, follow the below commands:
$ cd ~/openvpn-ca

$ source vars

$ ./build-key-pass client
Now that the certificate has been built, with or without a password, the OpenVPN server can be configured. During this configuration, make sure to match KEY_NAME with the correct name:
$ cd ~/openvpn-ca/keys

$ cp ca.crt server.crt server.key ta.key dh2048.pem /etc/openvpn

$ gunzip -c /usr/share/doc/openvpn/examples/sample-config-files/server.conf.gz | tee /etc/openvpn/server.conf
We need to edit the openvpn.conf file to continue the configuration, following all of the steps and commands outlined below, as applicable:
$ nano /etc/openvpn/server.conf
Once the edits are complete, it’s time to configure the server to forward traffic through the VPN:
$ nano /etc/sysctl.conf
add:
net.ipv4.ip_forward=1
Reload sysctl

$ sysctl -p
First, we need to locate the primary interface:
$ ip route | grep default

default via 192.168.65.254 dev eth0 onlink
After the primary interface is located, the UFW rules will need to be altered:
$ nano /etc/ufw/before.rules
# START OPENVPN RULES

# NAT table rules

*nat

:POSTROUTING ACCEPT [0:0]

# Allow traffic from OpenVPN client to eth0 (change to the interface you discovered!)

-A POSTROUTING -s 10.8.0.0/8 -o eth0 -j MASQUERADE

COMMIT

# END OPENVPN RULES
During this alteration, the default UFW rules will also need to be edited:
$ nano /etc/default/ufw
DEFAULT_FORWARD_POLICY="ACCEPT"
When the necessary edits are complete, it’s time to open the firewall port on OpenVPN:
$ ufw allow 1194/udp

$ ufw allow OpenSSH

$ ufw disable

$ ufw enable
It’s time to start and enable the OpenVPN server. When the server is enabled, make sure to check the server status:
$ systemctl start openvpn@server

$ systemctl enable openvpn@server

$ systemctl status openvpn@server
We need to create the client configuration file, making a few minor edits and adding some comments:
$ mkdir -p ~/client-configs/files

$ chmod 700 ~/client-configs/files

$ cp /usr/share/doc/openvpn/examples/sample-config-files/client.conf ~/client-configs/base.conf

$ nano ~/client-configs/base.conf
Edit the following lines:
remote server_IP_address 1194

proto udp

user nobody

group nogroup
Comment out these lines by adding “#”:
#ca ca.crt

#cert client.crt

#key client.key
Then add:
cipher AES-128-CBC

auth SHA256

key-direction 1
After completing the edits and comments, you will need to create a script that generates the config file, making sure to run the following commands and include any necessary changes:
$ nano ~/client-configs/make_config.sh
Then add:
KEY_DIR=~/openvpn-ca/keys

OUTPUT_DIR=~/client-configs/files

BASE_CONFIG=~/client-configs/base.conf
cat ${BASE_CONFIG} \
<(echo -e '
${KEY_DIR}/ca.crt \
<(echo -e '
${KEY_DIR}/${1}.crt \
<(echo -e '
${KEY_DIR}/${1}.key \
<(echo -e '
${KEY_DIR}/ta.key \
<(echo -e '
> ${OUTPUT_DIR}/${1}.ovpn
Change the permissions:
chmod 700 ~/client-configs/make_config.sh
Finally, it’s time to generate the client file:
cd ~/client-configs

./make_config.sh client_name
You should be able to access the client file:
ls ~/client-configs/files
Congratulations, you’ve successfully installed and updated OpenVPN on your node running Ubuntu 16.04 LTS. You’re now ready to run your OpenVPN instance and begin securely connecting and transmitting data over a variety of networks; make sure to update OpenVPN as needed or when critical updates are pushed. If you found this guide helpful, please share it with other users engaging in similar setups.
IP addresses, short for Internet Protocol addresses, are numbered labels that each device on a network receives; the IP address allows for the device to communicate while assigning identification and addressing. A static IP address is a specific classification that of address that is assigned or configured for a specific device; this means the address is not assigned by the client/server protocols used for automatically assigning IP addresses. These addresses are considered static since the IP address does not change; a static address may be used to provide a stable address for a device in your network, allowing requests to be forwarded consistently to a designated address without worrying about an IP address change.
In this tutorial, we’re assigning a static IP address in Windows Server 2016. To do that, you will need one node that already has Windows Server 2016 installed; the node you choose may be hosted on a cloud server or a dedicated server. A cloud server is a shared resource that hosts a virtual server environment while a dedicated server is a hardware server that’s been configured to be used by one party.
When you’ve chosen your node, make sure to run any updates necessary for your Windows Server 2016 instance; running updates on the system is a good first step for any changes or installations.
It’s important to note that you will need access to the administrator account or an administrative login for your server before you can set a static IP address.
The first step to assigning your new IP address is to connect to the node through the console or a remote desktop connection, if accessible:
Once accessed, you need to open the settings:
In the settings, open the network and internet settings:
When opened, click on the Ethernet option:

Then you can select the Change Adapter options:
After the options are open, right click on the interface you’re attempting to configure (this usually is your network connection) and then click on properties:

Then choose the Internet Protocol Version 4 (TCP/IPv4) option, click on the properties option:
Once opened, you can then fill in the information that’s required to make the change to a static IP, making sure to update the Network Mask, Default Gateway, and DNS IP address as necessary:
After updating the necessary information, click OK, then click OK again when the interface page comes up:
Once complete, your IP address has been configured to static, meaning it will not change or be assigned a new address.
Congratulations, you’ve successfully updated your node running Windows Server 2016 with a static IP address. Your IP address will no longer be assigned by the client/server protocols, instead of remaining the same each time. If you found this guide helpful when making changes to your Windows Server instance, please share this guide with other users attempting the same process.
Configuring your server with an accurate date and time is essential for keeping information consistent across multiple servers or file logs. The date and time for your server can be setup to validate using Network Time Protocol (NTP), which allows the system to synchronize for accurate time keeping.
NTP has been in use and continued development since 1985, making it one of the oldest internet standards currently used. NTP is intended for synchronizing the date and time on the network to within a few milliseconds of Coordinated Universal Time (UTC).
Using an NTP is an efficient method of making sure that the server date and time is always accurate, as the network will continuously adjust the system time based on the upstream NTP server.

NTP-Algorithm
The first step in your setup process is to install ntp and ntpdate, which can be installed using yum:
yum install ntp ntpdate
*Note: ntp is going to be used to receive a continuously updated, current system time from the upstream NTP server.

*Note: ntpdate is a utility that's used to set the system date and time via NTP.
Now that ntp and ntpdate are installed, you may use the following command to adjust your system’s date and time. This command should be run once, and then only as needed in the future:
ntpdate pool.ntp.org
Once the RPM installation has completed, you will need to edit the NTP configuration on your system using a text editor of your choice. After opening the NTP configuration file, add the NTP server that you would like to use for your upstream NTP server:
vim /etc/ntp.conf
You can set the public servers from the pool.ntp.org project web page:
server 0.north-america.pool.ntp.org

server 1.north-america.pool.ntp.org

server 2.north-america.pool.ntp.org

server 3.north-america.pool.ntp.org
After completing this, you are ready to start the ntpd server:
/etc/init.d/ntpd start
The final step is to set ntpd to start on boot if desired. If you choose to do so, use the following command to have the ntpd start on boot:
chkconfig ntpd on
Congratulations! You’ve completed setting up your system to received updated date and time from an upstream Network Time Server.
You’ve completed the steps needed to configure date and time using NTP on CentOS 6. These servers are designed to keep your system as close to Coordinated Universal Time as possible, usually within a few milliseconds. If you found this guide helpful during your setup, please share it with someone else that is going through the same process.
X-Forwarded-For (XFF) is a special HTTP header field that is used to identify the originating client IP address, regardless of whether connecting through a proxy, load balancer, or other such service. Normally, when you have something like a load balancer intercepting traffic to your website and then forwarding it to your back end server, the back end server will interpret all traffic it receives as coming from the load balancer. However, it can be easy to see how what you really want is to know the address of the client, and not your own load balancer. In order to obtain the actual client’s IP address, for example to use for geolocation data, you will need to enable usage of the X-Forwarded-For header field when determining the client IP address.
This brief tutorial will cover how you can enable usage of X-Forwarded-For in your Nginx server with a few simple configurations.
• 1 Server (Cloud Server or Dedicated Server) with installed Nginx Web Server
X-Forwarded-For in the Real World
Before we begin the tutorial, let’s discuss a possible real-world application of using X-Forwarded-For. The service CloudFlare, used for protection against Distributed Denial of Service (DDoS) attacks, is a popular use case.
To protect your server, CloudFlare actually acts as a reverse proxy. This means that instead of all requests going directly to your web server, they all first go to the CloudFlare servers. At this point, CloudFlare is receiving the actual client’s IP address in their header information. After the requests sent by the client are determined to be safe, the CloudFlare server will then forward the requests to your server. Here however, your server will see the IP address of the CloudFlare server as the originating client.
In the case that your web application uses the originating IP of the visitor as part of its logic or for geolocation data, the usage of the CloudFlare server’s IP address will essentially break down how your application needs the data. If you were to open the access logs on your server, you would quickly see the root of the problem: all originating requests appear to be coming from the CloudFlare server, with no actual client IP addresses in sight.
If you then use a security service such as CloudFlare or a load balancer such as HAProxy, you will encounter this issue unless you take the X-Forwarded-For IP header field into account. All intermediary services such as CloudFlare must include the originating client IP address that they receive in the X-Forwarded-For IP field, as is industry standard. This makes the solution very simple: all you need to do is configure your server to use the client information from X-Forwarded-For IP when processing data, and not the client IP address it is receiving directly.
Nginx Setup: Compiling with the RealIP Module
Nginx is a web server that can act as a reverse proxy as well as a load balancer. If you are using Nginx, you will need to modify it in order to make use of the X-Forwarded-For request header field. For your Nginx web server to use the real customer IP address instead of the proxy address (or the CloudFlare server address), we will need to enable a module known as ngx_http_realip_module, which can be referred to as the RealIP module. This module is responsible for telling your Nginx server which information to use from incoming requests when determining the client IP address.
To start using ngx_http_realip_module, you will need to compile it with Nginx as it is not built by default. For all modules that are not included in Nginx, you will need to recompile your entire web server to include them.
You can enable ngx_http_realip_module in the Nginx build using the configuration parameter –with-http_realip_module when recompiling Nginx. Note that the previously installed Nginx will be overwritten, so you will need to make sure that when recompiling you do not forget to include all previous configuration parameters that you used in your setup.
Obtain the archived TAR file of your desired Nginx version (which can be found online at the Nginx downloads page) and unpack it in any directory. In the unpacked, newly-created Nginx directory, execute the following to build Nginx alongside with the RealIP module:
./configure --with-http_realip_module

make

make install
If you need to specify multiple modules for Nginx, you will instead need to use syntax like the following example when running the configuration script (the first code line in the step above). Notice how we separated each module we want to include in the Nginx build with a space. You can find more information about what options are available during the build process for Nginx in the official documentation:
./configure --with-http_realip_module --with-http_ssl_module
When Nginx has finished compiling and installing, you will be able to use the X-Forwarded-For header field. If your landscape uses a chain of proxies, this header field will contain information like the following:
X-Forwarded-For: client, first_proxy, second_proxy, n_proxy
Nginx Setup: Configuring Intermediary Service Addresses
To tell Nginx to start using X-Forwarded-For, you will have to edit the Nginx configuration file. This Nginx configuration file is named nginx.conf and by default is placed in one of the following three directories depending on your exact landscape:
Option 1:
/usr/local/nginx/conf
Option 2:
/etc/nginx
Option 3:
/usr/local/etc/nginx
Open the file in a text editor such as nano after navigating to its directory:
nano nginx.conf
Within this file, we can add some lines to tell Nginx to use X-Fowarded-For as the client IP address. If we wanted to set the real IP address for traffic coming from a server with the IP address 192.168.1.10 for example, the lines we add would look as follows:
real_ip_header X-Forwarded-For;

set_real_ip_from 192.168.1.10;
You can add as many definitions as you want for the proxy addresses by using the set_real_ip_from line. To add two proxies for example, your configuration file would contain something like the following:
real_ip_header X-Forwarded-For;

set_real_ip_from 192.168.1.10;

set_real_ip_from 192.168.1.11;
When you are satisfied with the proxies you have added, save and close the file.
Nginx Setup: Verifying & Testing
To verify that the Nginx configuration has no issues, you can use a special command option provided by Nginx. The -t option tells Nginx to check the configuration file for proper syntax, try to open the files the configuration refers to, but not actually run the server. If you find errors, please go back and review that there are no spelling mistakes and all files are in the right place.
nginx -t
When you have confirmed that your configuration uses correct syntax, you will now need to reload the Nginx server for your changes to be made. Execute the following command to reload nginx as the root user. If you are not root, but are a user possessing superuser (sudoer) privileges, append the command sudo to the start of the line.
systemctl reload nginx
Depending on your landscape, you may instead need to use the following command to reload Nginx (again as root or using sudo):
service nginx reload
To test your setup is working correctly, simply visit your back end server from a different node a few times and then check its access logs. If the logs show your IP address instead of your intermediary service such as CloudFlare, your setup is successful.
Congratulations! Now that your Nginx server will be correctly identifying the originating client IP address as stated in the X-Forwarded-For header field instead of the possible proxy or other intermediary service IP address, your landscape is more resilient and able to handle consequences of using intermediaries. If this guide was helpful to you, share it with others who may also be interested in learning about using X-Forwarded-For.
X-Forwarded-For, or XFF for short, is a special HTTP header field that is commonly used to identify the originating client IP address whether or not they are connecting to the server through an HTTP proxy or a load balancer. Such web hosting cases where the web server is behind a proxy or a load balancer are extremely common, and thus arises the necessity to be able to log the actual client’s IP address in your system instead of the proxy or load balancer IP. In order to be able to identify the client, you will need to configure your back end Apache HTTP Web Server to be able to use the XFF header and render the real customer IP in its log files. Otherwise, your Apache server will by default log only the receiving IP from the connecting proxy or load balancer.
This guide will show you how you can configure your Apache web server to use the X-Forwarded-For header information so that you can avoid corrupt or incorrect logged data when behind a proxy or load balancer. Note that if your landscape also uses GeoLocation systems behind your proxy or load balancer, your geolocation data will be also corrupt if you do not use the XFF headers.
• 1 Server (Cloud Server or Dedicated Server) with installed Apache HTTP Web Server
X-Forwarded-For in Practice
We will cover setting up your back end web server to use the special X-Forwarded-For HTTP header by using the example of CloudFlare. CloudFlare is a popular protection service against Distributed Denial of Service (DDoS) attacks and essentially acts as a proxy for your web servers. By acting as a reverse proxy for all incoming traffic to your web server, CloudFlare sends all traffic first to its own servers for DDoS detection before they reach your server.
This beneficial service however comes with the drawback that your web server will process all traffic it receives as originating from the CloudFlare server. This means that in cases where your web application relies on the originating visitor IP, it will instead pick up only the CloudFlare IP address instead of the actual original client’s IP address, thus possibly breaking the application logic and corrupting data such as web tracking. The content of your web server access logs would only contain the CloudFlare IP address listed as the $remote_addr. If you use originating IP for GeoLocalisation purposes, you will see your data as though all connections originated just from one IP, ruining the location data.
Due to the importance of being able to correctly identify your actual originating client, CloudFlare and other such services follow industry standards to include the original visitor’s IP address in the X-Forwarded-For header.
Loading the remoteip Module in Apache
In order to omit the IP address of the proxy service (such as CloudFlare) and instead use the real customer IP, we will need to activate a special Apache module known as remoteip when using Apache version 2.4 or higher.
The remoteip module is used to treat the useragent, the identified client, initiating the request as the actual client address, and not the possible load balancer, proxy, or other front end server address that Apache may be receiving. This means that your Apache web server will instead override the client IP address that it receives as the original useragent, such as the CloudFlare server IP address, in order to instead prefer the new useragent address from the XFF header as given by the RemoteIPHeader directive.
Luckily, this module is built by default in your Apache server installation and should not require an Apache recompilation. Instead, all you have to do is activate remoteip. As root or using the command sudo with a user possessing superuser privileges, execute the following command:
a2enmod remoteip
If you are using sudo, your command will instead look like:
sudo a2enmod remoteip
Next, open the Apache server configuration file. Depending on your system, this file called apache2.conf will be located in /etc/httpd/conf or /usr/local/apache2/conf. Open the file in a text editor such as nano after navigating to its location:
nano apache2.conf
In the file, search for the following line:
#LoadModule remoteip_module modules/mod_remoteip.so
Remove the first # if present from the line so it instead looks as follows. Then, close and save the file.
LoadModule remoteip_module modules/mod_remoteip.so
Defining Your Proxies and Services
Once the remoteip module has been loaded, you will need to edit the Apache remote IP configuration file. If it does not yet exist, create it in /etc/apache/conf-available/remoteip.conf. Open the file for editing in your preferred text editor, such as nano shown below:
nano /etc/apache/conf-available/remoteip.conf
The contents of the remoteip.conf file represent your proxy servers or services such as CloudFlare. To add a proxy with the internal IP address 192.168.1.10 in order to represent the CloudFlare server for example, you would need to add the following lines:
RemoteIPHeader X-Forwarded-For

RemoteIPTrustedProxy 192.168.1.10
You can add as many proxy definitions as you need to the remoteip.conf file in order to configure the usage of XFF headers for traffic coming from those proxies when using multiple services or load balancers. An example of adding multiple proxies is shown below:
RemoteIPHeader X-Forwarded-For

RemoteIPTrustedProxy 192.168.1.10 10.10.0.1
Note that if the end-user has an IP in the internal network however, RemoteIPTrustedProxy as used above will not work. To also accept internal network IPs if it suits your environmental needs, you will need to instead use the following to define your proxies in the configuration file:
RemoteIPHeader X-Forwarded-For

RemoteIPInternalProxy 192.168.1.10
Save and exit the file when you are finished.
Configuring Apache Log Formats to Use X-Forwarded-For
Next, you will need to modify the logging format used by Apache. Open the apache2.conf file in a text editor. Again, this file may be located in /etc/httpd/conf or /usr/local/apache2/conf depending on your system. Navigate to its location and open the file in a text editor:
nano apache2.conf
Search for the LogFormat line within the file. The standard logging format for Apache is shown below, you will likely see something similar in your file as well.
LogFormat "%h %l %u %t \"%r\" %>s %b \"%{Referer}i\" \"%{User-Agent}i\" %I %O" combined
This format captures the header with the %h field, which will use the CloudFlare proxy address in our example by default. Since we want to instead use the originating client IP address in logging, you will have to modify the LogFormat definition to look as follows:
LogFormat "%a %l %u %t \"%r\" %>s %O \"%{Referer}i\" \"%{User-Agent}i\"" combined
Notice how we have replaced the original header field position (%h) with the field %a. This is the X-Forwarded-For field that is responsible for displaying the correct originating client IP address and would be sent by services such as CloudFlare. Wherever you have a logging format definition, replace the %h with %a to use X-Forwarded-For.
With Apache being highly configurable, you can further modify the log format until it is best suited to your landscape and web applications by playing around with the placement of the XFF header field. When you are satisfied with the final format, save and exit the file. Next, you will need to reload Apache in order for your changes to take into effect.
Before reloading the server, you can verify that your configuration has no errors in it by using the Apache command apache2ctl:
apache2ctl configtest
If the previous step outputs no errors, you can feel safe reloading to the new configuration to start using XFF. Use the service command to restart the Apache web server:
service apache2 restart
Once your Apache web server restarts, it will begin logging the correct customer IP address information in place of any middleman services you may be using in your landscape. You can rest easy knowing that if you do use a proxy or other similar service, your client information data will be 100% preserved. Share this tutorial with your friends if you found it useful!
RDP, known as the Remote Desktop Protocol, is a proprietary Microsoft protocol that is responsible for enabling remote desktop connections to a server. This protocol is highly customizable and its configuration can be edited to increase both its security and flexibility through options such as limiting the number of possible concurrent connections or changing the listening port. This second option, modifying the listening port (where new connections communicate with the server) for RDP, is useful as it can enhance your security setup in a very quick and easy way.
In order to modify the listening port for RDP on your Windows 2012 server, we have put together a short guide that will explain the configuration.
To complete this tutorial, you will need:
• 1 Windows 12 RDP Server (Cloud Server or Dedicated Server)
Before you proceed, you should note that if you want to change your RDP listening port, you must allow connections to the new port in your Windows Firewall. If you do not do this, you will be locked out of your server. Once you have allowed the new port number in your Windows Firewall and other firewalls on your system, you can continue with the guide.
Begin by opening an administrative session on the Windows 12 RDP server. Click the Start button. In the field that pops up, you will need to enter the following text and execute:
regedit
The command above will open up the Registry Editor utility window. This Microsoft tool is the central point for making tweaks to how your Windows 12 system runs, and is the location of the port number value for RDP.
With the window open, browse to the following view:
HKEY_LOCAL_MACHINE\SYSTEM\CurrentControlSet\Control\Terminal Server\WinStations\RDP-Tcp
Once you have the RDP-Tcp view open, find the PortNumber field. This field contains the value of your current RDP listening port. For our tutorial, we will change it to 9998 as our new listening port. You can select a different port number, but ensure beforehand that your chosen port number is not already in use on the system and, as a security bonus, is not a commonly-used port number. Edit the PortNumber value to your desired port number:
9998
Next, you will need to restart the remote desktop connection service in order for the port number changes to be implemented. This service, known as Remote Desktop Services can be reloaded within Control Panel. Open Control Panel now.
With Control Panel open, navigate to the following views:
System and Security > Administrative tools > Services
In the services list, you will need to find Remote Desktop Services. Right click on it to bring up the option menu, and click on Restart.
While the remote desktop connection service restarts itself, note that any RDP connections currently on will be disconnected. After RDP is running again, you will be able to connect using the new listening port you set.
Congratulations! You have successfully changed the value of the listening port for RDP on your Windows 12 server. If you liked this easy way to enhance your security setup, share it with your friends.
The Remote Desktop Protocol, also known as RDP, enables remote desktop connections to be made to a machine. This protocol is proprietary to Microsoft and is executed in a typical client-host architecture, where one machine runs the RDP server software and the clients can connect if they have the necessary RDP client software. RDP has many useful applications, most commonly in that it allows users away from the office access their work stations when needed.
However, as RDP may be set to allow only one remote session at a time, it is useful to know how to enable multiple sessions to allow more users to connect. This tutorial will show you how you can accomplish exactly this in Windows 2012.
For the purposes of this tutorial, you will need the following:
• 1 Windows 12 RDP Server (Cloud Server or Dedicated Server)
If the RDP server is configured to only allow one session maximum, further users who try to connect to the RDP server will encounter an error while negotiating a connection. This error will present itself in the following message from RDP hanging indefinitely:
Configuring Remote Session...
As the RDP server can only allow one session, this message will hang for the second user and the connection will never complete. This problem can be fixed easily by enabling the option for multiple RDP sessions.
This issue occurs in the first place due to the limit Microsoft places on client editions of Windows for security reasons. If you have a server edition of Windows, you are unlikely to face this issue unless someone has set the RDP configuration to accept only one connection.
If you encounter the multiple session hang, you can fix it easily by changing two things in the RDP configuration. First, you will need to open an administrative session on the server. This means that you should have administrative rights to the system and be logged in as the administrative user.
Next, click on the button Start in order to bring up a prompt. Type the following into the prompt that appears and execute:
gpedit.msc
This brings up the Local Group Policy Editor. This utility manages the local network and contains the settings for remote sessions and remote session user limits. In the window for the Local Group Policy Editor, you will need to go through several tabs in order to find the relevant one for RDP policy.
Navigate through the menus that you see in the order below in order to open up the main RDP menu:
Computer Configuration > Administrative Templates > Windows Components > Remote Desktop Services
Once you have the main RDP menu open in the Local Group Policy Editor, you will need to go through two more tabs in order to find the connection limit settings. Locate these tabs:
Remote Desktop Session Host > Connections
After the Connections window opens, you will see a setting called Restrict Remote Desktop Services user to a single Remote Desktop Services session. This is the setting that is responsible for restricting the number of RDP sessions on your Windows 2012 node. In order to allow multiple remote connections, please make sure that this setting is set as:
Disabled
Afterwards, you will also need to add a value for the maximum number of connections. The responsible setting, Limit number of connections, is also in the Connections view. Change the value of this field to the following, or any desired number that fits your RDP usage purposes. For example if you have a large distributed landscape with a need for high concurrent remote connection density, then input a larger number. However, in the case that you have smaller operations, try to limit yourself to the exact number of connections you can expect at any time in order to not overload the server in unexpected cases. For a start while you evaluate your multiple remote connection usage, set the value to:
999999
To test that the new setup is allowing multiple connections correctly, try to login again to RDP with multiple users. If the connection for the second user does not hang, you have succeeded.
With your Windows 12 server now configured to allow multiple RDP sessions, clients will no longer encounter the indefinite hanging issue when trying to connect in bulk. If this quick guide was useful to you, why not share it with your friends?
Secure shell, more commonly known as SSH, is a network protocol that provides secure channels for server communications on a network in a client-server architecture. This protocol is used in many applications, such as users accessing shell accounts on a server or during communications for authentication. SSH communications go through something called a port, which is essentially a communications endpoint on a server. By default, SSH uses the TCP (Transmission Control Protocol) port 22. Being able to modify this SSH port number on your CentOS 7 server is an easy and proven way that you can enhance server security by switching to a less-commonly known port.

In this guide, we will show you how you can change SSH port number to any desired choice, on your own CentOS 7 server.
Confirm that you have the following before you follow this guide:
• 1 Node (Cloud Server or Dedicated Server) running CentOS 7.
• Root access to the node.
To change the SSH port of your server, you must edit the configuration file for the SSH daemon that is found in /etc/ssh/sshd_config. Before we do this step however, we will create a backup of the existing sshd configuration file as a matter of good practice. Use the copy command cp with the flag -p, which preserves last edited information, to make a copy of the file and save it in a backup file whose name includes the date, which is achieved by appending the result of $(date +%F) to the filename. The %F ensures that the full date in year-month-date format is used when obtaining the current date with date.
cp -p /etc/ssh/sshd_config /etc/ssh/sshd_config.orig.$(date +%F)
With our backup file saved, you are now free to modify the sshd configuration file as you wish. Open this file in the vi text editor:
vi /etc/ssh/sshd_config
Search the file for a line that appears as either #Port 22 or Port 22. If the line contains the “#” symbol, meaning that the line is commented out and thus is ignored, remove this symbol and change the port number from 22, which is the default SSH port, to your desired port. In our example, we will use port 2222 so our line in the sshd configuration file will look as follows:
Port 2222
When choosing a new port number, try to avoid using a common port from this list: 21, 80, 443, 25, 110, 113. Also stay away from ports that are already in use by your CentOS 7 server. Generally, it is recommended to use a new port number that is over 1024. If you have difficulty choosing a new port number however, you can look up what common ports are used online through lists of well-known TCP and UDP port numbers that are available, and choose one that is not listed.
After writing your new port in the configuration file, save and close the file. To bring your changes into effect, you must restart the SSH daemon. Do this with the following command:
systemctl restart sshd.service
Be careful however, you are not done quite yet! There are some additional steps you must take if you have SELinux, a Linux kernel security module also known as Security-Enhanced Linux, enabled on your server. If you have a firewall running, you also must continue with the following. If you do not have SELinux or firewalld, skip to the last step before the end of the tutorial. If you do have either of these, please continue.
By default, SELinux only allows SSH on the port 22. We must change this to our new port. In our example, we are using 2222 but you should replace this number with the number of your port in the below command, which uses semanage port to configure ports in the SELinux policy:
semanage port -a -t ssh_port_t -p tcp 2222
You can verify that SELinux has the new port by searching the output of the semanage port -l command, which lists the ports that are working with SELinux. The tool grep is used to search this output for you, and outputs only the relevant lines that contain the word SSH. To do the verification, run:
semanage port -l | grep ssh
The output of the above command should look like the following:
ssh_port_t tcp 2222, 22
Next, to allow the new port in your firewall, you have to run add the port to the public zone permanently. Replace the number 2222 below with your own port number that you set in the SSH configuration file and run:
firewall-cmd --permanent --zone=public --add-port=2222/tcp
You must restart the firewall for the changes to be done. This is extremely important is that otherwise, if your changes are not applied you will be locked out of SSH to this server if you logout! Reload firewall using:
firewall-cmd --reload
Once the firewalld and SELinux configuration is complete (or if you have skipped to this section), you can test that your new SSH port configuration is working. The command ss calls a utility that investigates Linux sockets, which is just a complicated term for a communication point for the server. This command will let you find the port that is listening for SSH on your server, and we can search the output for the exact port numbers for SSH. To do this, first enter:
ss -tnlp|grep ssh
The output will look something like this:
LISTEN 0 128 *:2222 *:* users:(("sshd",2786,3))
Ensure that you see your new port number in the output, much like we can see 2222 in the line above for our port we are using in the tutorial.
Congratulations! Now you have successfully configured a new port for SSH on your CentOS 7 server. If this introduction to the basics was helpful to you, please feel free to share this tutorial with your friends.